This shower bombs recipe is so easy to make, it’s practically foolproof! With only 3 dry ingredients and a special ingredient that acts like magic “glue,” these no-fail DIY shower bombs are perfect for beginners and experts alike. Read on to learn how to make shower fizzies with essential oils (for Christmas and beyond).
I spent many months recipe testing for my detailed shower steamers guide, and these Epsom salt shower bombs became one of my favorites.
Have you ever made shower bombs that crumbled apart, didn’t smell very strong, or simply didn’t work out? Maybe they fizzed too soon, or cracked as soon as you removed them from the mold.
This simple, foolproof shower bomb recipe fixes all of those issues and more. It’s easy to make and nearly impossible to mess up, even if you’ve never made shower fizzies before. I’ll take you through the process in detail, with photos for each step.
Thanks to Epsom salts, these tablets dry rock-hard, and fast. You can have them ready in 24-48 hours if you’re in a time crunch or if you need a last-minute homemade gift.
They’re surprisingly inexpensive too, as the secret ingredient cuts down on essential oil wastage, which is a common issue when making aromatherapy tablets at home.
One more thing – don’t be put off by the holiday-themed scents and shapes, because these DIY shower bombs aren’t just for Christmas. I’m also sharing a simple base recipe that you can customize with your favorite essential oil blends.

DIY shower bombs with Epsom salt
These shower bombs make a perfect handmade gift idea for essential oil lovers. As a bonus, Epsom salt gives them a sparkly, snowy appearance that adds to their festive touch.


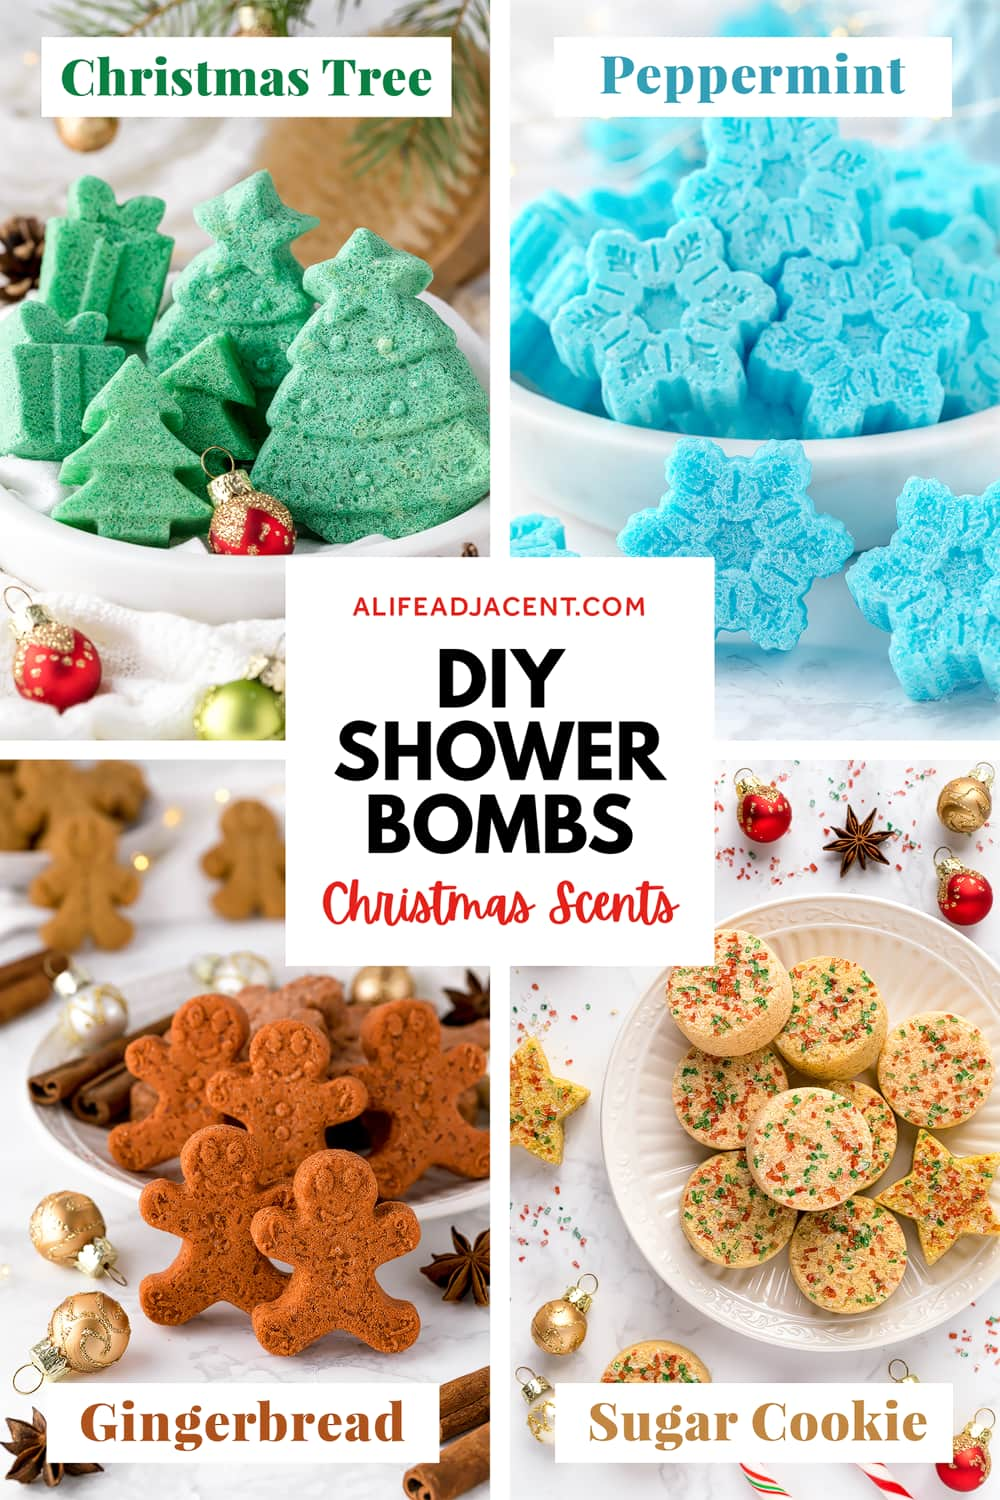
Below you’ll find 4 holiday shower bomb recipes with Christmas essential oil blends:
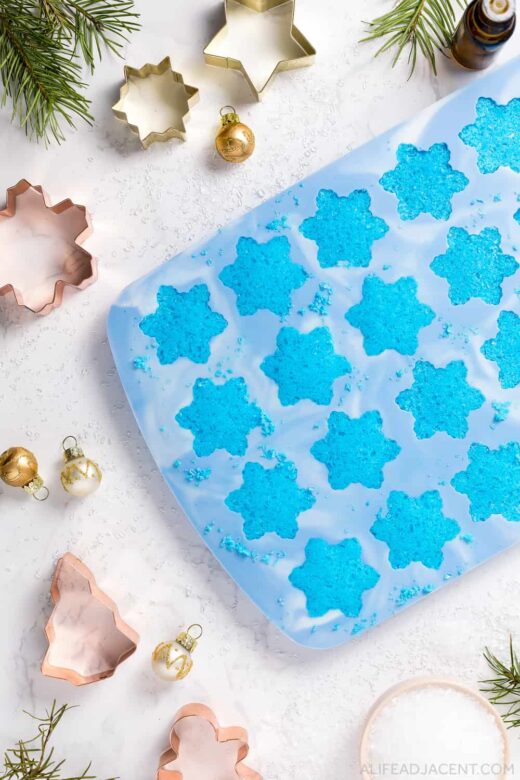
- ❄️ Peppermint Candy Cane: Not just for the holidays, these snowflake-shaped peppermint shower bombs can help relieve headaches and soothe sinus issues any time of year. Since they dry so quickly, you’ll have soothing aromatherapy relief at your fingertips when you need it.
- 🌲 Christmas Tree: These tree-shaped shower melts smell like fresh Christmas trees. Tree oils such as pine, fir, and spruce can help relieve cough and congestion. But even if you’re not sick, their scent helps uplift your mood for an energizing morning shower.
- 🧡 Gingerbread: These cookie-shaped shower fizzies have a sweet and spicy gingerbread scent that energizes the senses and can help relieve holiday fatigue. Or, use them year-round as “wake up” aromatherapy bombs.
- 🍪 Sugar Cookie: Be sure to inform your recipient they aren’t edible, because these shower bombs look and smell like real Christmas cookies! They offer a dose of sweet-smelling, calming aromatherapy for stress relief after a long day (which many of us can use during the holiday season).
Before we get into how to make shower bombs, I’m sharing some information about how they work. If you’re not interested, you can skip ahead to the recipes and tutorial.
What are shower bombs?
Shower bombs are essentially water-activated, fizzy aromatherapy “bombs” for the shower. Also called steamers, melts, soothers, or fizzies, shower bombs are similar to bath bombs (which is why they’re also sometimes called shower bath bombs).
But the difference between a shower bomb and a bath bomb is that, instead of pampering your skin, shower bombs indulge your senses. They fizz on contact with shower water, releasing a strong dose of essential oils for a fragrant aromatherapy spa experience.
It’s important to note that shower fizzies cannot be used as bath bombs, as their high concentration of essential oils can irritate your skin. However, their potent scent makes them ideal for a variety of aromatherapy uses.
Depending on the essential oils it contains, a DIY shower bomb can help increase energy, calm stress, soothe a cough, or relieve headache during shower time. You’ll find recipes for all of the above below.
What are shower bombs made of?
Similar to bath bombs, shower bombs typically consist of dry ingredients such as baking soda and citric acid for fizz, fillers such as Epsom salt or corn starch, and essential oils for aromatherapy.
To make shower fizzies, you simply mix the ingredients and pack them into molds. This condenses them into hard tablets that fizz on contact with water.
If it sounds easy, that’s because it is! With only 3 dry ingredients, this Epsom salt shower bombs recipe is very simple, and the tablets pack a powerful fizz.
As mentioned, aromatherapy tablets go by many names, but I decided to call these ones shower “bombs” because of their incredible fizziness. So let’s get into how to make them.

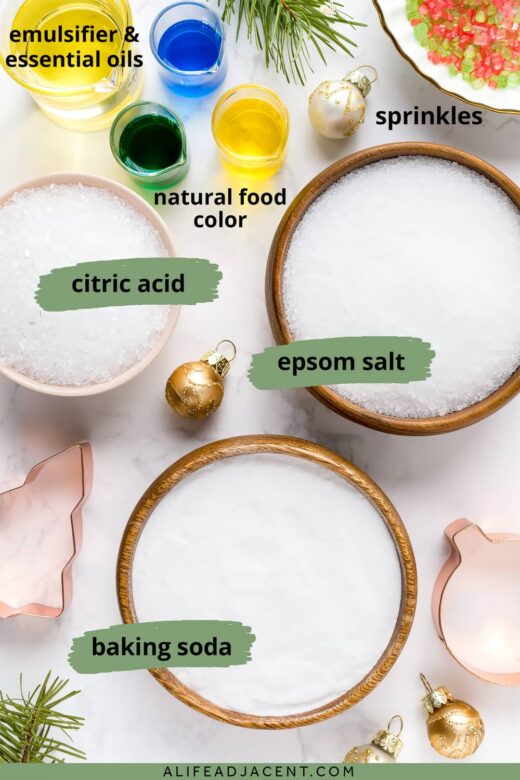
Aromatherapy shower bombs ingredients
To make this easy shower bombs recipe, you’ll need 3 simple dry ingredients for the base:
- Baking soda + citric acid for fizz
- Epsom salt to harden the tablets
You’ll also need a few wet ingredients to create the “glue” that holds each tablet together:
- Essential oil blend for aromatherapy
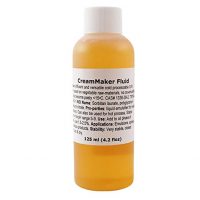
- Natural liquid emulsifier CreamMaker FLUID (substitutions below)
- Water, alcohol, or witch hazel
If you’d like to color your shower bombs, you can use a natural food coloring liquid such as Color Garden, which replaces the liquid in the recipe.
You can also opt for a dry colorant instead. Options include yellow clay for golden sugar cookie beige, green spirulina for Christmas tree green, blue spirulina for snowflake blue, and red or brown clay for a warm gingerbread tone.

Epsom salt
Epsom salt is one of the secret ingredients for the best shower bombs. It’s highly desiccant (water-absorbing), so it dries very quickly.
Homemade shower steamers with Epsom salt also dry especially hard. They don’t have the typical, powdery bath bombs texture – they feel more like salt rocks instead. So, if you’ve ever dealt with crumbly shower bombs that fall apart, that won’t be an issue with this recipe.
Epsom salts also have a shimmery, icy appearance, which is a bonus if you’d like to make festive DIY gifts for the holidays.
Baking soda and citric acid
Just like DIY bath bombs, baking soda and citric acid are key for the chemical reaction that makes shower fizzies fizzy.
Citric acid also has hardening effects, which helps create durable, solid tablets that don’t break or crumble – another bonus if you’ll be gifting them.
If you don’t have it on hand, I also have other shower steamer recipes without citric acid, using cream of tartar instead.
Essential oils
Essential oils are what makes aromatherapy shower bombs work, and you’ll find 4 essential oil blends below.
It’s always important to use high-quality pure essential oils from a reputable brand – but even more so when you’ll be inhaling them.
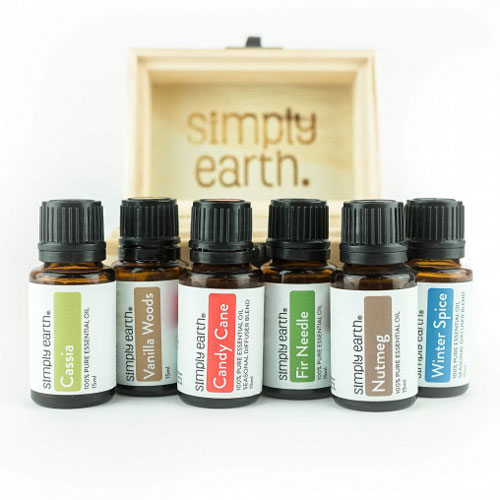
I like Simply Earth, as they source their oils from ethical farms and lab test all batches. They carry fun Christmas essential oil blends like Gingerbread, and they also have a monthly Essential Oil Recipe Box, which makes a perfect gift idea for essential oil lovers.
Check it out if you’re interested, and use our code ALIFEADJACENTFREE for bonuses.
Finally, please avoid using fragrance oils in shower bombs. If you’ve found yourself on a natural lifestyle blog, I likely don’t have to remind you of the health issues associated with synthetic fragrances.
Natural emulsifier
Have you ever made shower fizzies that fell apart, didn’t dry, or lost their fragrance? Adding an emulsifier solves all of these issues (and more).
An emulsifier is the “glue” that holds your shower bombs together. It binds the dry ingredients, suspends the essential oils, and helps the tablets dry hard. As a result, the mixture sticks together easily.
Finally, adding an emulsifier helps your shower bombs last longer in the shower. It also lengthens their shelf life, helping them last a long time in that respect too.
You can use any one of the following natural emulsifiers:
- CreamMaker FLUID
- Polyglyceryl oleate
- Sorbitan oleate
- Olivem 2090
I tested each emulsifier extensively, and if you’re interested, I wrote about them in more detail in my full shower steamer guide.
Liquid or liquid coloring
This shower bombs recipe requires only a small amount of liquid – just enough to moisten the mixture to easily form it into tablets.
Adding water activates the fizzing reaction between citric acid and baking soda, which inevitably dissolves some of dry ingredients. But this is a good thing – once the mixture dries, the dissolved ingredients re-solidify into hard tablets, gluing the shower fizzies together.
For the liquid, you can use water, high-proof alcohol (such as vodka or Everclear), or witch hazel.
You can also use liquid food coloring, preferably a natural one. This has two benefits: it adds moisture while also giving your shower bombs a pretty natural color. I’ve also provided other colorant options below.
Equipment + Supplies
Finally, here’s the equipment needed to make shower bombs at home:
- Silicone mold. I’ve provided options below in several festive shapes, but you can also use a simple round tablet mold for year-round use.
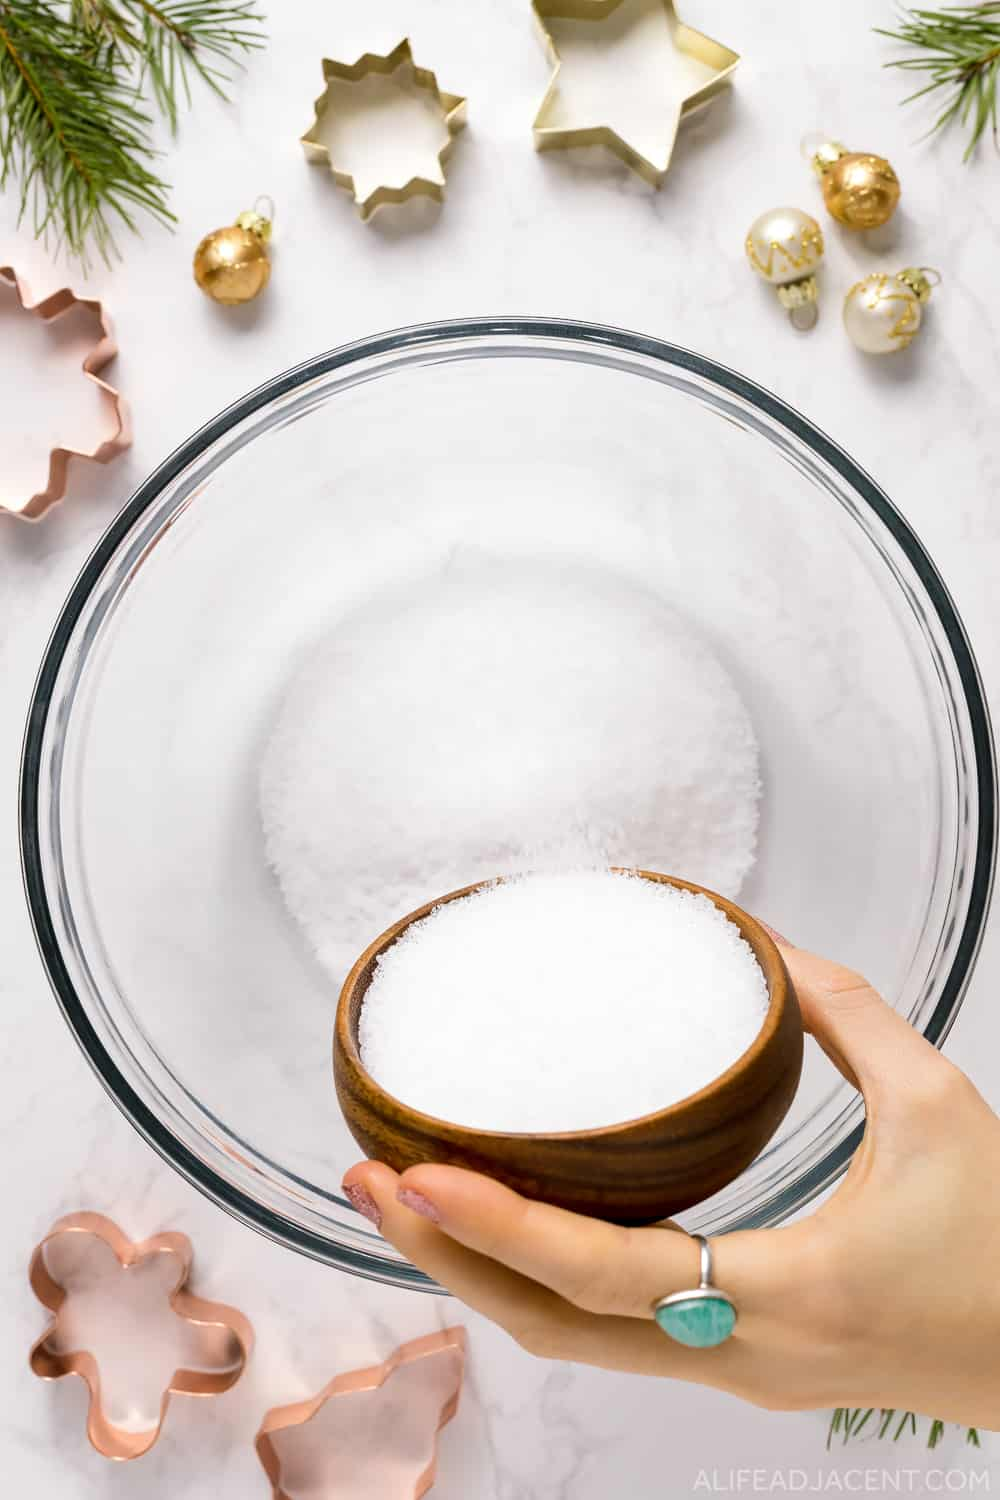
- Mixing bowl. Citric acid reacts with metals, so you’ll need a glass mixing bowl (or another non-metallic material).
- Containers for measuring. Measuring cups are ideal for dry ingredients, and small glass lab beakers with markings work best for measuring liquids and essential oils.
- Plastic scoop or measuring cup. I used a plastic scoop to press and smooth each shower bomb’s top.
- Gloves. These recipes contain a large amount of essential oils, and wearing gloves helps protect your hands against skin irritation.
How to make shower bombs
- Decorate mold. If desired, place a decoration into your mold before you begin, such as colored Epsom salt or cookie sprinkles. This step is optional, and only necessary for the sugar cookie shower bombs.
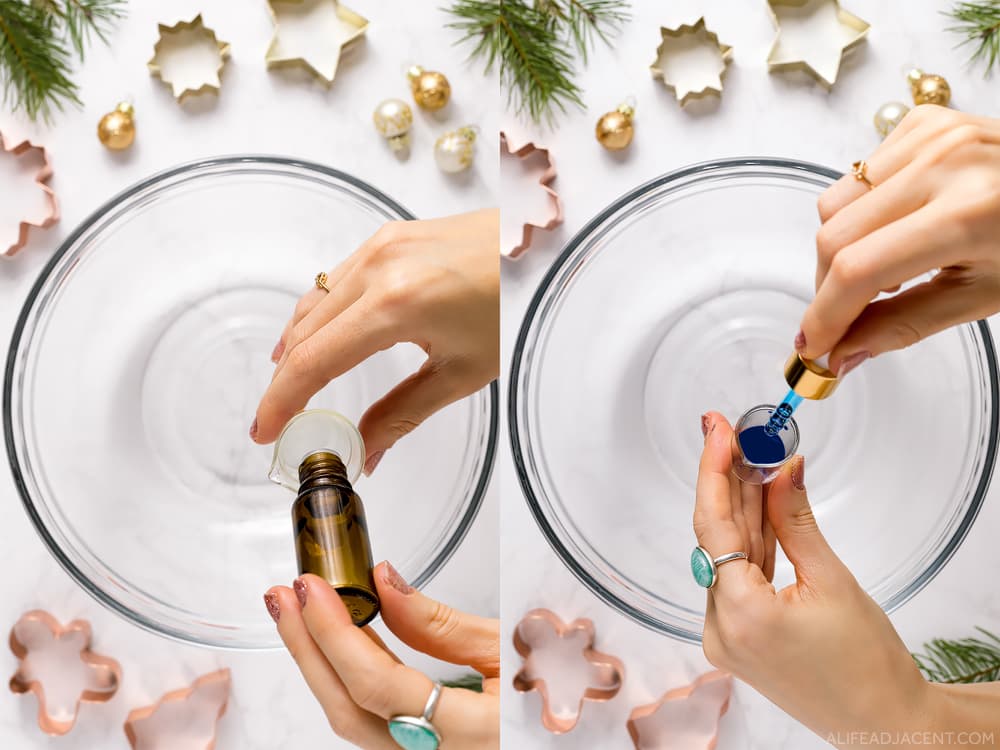
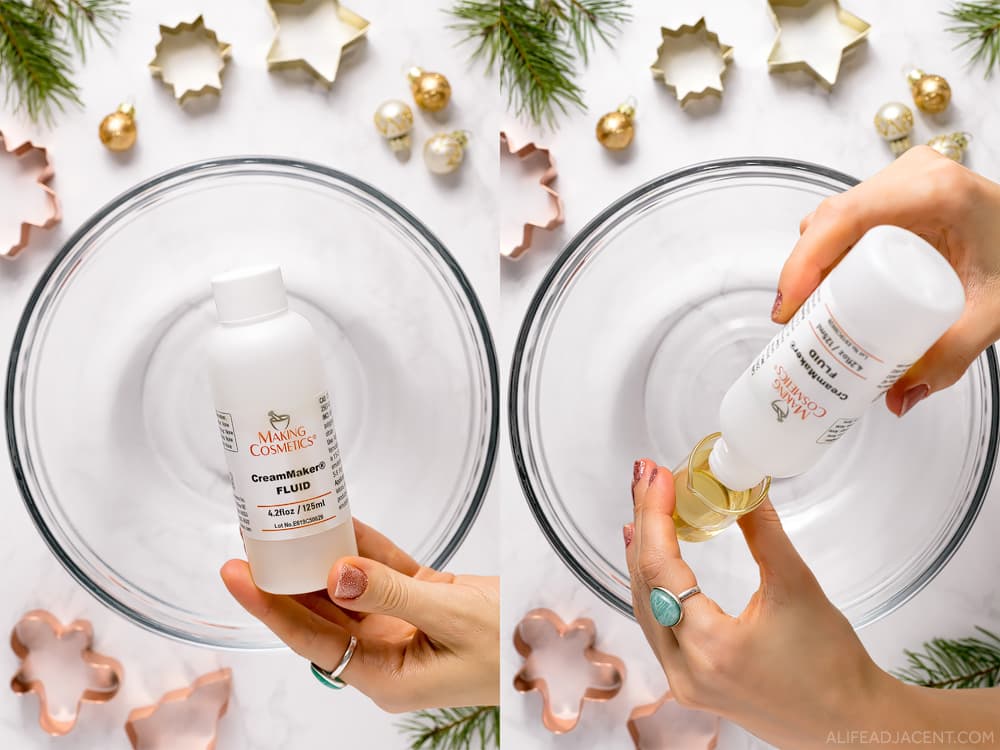
- Measure liquid ingredients. You’ll need 3 small containers or beakers for this step. In one beaker, pour in the emulsifier. Measure the liquid into another beaker, whether that’s water, alcohol, witch hazel, or food coloring. Finally, in the last beaker, add the essential oil blend. Set all beakers aside.
- Combine dry ingredients. In a mixing bowl, simply combine baking soda, citric acid, and Epsom salt. These ingredients don’t tend to clump, so there’s no need to use a sieve. Mix gently with a wooden spoon (or a gloved hand) to combine. If using a powdered colorant such as clay, add it during this step.
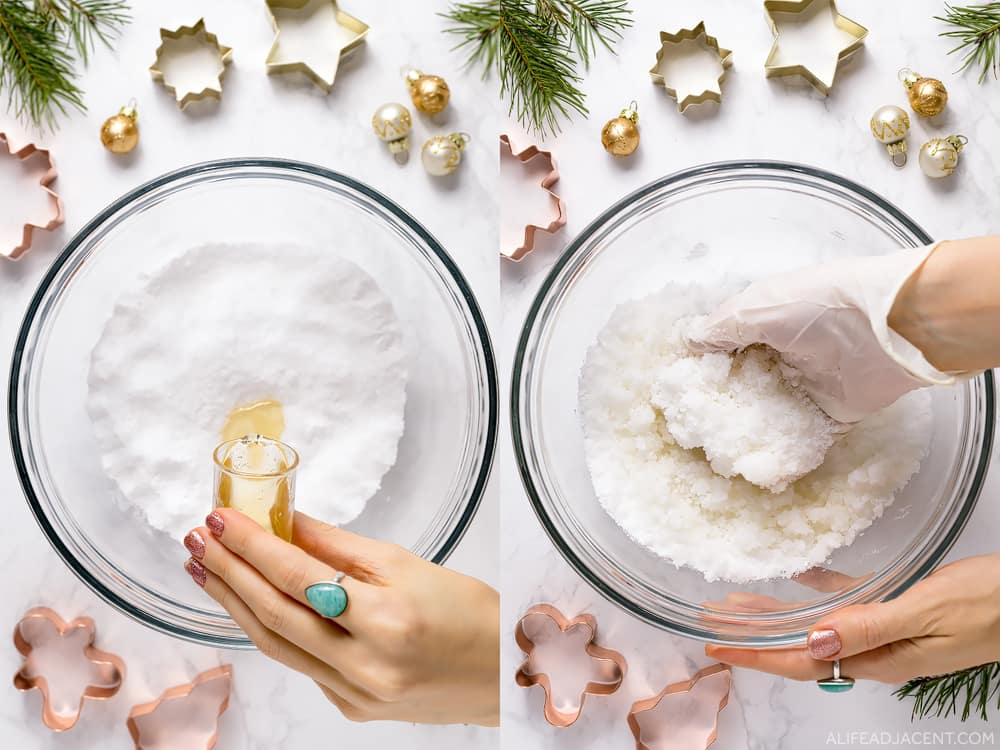
- Add emulsifier and essential oils. Put on your gloves to protect your hands. Pour the emulsifier into the dry ingredients and mix well to evenly coat the mixture. Then, add the essential oils and mix again. At this point, the shower bomb mixture will form a grainy, paste-like texture.
- Add liquid. This step is pivotal, so be prepared to work fast. Once you introduce water into the shower bombs, you will need to mix quickly to avoid too much fizzing.
Grab the beaker you filled with liquid during step 2, whether that’s water, alcohol, or food coloring. Pour the liquid into your gloved hand, then quickly knead it into the mixture. Continue kneading thoroughly until evenly incorporated, and be sure to knead out any uneven splotches of food coloring.
Tip: Pouring the liquid onto your hand first is preferable to pouring directly into the bowl, as it helps cut down on too much fizzing.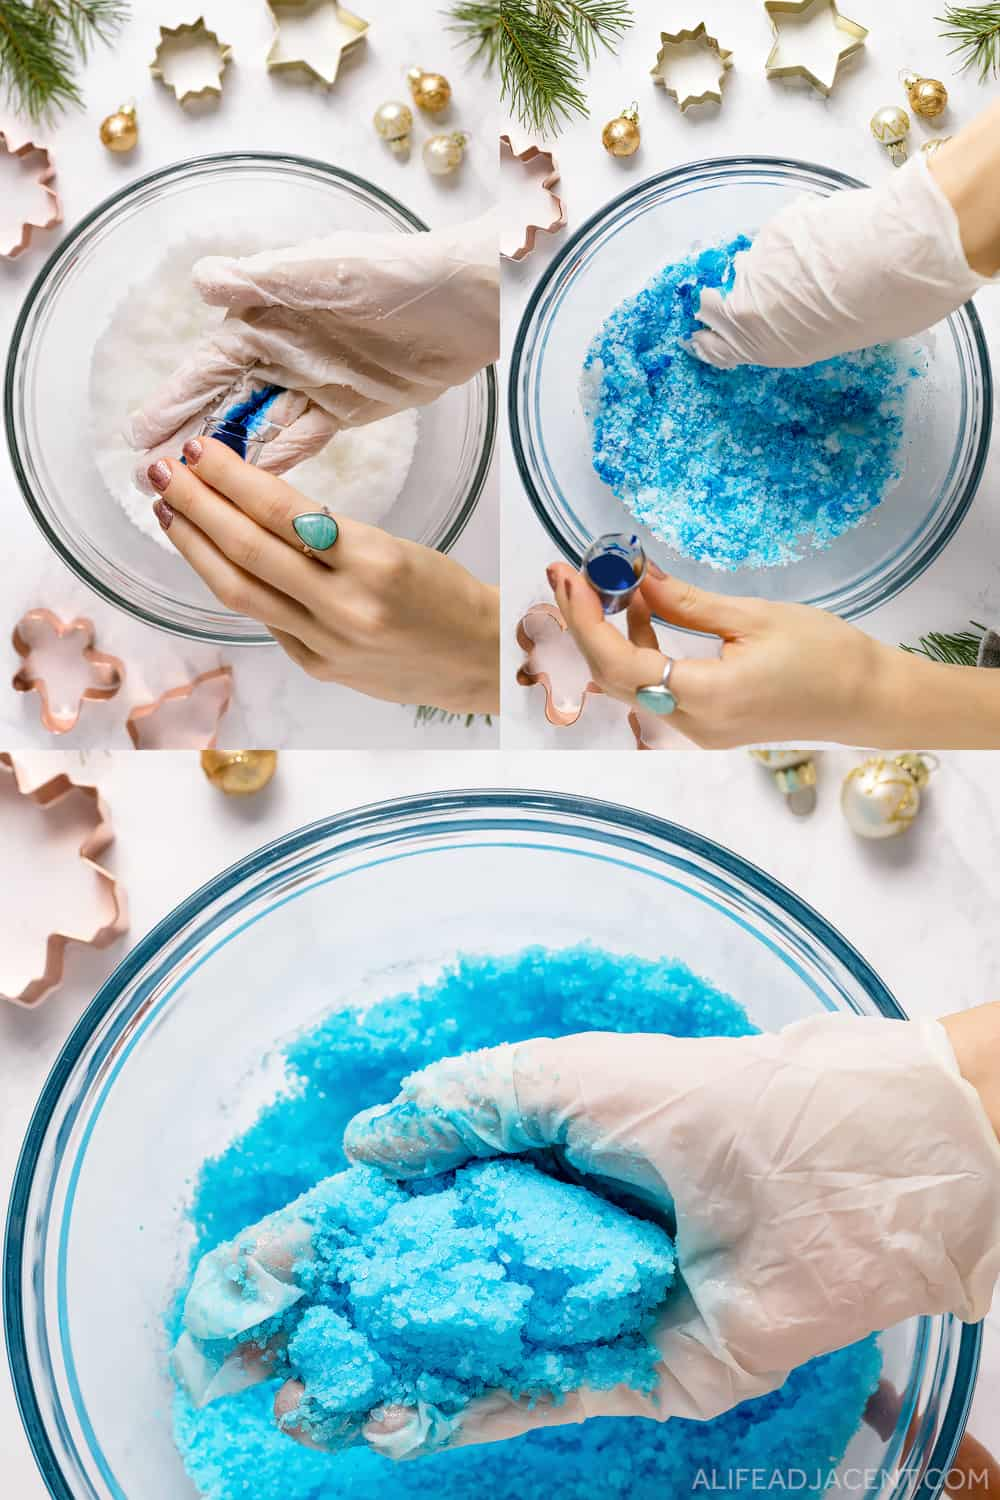
- Fill the mold. Pack the mixture tightly into the silicone mold. Then, use a plastic scoop to smooth out the top of each tablet. If the shower bombs expand a little bit in the mold, don’t panic – keep pressing the tops down with the scoop until they lie flat. This won’t take long, and the tablets will begin to harden quickly.
Continue to fill each mold cavity, pressing the tablets down as you go. Once they have stopped rising and started hardening, you can move on.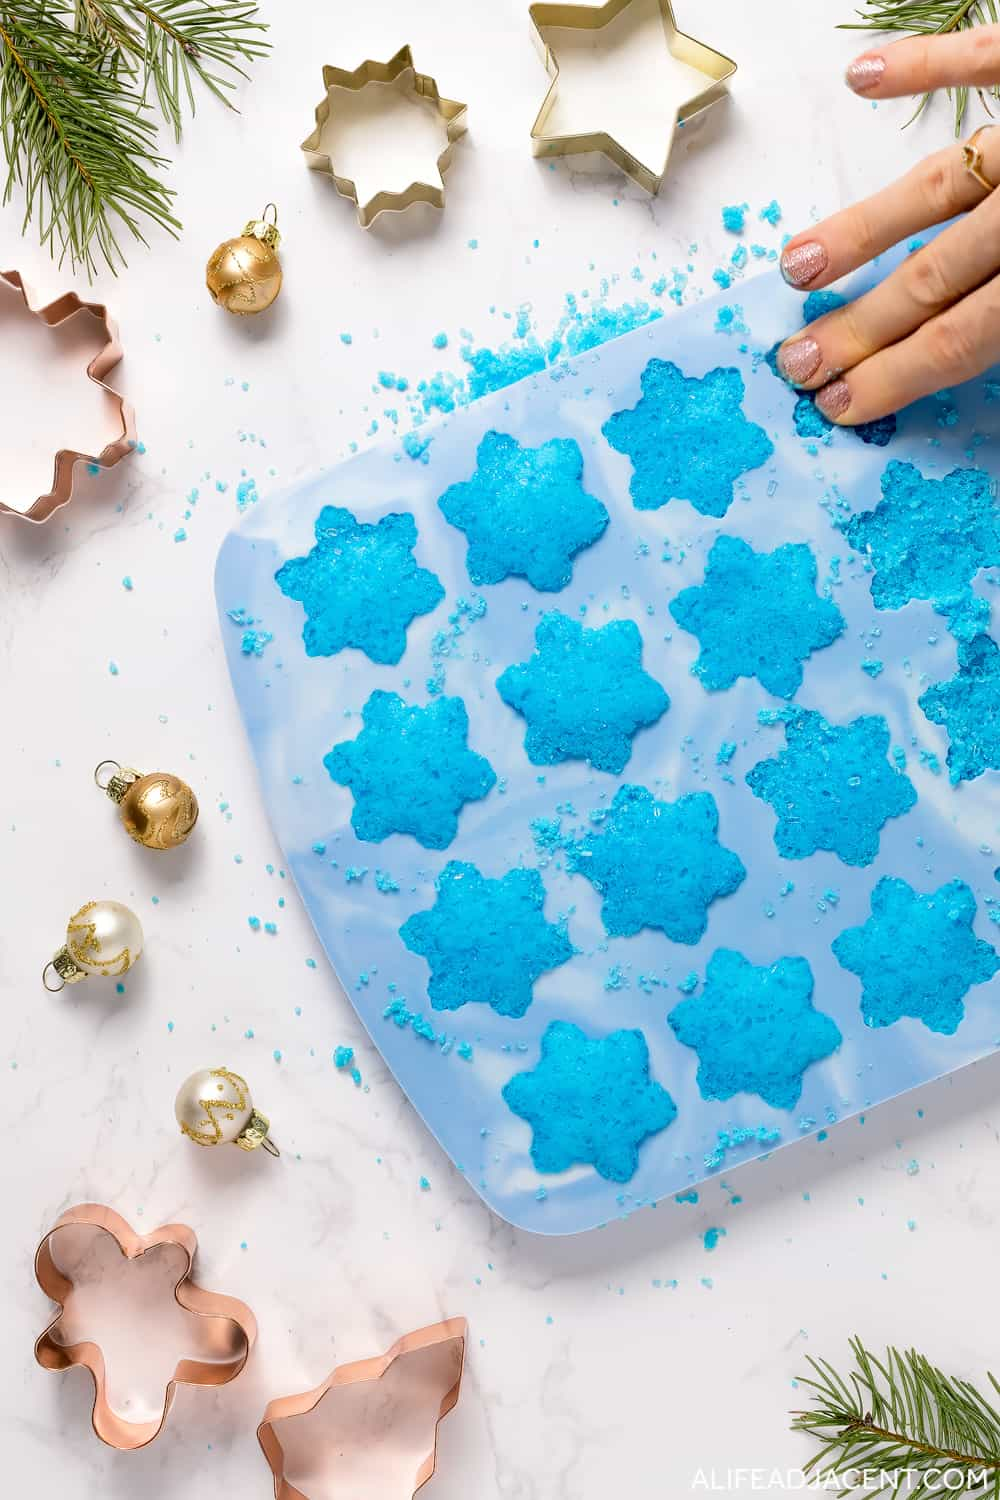
- Leave to dry. Set the shower fizzies aside to dry in a safe, well-ventilated place where they will not be disturbed. Epsom salt shower bombs harden quickly, so during the summertime (or in a hot climate), they may be ready in as quickly as 12 hours (or overnight).
However, during the wintertime (or in cool climates), they may still be a little sticky to the touch if not given ample time to dry. For best results, leave them to dry for at least 24-48 hours or until they’re hard and dry to the touch. When they’re fully dry, the shower fizzies should feel like hard salt rocks. - Remove from mold. Carefully remove each shower bomb from the mold. If you used a silicone mold, slowly and carefully pop each mold cavity inside out to gently release each tablet. Be gentle here – round shaped shower tablets are pretty durable, but certain molds (such as snowflake shapes) may have more delicate edges.
- Wrap or package. Immediately wrap and package your homemade shower bombs to protect the essential oils’ fragrance and potency (see notes below). They’re ready to give as holiday gifts, or simply to enjoy yourself!
Recipe Notes
- These recipes make approximately 6 shower bombs using a 1.5″ tablet mold, but this will depend on the shape and size of your particular mold.
- Each recipe contains 120 drops of essential oils, or approximately 20 drops per tablet. This may seem like a lot, but it’s to account for evaporation, as you will inevitably lose some essential oil as the tablets dry.
Storage and shelf life
- For best results, use DIY shower bombs within 6 months and store them in an airtight container in a cool, dark place. This preserves their scent for the best shower aromatherapy experience.
- For gifting, you can wrap each shower fizzy in Christmas beeswax wrap for an eco-friendly gift wrap idea, or place them in small, airtight mason jars. Make multiple kinds for a shower bombs gift set!
Tips and tricks
- If you need shower fizzies quickly for gifts, try to plan a couple days ahead. In hot weather they’ll dry in under 12 hours, but during the wintertime they may need 24-48 hours to harden completely. If you’re in a rush to dry them, place them in the warmest room of the house.
- If your tablets still aren’t strong enough, you can experiment with adding even more fragrance. For more information on how much essential oils shower bombs need, see this guide.
- If you still need help or if you run into issues, see the troubleshooting section at the end.
Shower Bombs Recipe
- 1/4 cup baking soda
- 1/4 cup citric acid
- 1/4 cup Epsom salts
- 15ml / 1 tbsp natural liquid emulsifier
- 1ml water, high-proof alcohol, or witch hazel
- 5ml / 120 drops essential oils (blends below)
This is the simple base shower bombs recipe with Epsom salt. You can customize it with any combination of essential oils you wish. You can also replace the liquid in the recipe with natural liquid food coloring.
For scents, see the shower bombs essential oil blends section.
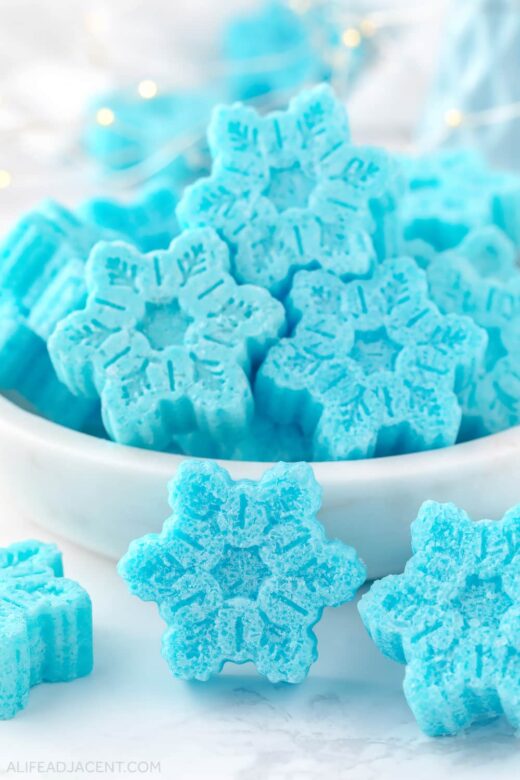
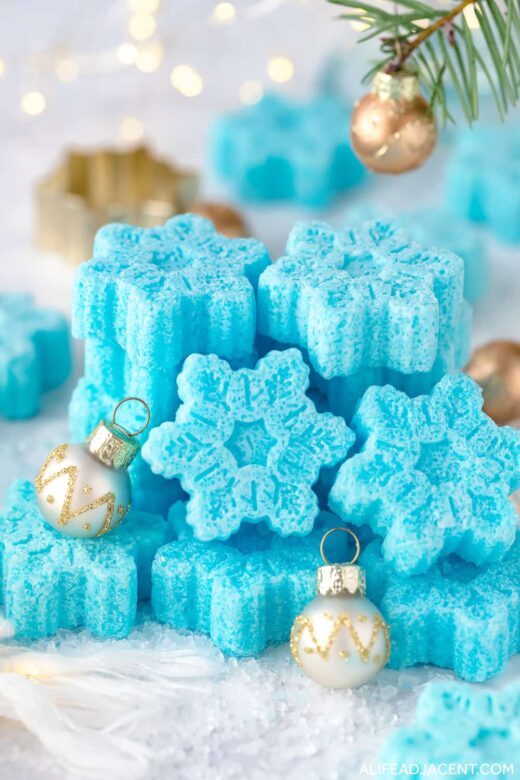
Peppermint Shower Bombs
- 1/4 cup baking soda
- 1/4 cup citric acid
- 1/4 cup Epsom salts
- 15ml / 1 tbsp natural liquid emulsifier
- 1ml natural blue food coloring
- 5ml / 120 drops peppermint supreme oil, spearmint oil, or candy cane essential oil blend (see blends section)
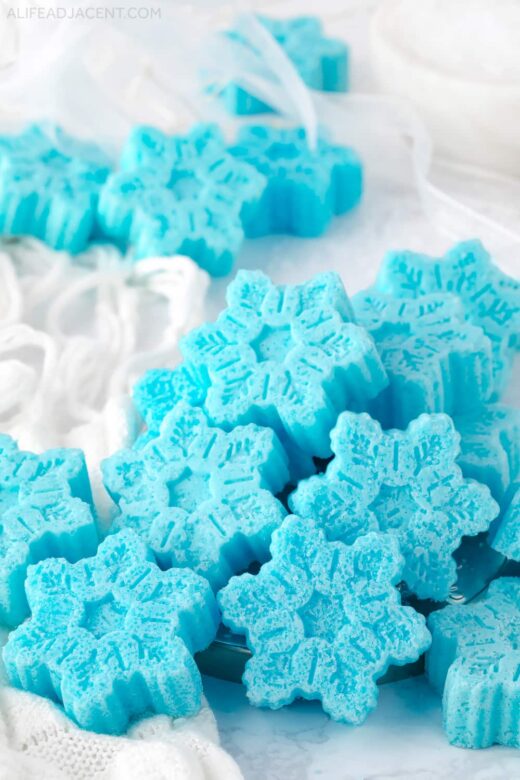
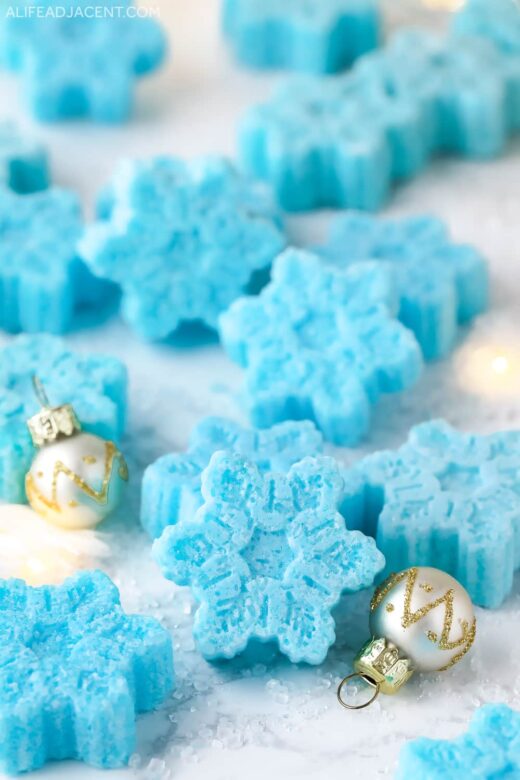
These peppermint shower fizzies are like a breath of cool winter air. They have a refreshing and wintery candy cane scent that can help relieve headaches, cough, or congestion, or simply help you relax and unwind.
You can make this recipe with your choice of peppermint essential oil, spearmint essential oil, or a candy cane blend for Christmas shower steamers.
I used a small silicone snowflake mold. You can also use a snowflake bath bomb mold for larger fizzies, or a simple plain round tablet mold.
Finally, you can also use blue spirulina powder or mica to color your snowflake shower bombs. Start with 1/2 teaspoon, and simply replace the food coloring in the recipe with plain water, witch hazel, or alcohol instead.
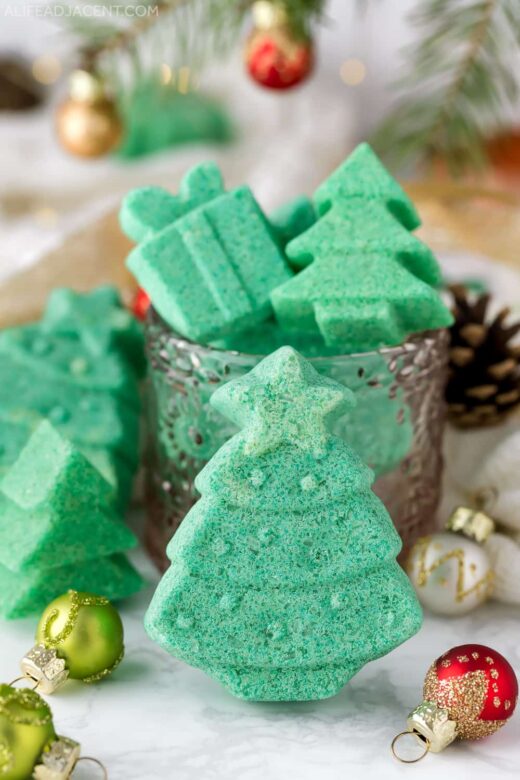
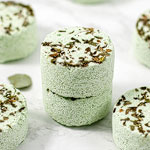
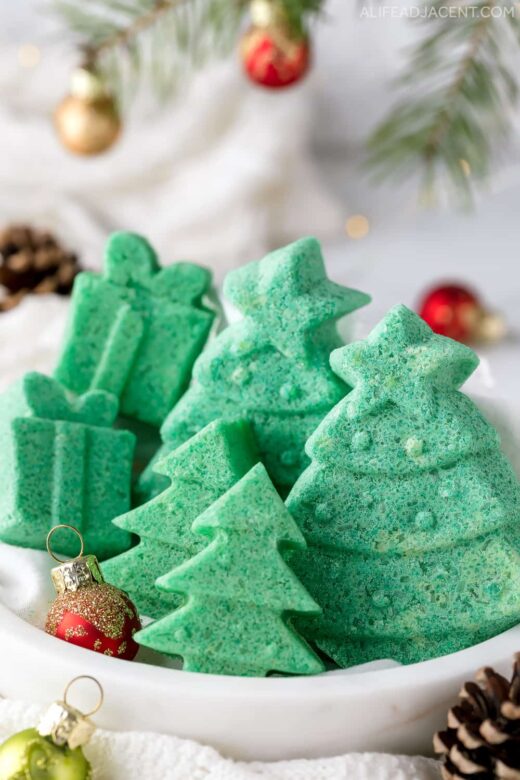
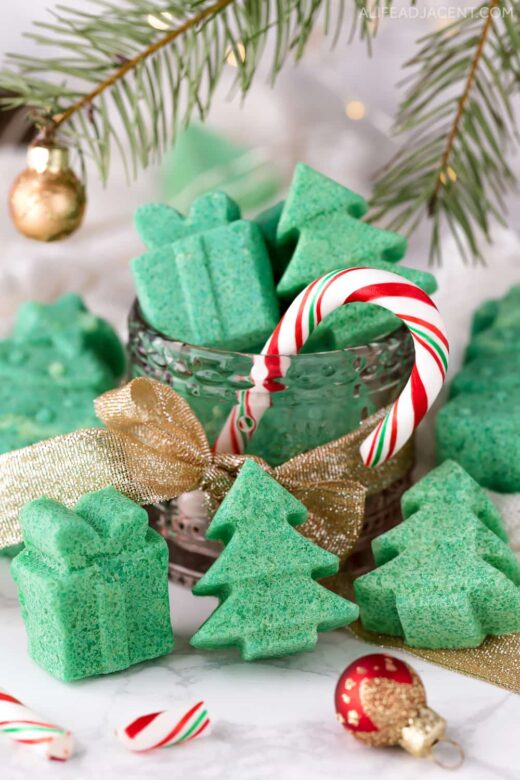
Christmas Tree Shower Bombs
- 1/4 cup baking soda
- 1/4 cup citric acid
- 1/4 cup Epsom salts
- 15ml / 1 tbsp natural liquid emulsifier
- 1ml natural green food coloring
- 5ml / 120 drops Christmas tree essential oil blend (see blends section)
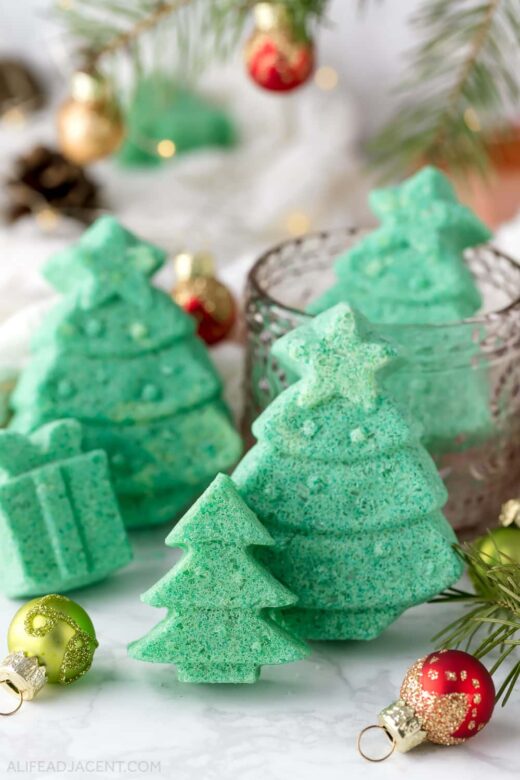
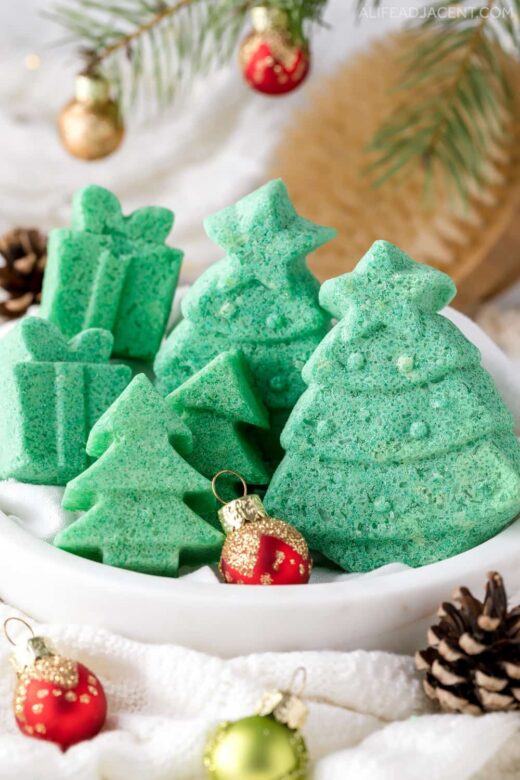
These Christmas tree shower melts aren’t just for festive appeal. Arboreal essential oils like fir needle, cypress, pine, and balsam fir can help relieve cough and congestion.
Unlike peppermint and other minty oils, tree oils are also safe for kids. So these tablets are a kid-friendly alternative to shower bombs for colds using peppermint or menthol crystals.
Use a tree candy mold for small shower fizzies, or a Christmas tree soap mold for a larger size. If you’re not into the festive look, you can also make them in a plain round tablet mold for year-round use.
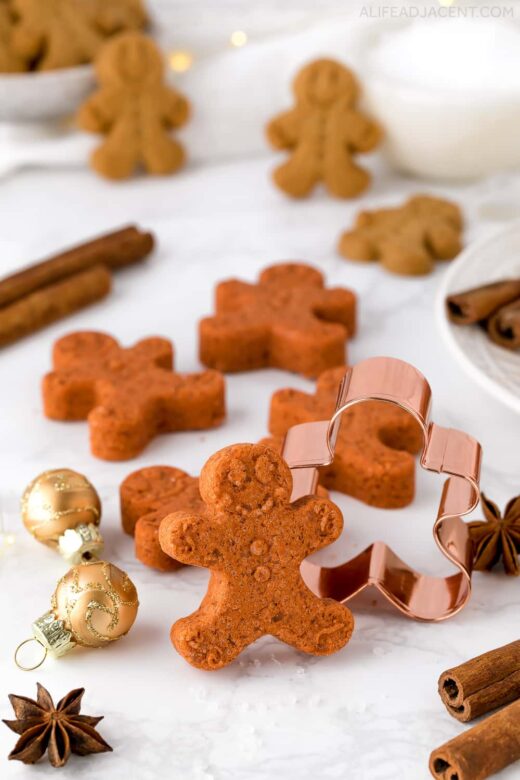
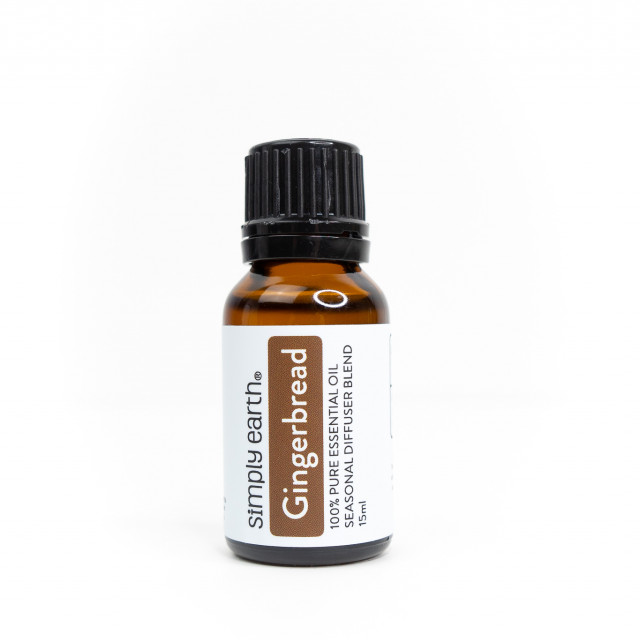
Gingerbread Shower Bombs
- 1/4 cup baking soda
- 1/4 cup citric acid
- 1/4 cup Epsom salts
- 15ml / 1 tbsp natural liquid emulsifier
- 1ml water, witch hazel, or alcohol
- 2-3 tsp brown or red clay for gingerbread color
- 5ml / 120 drops gingerbread essential oil blend (see blends section)
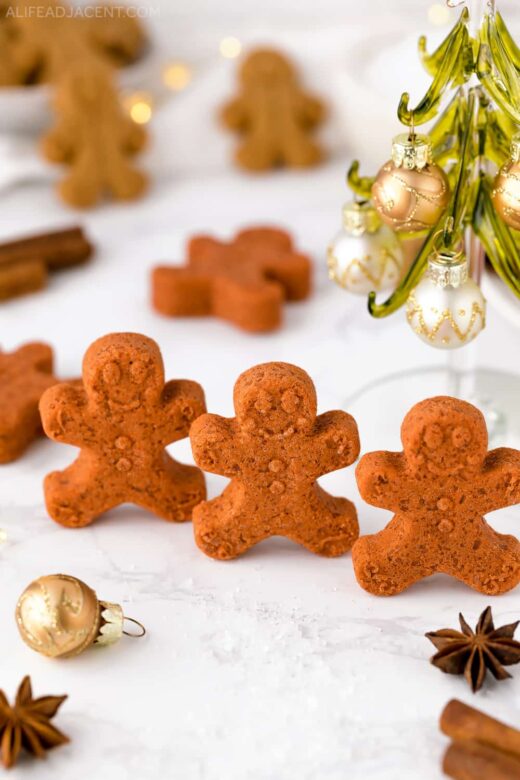
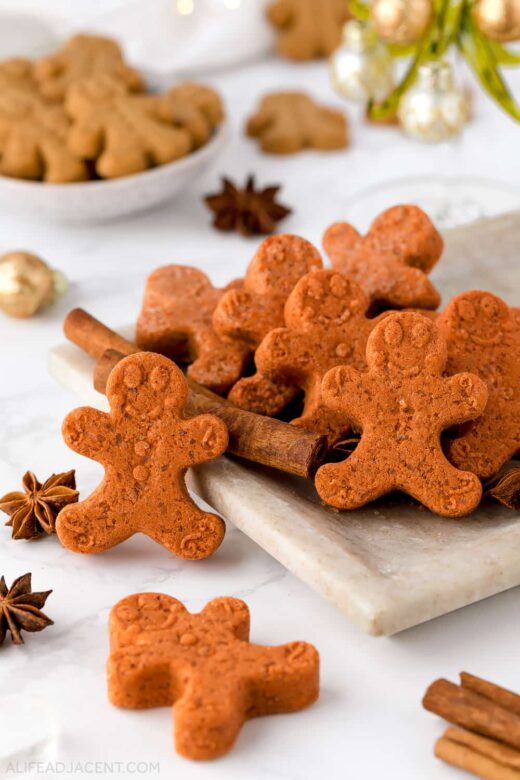
These uplifting, energizing shower bombs look and smell like real gingerbread men. You can use a pre-bottled gingerbread cookie blend, or find an essential oil recipe in the blends section below.
I used a gingerbread man candy mold for a cute shape and size. For an authentic cookie color, I used a mixture of red clay and cocoa brown clay powders. You can also use mica in a reddish brown hue, but please be sure to source cruelty-free mica.
Sugar Cookie Shower Bombs
- 1/4 cup baking soda
- 1/4 cup citric acid
- 1/4 cup Epsom salts
- 15ml / 1 tbsp natural liquid emulsifier
- 1ml water, witch hazel, or alcohol
- 1-2 tsp French yellow clay for sugar cookie color (optional)
- 5ml / 120 drops vanilla cookie essential oil blend (see blends section)
- Christmas cookie sprinkles or colored salt for decoration


With their buttery shortbread color and real sprinkles, these sugar cookie scented shower bombs look and smell like Christmas cookies. They’re naturally fragranced with a sweet and calming vanilla sugar cookie essential oil blend for relaxing aromatherapy.
These make a fun and unique essential oil gift idea for self-care. Just be sure to label them so your recipient knows they’re not edible!
I used a plain round silicone tablet mold for a small cookie shape, but you can also use stars, snowmen, or another holiday cookie shape.
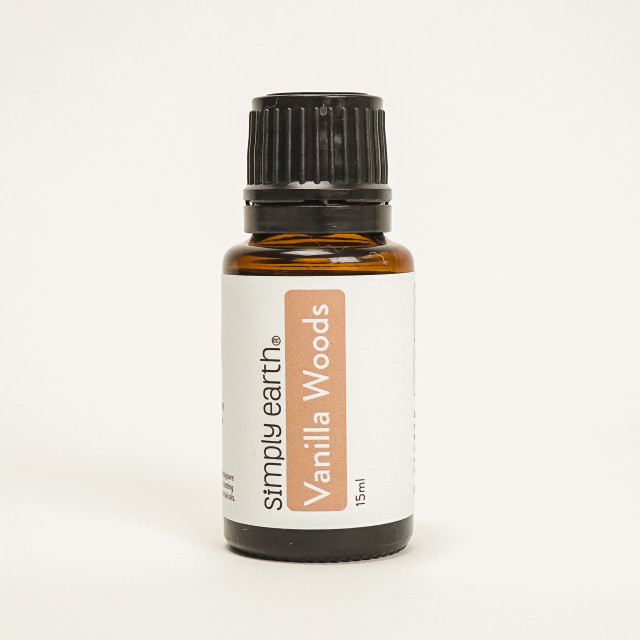
Dark-colored vanilla and orange essential oils add a natural color to this DIY shower bombs recipe. If desired, you can also add French yellow clay for a brighter golden cookie beige, or gold mica for a shimmery appearance.
Finally, you can use real cookie sprinkles to dust the top, or make your own sprinkles with colored Epsom salt (tutorial here).
Shower Bombs Essential Oil Blends
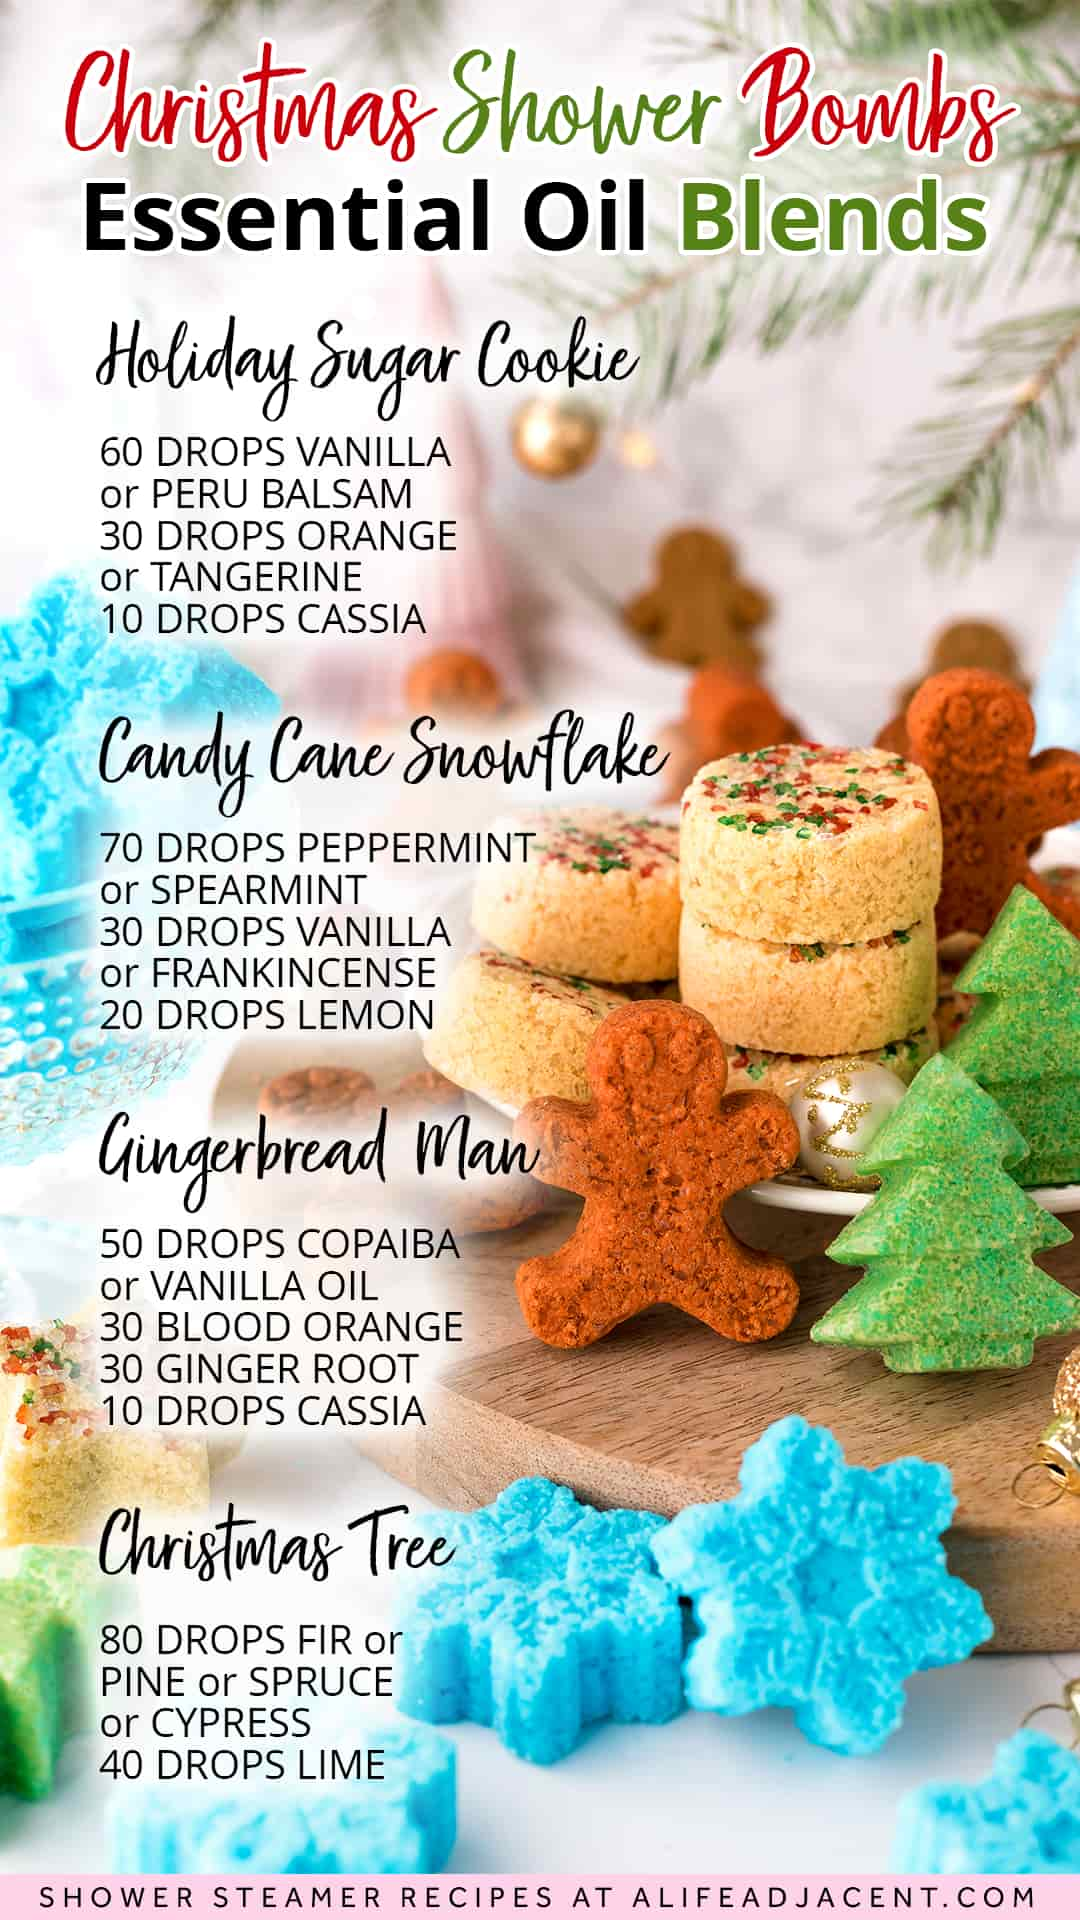
Candy Cane
70 drops peppermint or spearmint essential oil
30 drops vanilla or frankincense essential oil
20 drops lemon essential oil
This candy cane essential oil blend has a refreshing, minty fragrance with the sweetness of real candy canes. Use vanilla oil to give it a sweeter candy cane scent, or frankincense to make it more fruity.
Spearmint oil smells sweeter than peppermint, but peppermint contains more menthol. So peppermint is more therapeutic for headaches, migraines, and minor respiratory symptoms such as a cold.
To keep things simple, you can also use 120 drops of straight peppermint supreme or spearmint essential oil, which creates very strong peppermint shower melts.
For an even easier option, use a pre-bottled candy cane essential oil blend.
Gingerbread
50 drops copaiba oleoresin or vanilla essential oil
30 drops blood orange essential oil
30 drops ginger root essential oil
10 drops cassia essential oil
This sweet and spicy gingerbread essential oil blend smells like the quintessential Christmas cookie.
Vanilla creates a sweeter gingerbread scent, but copaiba is often easier to find. If you use copaiba, it will give you an earthier, spicier cookie scent.
If desired, you can also use a pre-bottled gingerbread essential oil blend. If you enjoy aromatic scents, you might also enjoy these pumpkin spice shower bombs.

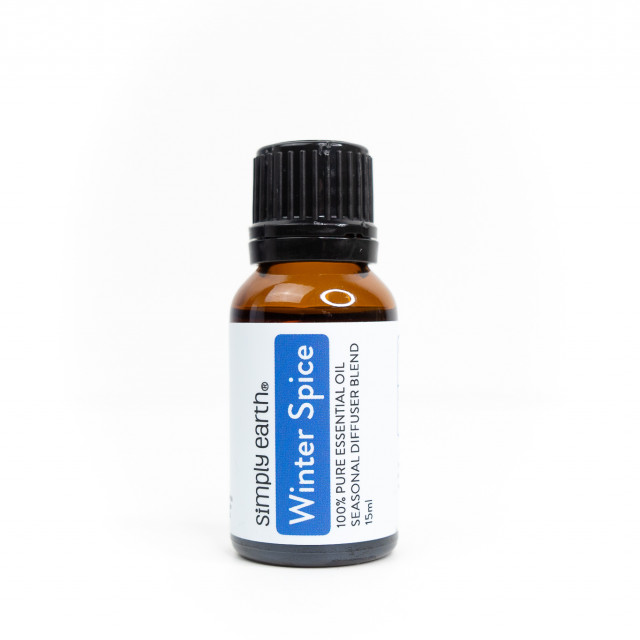
Christmas Tree
80 drops tree essential oil (options below)
40 drops lime essential oil
This Christmas tree essential oil blend has a sweet, fresh, and herbaceous scent like a real Christmas tree!
Arboreal essential oils such as fir, pine, cypress and spruce are kid-friendly alternatives to peppermint and menthol. They’re ideal for relieving minor respiratory symptoms such as cough and congestion, making these shower bombs ideal for cold and flu season.
Christmas trees can be any kind of evergreen conifer, including fir, pine, spruce, or cypress. So, you can use any of the following essential oils for a Christmas tree scent:
- Balsam fir
- Fir needle
- Douglas fir
- Pine needle
- Pine scotch
- Black spruce
- Cypress
For an easy, pre-bottled Christmas tree aroma, I like this blend called Winter Spice.
Disclaimer: Please note that only steam-distilled lime essential oil is safe for kids. As well, consult your doctor before using any essential oils around children.
Sugar Cookie
60 drops vanilla essential oil or Peru balsam
30 drops sweet orange or tangerine essential oil
20 drops copaiba essential oil
10 drops cassia essential oil
This calming shower bomb blend smells like a spiced Christmas shortbread cookie. Vanilla is ideal for relaxing the senses, and cassia adds a subtle festive spice.
Pure vanilla essential oil can be expensive and hard to find, so I often use this bottled vanilla blend to save on costs. You can also use Peru balsam as a vanilla alternative.
For a truly authentic sugar cookie scent blend with perfumery oils, see my sugar cookie essential oil blend – but please note that it contains bitter almond oil, which is not suitable for aromatherapy use.
More Christmas sugar cookie bath and body recipes:
How to use a shower bomb
Place your shower bomb in a corner of the shower or on the shower floor. Don’t place it too close to the direct stream – you want your bomb to get wet, but not so much that it washes away.
As you begin your shower, splash some water onto the shower tablet to activate it. It will fizz and froth, releasing the essential oils into the air for a potent aromatherapy experience.
Your homemade shower bomb should last between 10-15 minutes in a hot shower, but its exact use time will depend on its size and where it’s placed in the shower.
Tips + Troubleshooting
I tested over 100 batches in my attempts to come up with the easiest and best shower bomb recipe. But, the nature of homemade products means the process is still not 100% foolproof.
There are many variables at play, including your home’s temperature and climate. Plus, sometimes accidents and miscalculations happen, especially when it comes to adding liquids.
For detailed troubleshooting instructions and fixes for common issues, I’ve written a whole guide on shower steamers. However, here are a few quick tips that may help with the process.
How to fix expanding shower fizzies
Once you place your shower bombs into the mold, it’s normal for them to rise slightly for a couple minutes until the mixture begins to harden. As mentioned in the instructions, simply continue to press and smooth down the tops of each tablet with your plastic scoop.
However, if your shower fizzies are rising like holiday cookies in the oven, this is a bigger problem, and it means your mixture was too wet. This shouldn’t happen if you followed the recipe, but accidents happen.
You want to avoid this at all costs, as it can end up ruining your batch. So it’s vital to make sure your mixture is not expanding too much before you place it into the mold.
To safeguard against this issue, you can keep a small amount of extra Epsom salts at your workspace. If you notice that your shower bomb mixture is fizzing or expanding in the mixing bowl, you can quickly add more Epsom salts to absorb the excess moisture.

DIY Shower Bombs Recipe
This shower bombs recipe is so easy to make, it's practically foolproof! With only 3 dry ingredients and a special ingredient that acts like magic "glue," these no-fail DIY shower bombs with Epsom salt are perfect for beginners and experts alike. Learn how to make shower bombs with essential oils in 4 holiday scents: peppermint candy cane, sugar cookie, gingerbread, and Christmas tree.
Ingredients
Shower Bombs Recipe
- 1/4 cup baking soda
- 1/4 cup citric acid
- 1/4 cup Epsom salts
- 15ml / 1 tbsp natural liquid emulsifier
- 1ml water, high-proof alcohol, or witch hazel
- 5ml / 120 drops essential oils (see blends section)
Peppermint Candy Cane Shower Bombs
- 1/4 cup baking soda
- 1/4 cup citric acid
- 1/4 cup Epsom salts
- 15ml / 1 tbsp natural liquid emulsifier
- 1ml natural blue food coloring
- 5ml / 120 drops candy cane essential oil blend (see blends section)
Sugar Cookie Shower Bombs
- 1/4 cup baking soda
- 1/4 cup citric acid
- 1/4 cup Epsom salts
- 15ml / 1 tbsp natural liquid emulsifier
- 1ml water, witch hazel, or alcohol
- 1-2 tsp French yellow clay for sugar cookie color (optional)
- 5ml / 120 drops vanilla cookie essential oil blend
- Christmas cookie sprinkles or colored salt for decoration
Gingerbread Shower Bombs
- 1/4 cup baking soda
- 1/4 cup citric acid
- 1/4 cup Epsom salts
- 15ml / 1 tbsp natural liquid emulsifier
- 1ml water, witch hazel, or alcohol
- 2-3 tsp brown or red clay for gingerbread color
- 5ml / 120 drops gingerbread essential oil blend (see blends section)
Christmas Tree Shower Bombs
- 1/4 cup baking soda
- 1/4 cup citric acid
- 1/4 cup Epsom salts
- 15ml / 1 tbsp natural liquid emulsifier
- 1ml natural green food coloring
- 5ml / 120 drops Christmas tree essential oil blend (see blends section)
Equipment
- Silicone shower bomb molds
- Non-metallic mixing bowl
- Measuring utensils
- Small glass beakers to measure liquid ingredients
- Plastic scoop to smooth tops of shower bombs
- Gloves to protect hands from essential oils
Instructions
- Decorate mold. If desired, place a decoration into your mold before you begin, such as colored Epsom salt or cookie sprinkles. This step is optional, and only necessary for the sugar cookie shower bombs.
- Measure liquid ingredients. You’ll need 3 small containers or beakers for this step. In one beaker, pour in the emulsifier. Measure the liquid into another beaker, whether that’s water, alcohol, witch hazel, or food coloring. Finally, in the last beaker, add the essential oil blend. Set all beakers aside.
- Combine dry ingredients. In a mixing bowl, simply combine baking soda, citric acid, and Epsom salt. These ingredients don’t tend to clump, so there’s no need to use a sieve. Mix gently with a wooden spoon (or a gloved hand) to combine. If using a powdered colorant such as clay, add it during this step.
- Add emulsifier and essential oils. Put on your gloves to protect your hands. Pour the emulsifier into the dry ingredients and mix well to evenly coat the mixture. Then, add the essential oils and mix again. At this point, the shower bomb mixture will form a grainy, paste-like texture.
- Add liquid. This step is pivotal, so be prepared to work fast. Once you introduce water into the shower bombs, you will need to mix quickly to avoid too much fizzing.
Grab the beaker you filled with liquid during step 2, whether that’s water, alcohol, or food coloring. Pour the liquid into your gloved hand, then quickly knead it into the mixture. Continue kneading thoroughly until evenly incorporated, and be sure to knead out any uneven splotches of food coloring.
Tip: Pouring the liquid onto your hand first is preferable to pouring directly into the bowl, as it helps cut down on too much fizzing. - Fill the mold. Pack the mixture tightly into the silicone mold. Then, use a plastic scoop to smooth out the top of each tablet. If the shower bombs expand a little bit in the mold, don’t panic – keep pressing the tops down with the scoop until they lie flat. This won’t take long, and the tablets will begin to harden quickly.
Continue to fill each mold cavity, pressing the tablets down as you go. Once they have stopped rising and started hardening, you can move on. - Leave to dry. Set the shower fizzies aside to dry in a safe, well-ventilated place where they will not be disturbed. Epsom salt shower bombs harden quickly, so during the summertime (or in a hot climate), they may be ready in as quickly as 12 hours (or overnight).
However, during the wintertime (or in cool climates), they may still be a little sticky to the touch if not given ample time to dry. For best results, leave them to dry for at least 24-48 hours or until they’re hard and dry to the touch. When they’re fully dry, the shower fizzies should feel like hard salt rocks. - Remove from mold. Carefully remove each shower bomb from the mold. If you used a silicone mold, slowly and carefully pop each mold cavity inside out to gently release each tablet. Be gentle here – round shaped shower tablets are pretty durable, but certain molds (such as snowflake shapes) may have more delicate edges.
- Wrap or package. Immediately wrap and package your homemade shower bombs to protect the essential oils’ fragrance and potency (see notes below). They’re ready to give as holiday gifts, or simply to enjoy yourself!
Notes
- Please see the essential oil blends section in the article for the full blends.
- Each recipe makes approximately 6 shower bombs with a 1.5" tablet mold, but this will depend on the shape and size of your particular mold.
- These shower bomb recipes contain 120 drops of essential oils, or approximately 20 drops per tablet. This may seem like a lot, but it's to account for evaporation, as you will inevitably lose some essential oil as the tablets dry.
- Use DIY shower bombs within 6 months. Please store them in an airtight container in a cool, dark place to preserve their scent.
- For gifting, you can wrap each shower fizzy in Christmas beeswax wrap for an eco-friendly gift wrap idea. Or, place them in small, airtight mason jars.
- For more tips, tricks, and help if you run into issues, see the troubleshooting section.
Recommended Products
As an Amazon Associate and member of other affiliate programs, we earn from qualifying purchases.


More shower aromatherapy recipes
You may also enjoy these other recipes for shower aromatherapy:
- How to Make Shower Steamers: Ultimate Guide
- Lavender Shower Melts for Sleep
- Shower Melts for Colds and Congestion
- Allergy Relief Shower Fizzies with Blue Tansy Oil
- Pumpkin Spice Shower Tablets
For more essential oil recipes, follow us on Pinterest, Instagram, YouTube, Facebook, TikTok, and Twitter.