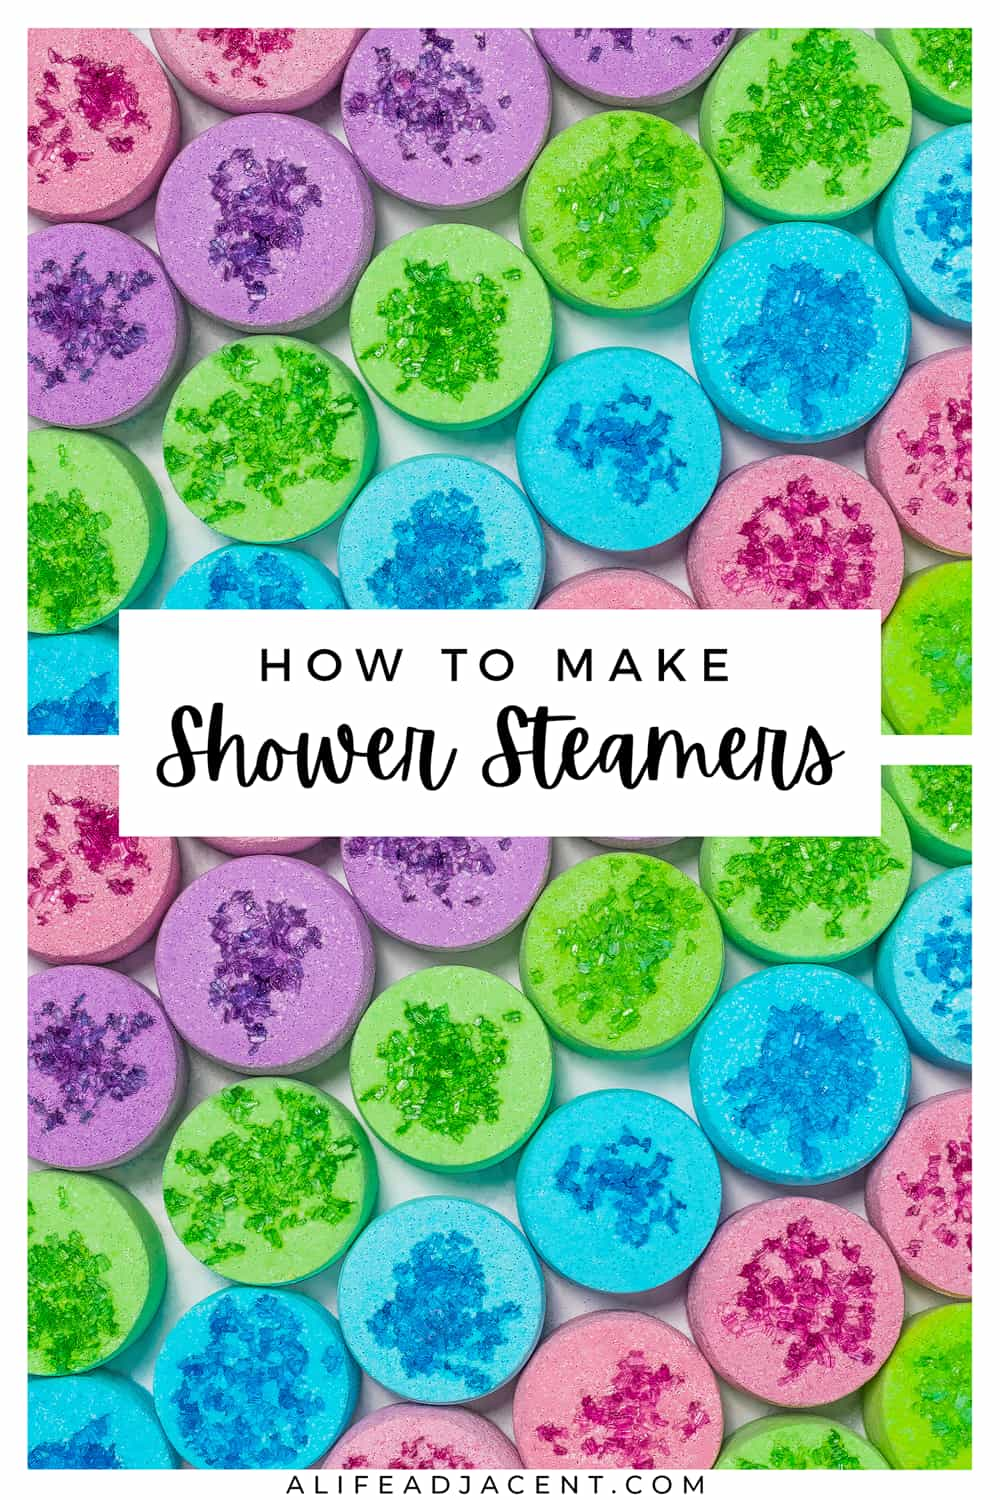
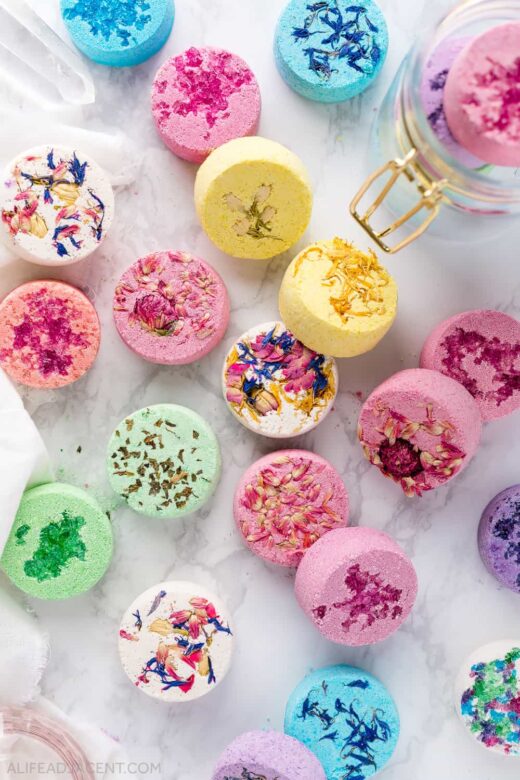
Learn how to make shower steamers! This detailed guide and step-by-step tutorial covers everything you need to know about making (and using) DIY shower steamers. With 12 easy recipes to choose from, there’s something for everyone – even if you’re missing corn starch, citric acid, or another ingredient.
Aside from the recipes, this guide also covers essential oil blends, molds, colorants, packaging ideas, and more. You’ll find an extensive FAQ with tips, tricks, and fixes for common issues.
Essential oil shower steamers are an at-home luxury that elevate a regular shower to an aromatherapy spa experience. Depending on your needs, they can help reduce feelings of stress, soothe congestion, relieve headache, or even help wake you up in the morning.
They’re also easy to make – in theory, at least. Unfortunately, making steamers at home can be a finicky process.
But hopefully, this tutorial will help change that! This guide is the result of months of testing, and I hope it will help you make the best shower steamers.
Why I made this shower steamer guide
Do you want to make shower tablets, but are overwhelmed by all the recipes out there? Or maybe you’ve already tried a recipe, and ran into issues.
After making and testing hundreds (literally) of shower steamer tablets over the years, I’ve experienced every possible issue, and wasted time and money in the process.
For instance, if they’re too dry, they’ll crack, crumble apart, or have unsightly jagged edges. But if you add too much liquid, the mixture will fizz too soon – often ruining the whole batch.
Not to mention, sometimes your tablets just don’t work, or don’t smell strong enough.

After experiencing the frustration firsthand, I was determined to create easy, no-fail DIY shower steamers with economical, accessible ingredients.
I went through hundreds of dollars of ingredients and essential oils (so you don’t have to!), and I truly hope this guide helps save you time and frustration.
- 🥣 Ingredients + Supplies
- 📝 Recipes
- 🥣 How to Make
- 📝 Quick Questions
- 🌸 Essential Oil Blends
- 💦 How To Use
- 🌈 Decorating Guide
- ❓ FAQ: Frequently Asked Questions + Troubleshooting
- My shower steamers are expanding – what do I do?
- What if my shower tablets are expanding in the mold?
- Why are my shower steamers crumbling?
- Why are my shower steamers cracking?
- Why are my shower steamers sticky?
- Can you make shower bombs in high humidity?
- Why do my shower steamers have no smell?
- How much essential oil do shower steamers need?
- Why do shower tablets need so much essential oil?
- How can I make my shower steamers smell stronger?
- Why use an emulsifier in shower steamers?
- What are the best natural emulsifiers for shower steamers?
- Can you use polysorbate 80 in shower steamers?
- Is there a natural alternative to polysorbate 80?
- Why use castor oil in shower steamers?
- How to make steamers last longer in the shower?
- Which starch is best for shower fizzies?
- Which liquid is best for shower steamers?
- Why use clay in shower steamers?
- Can you use a shower steamer as a bath bomb?
- ⚠️ Health and Safety Disclaimer
Ultimate Guide to Making DIY Shower Steamers
In this post, you’ll discover how to make shower steamers using natural ingredients.
These DIYs are easy to follow for beginners and experienced makers alike, regardless of whether you’re making shower steamers to sell, gift, or to enjoy yourself.
Each recipe contains a special ingredient that acts like “glue,” so your tablets turn out beautifully every time without crumbling. This ingredient also helps preserve their scent for long-lasting, strong-smelling aromatherapy.
You’ll find the following recipes:
- 💎 Rock-hard Epsom salt shower bombs that harden overnight, so they’re ready the next morning!
- 🌸 Long-lasting shower fizzies with kaolin clay
- 🫧 Fizzy shower melts without citric acid
- 💦 Recipes for high humidity areas or cold temperatures
In this detailed guide, you’ll also discover:
- 🌿 Essential oil blends for shower aromatherapy
- 🌈 Different ways to decorate and color shower tablets, including an Epsom salt glitter tutorial for a geode effect
- 🥣 A breakdown of the best ingredients to use for best results
- ❗️Extensive troubleshooting section with tips if things go wrong
- ❓FAQ with answers to common questions such as how to make shower tablets last longer, and how much essential oils to use
- 🛁 How to use aromatherapy shower steamers
How to use this post for success
Fair warning: this is a long guide, and I did my best to consolidate months of testing.
I’ve included the recipes and tutorial first. Then, a more detailed guide, FAQ, and troubleshooting section for those who need extra help. You’ll find 4 base recipes and 8 essential oil blends for a total of 12 recipes.
Use the Table of Contents or Jump to Recipe button for easy navigation. You can skip straight to the shower steamer recipes and find step-by-step process photos in the “how to make” section.
If you have a question or need to troubleshoot an issue, consult the FAQ section at the bottom.
Finally, don’t forget to bookmark or pin this post for later. Before we get into the tutorial, I’m going to cover some basic info, so skip ahead if you prefer.
What are shower steamers?
Shower steamers are effervescent, water-activated aromatherapy tablets for your shower. They’re highly concentrated and contain a large dose of essential oils for potent aromatherapy.
Often, shower tablets are also called bath bombs for the shower (or shower bombs) since they work in a similar way.
But while a bath bomb is formulated to nourish your skin, a shower tablet works directly on the senses and sinuses.
Shower steamers may also be called shower tablets, fizzies, melts, pucks, or soothers. Whatever you call them, the purpose is the same – to pack a serious punch of in-shower aromatherapy. (They also make a great bath bomb alternative when you don’t have time for a long soak.)
How do shower steamers work?
A shower steamer’s ingredients are activated by moisture. Once it gets wet, it begins to fizz, vaporizing the essential oils into the air.
The oils are then circulated by the warm shower steam, creating potent aromatherapy vapor that turns your shower into a giant essential oil diffuser.
Fizzing is one of the keys to strong aromatherapy shower steamers, as it helps catapult the essential oils upwards and towards your nose.
Finally, shower tablets work best in conjunction with warm shower steam to help circulate the essential oils. They’ll still work in a cold shower, but they won’t be as effective.
What are shower steamers for?
DIY shower steamer tablets can add a dose of self-care to your shower, but they’re especially useful when you’re experiencing an issue that could benefit from aromatherapy.
Whether you have a headache, suffer from sinus congestion, or need to decompress before bed, there’s a shower bomb for every situation. Simply choose an essential oil blend that helps your individual concern.
Shower steamer benefits include:
- For headache or migraine relief
- To help clear a stuffy nose from cold or flu
- To help soothe allergy symptoms or inflamed sinuses
- During your nighttime shower for restful sleep
- During your morning shower to energize
- For a relaxing shower at the end of a long day
- To help refresh your energy during an afternoon slump
Later you’ll find some of the best essential oil blends for each of the above scenarios.
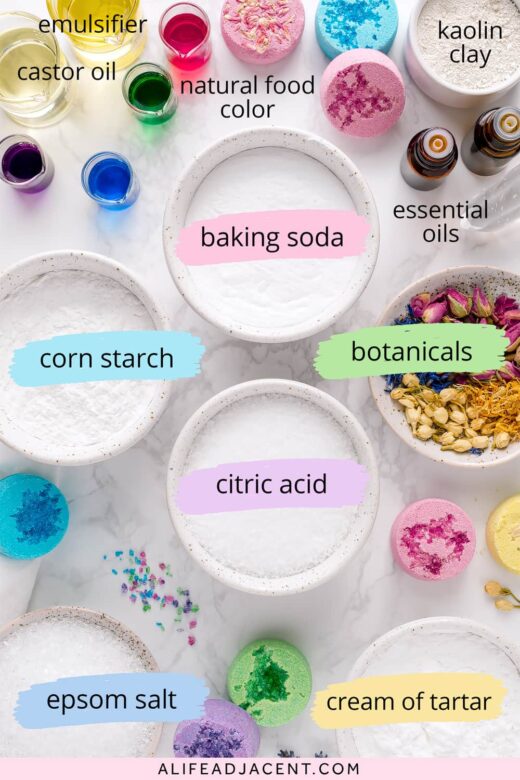
Shower Steamers Ingredients
Depending on which recipe you make, you will need ingredients from the list below:
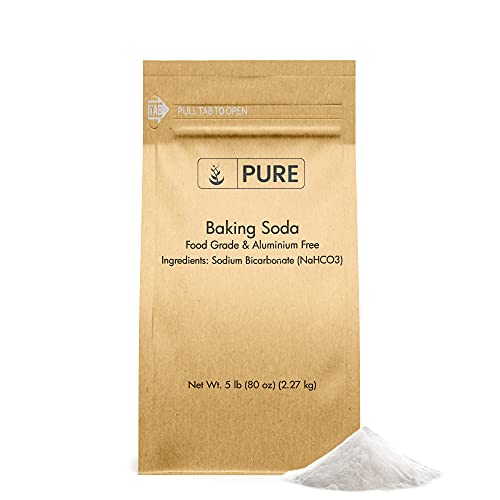
- Fizzing base: Baking soda and citric acid in a 1:1 ratio create fizzy tablets.
- Buffers/thickeners: Corn starch, arrowroot starch or tapioca starch buffer the fizzing reaction.
- Hardeners: Epsom salt, kaolin clay, or cream of tartar create hard tablets that won’t crumble.
- Liquid binder: A natural liquid emulsifier (or castor oil) binds shower steamers together and protects the essential oils.
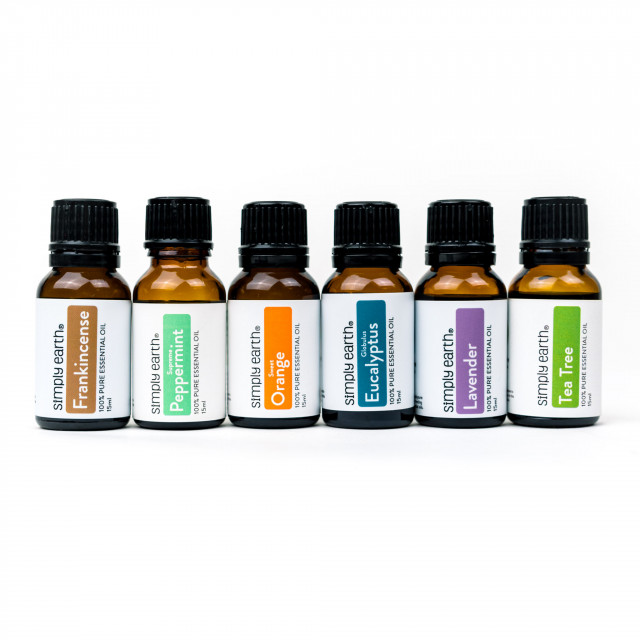
- Fragrance: All-natural essential oils for shower aromatherapy.
- Colorant: Natural liquid food coloring for color.
- Decoration: Optional decoration such as dried flowers or Epsom salt glitter.
If this sounds like a lot of materials, don’t worry – you won’t need every single one to make DIY shower steamers. The simplest recipe requires only 3 dry ingredients, and is very easy to make.
Equipment + Supplies
Besides your ingredients, you’ll also need the following supplies:
- Shower steamer mold. You can use a simple silicone tablet mold, but you’ll find other options below.
- Large mixing bowl. Citric acid reacts with metals, so use a glass or non-metallic mixing bowl.
- Measuring cups. Use a kitchen scale if you’d prefer to measure the dry ingredients by weight.
- Sieve. This prevents lumps and ensures a uniform texture.
- Small beakers. Glass lab beakers with markings are useful for measuring liquids and essential oils, but you can use any small containers you have on hand.
- Small mixing utensil. A mini silicone spatula is helpful to combine the liquid ingredients.
- Plastic scoop or measuring cup. You’ll need a tool with a flat bottom to press down and smooth each tablet, such as a plastic scoop or small measuring cup.
- Gloves. Please use gloves to protect your hands, as you’ll be working with an extremely high concentration of essential oils. Essential oils erode vinyl and latex gloves, so consider wearing cotton gloves underneath for extra protection.
- Mask. You can wear a mask to protect yourself from any powder released into the air.
DIY Shower Steamers Recipes
After testing over 100 batches and dozens of ingredient combinations, here are the best shower steamer recipes.
Choose one, then see the “how to make” section for step-by-step instructions, and the essential oils section for scents.
How to choose your recipe:
- For foolproof, rock-hard tablets that dry overnight, make the Epsom salt shower bombs.
- For the longest lasting shower tablets, try the recipe with clay.
- If you don’t have citric acid, make the recipe with cream of tartar instead.
- If you live in high humidity, shower steamers with moisture-absorbing clay or Epsom salt will likely work best, as these dry the fastest.
Aromatherapy Shower Steamers Recipe
1/4 cup baking soda
1/4 cup citric acid
3 tbsp corn starch or arrowroot starch
1 tbsp kaolin clay
15ml / 1 tbsp natural liquid emulsifier or castor oil
1 tsp / 5ml natural liquid food coloring
5ml / 120 drops essential oils (blends below)
These long-lasting shower steamers contain kaolin clay to drastically slow fizzing, so they’re perfect for long showers.
Epsom Salt Shower Steamers Recipe
1/4 cup baking soda
1/4 cup citric acid
1/4 cup Epsom salts
15ml / 1 tbsp natural liquid emulsifier
1ml natural liquid food coloring
5ml / 120 drops essential oils (blends below)
If you’re looking for the easiest, quickest recipe, these DIY shower steamers with Epsom salt are for you.
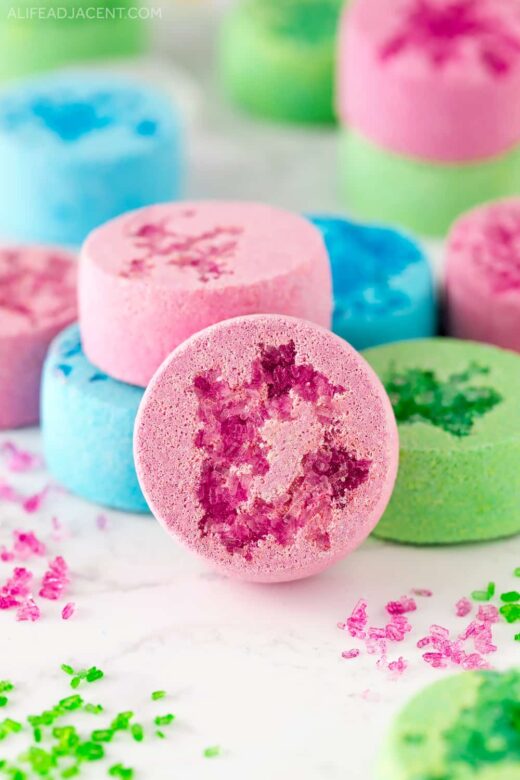
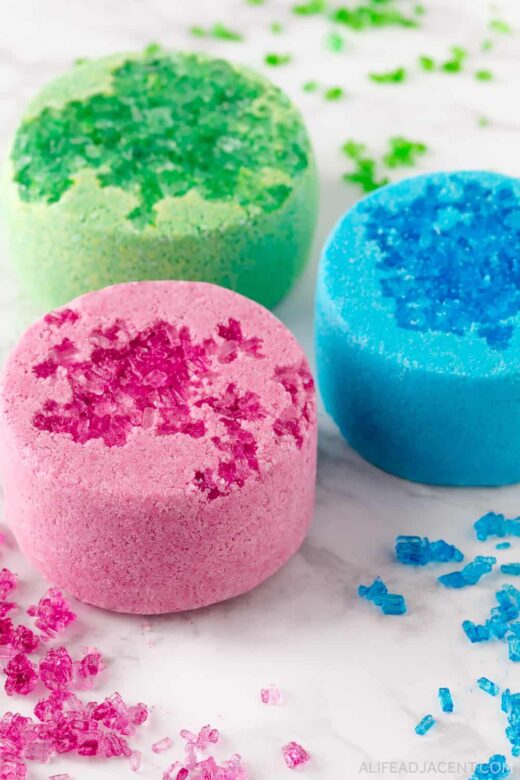
These easy-to-make tablets dry rock-hard and fast. Practically indestructible, they won’t break, crumble or crack even if you drop them, making them ideal for gifting or shipping.
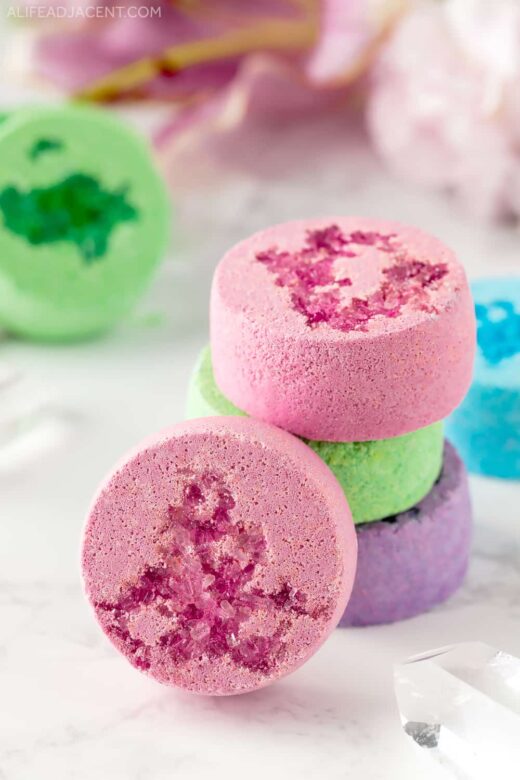
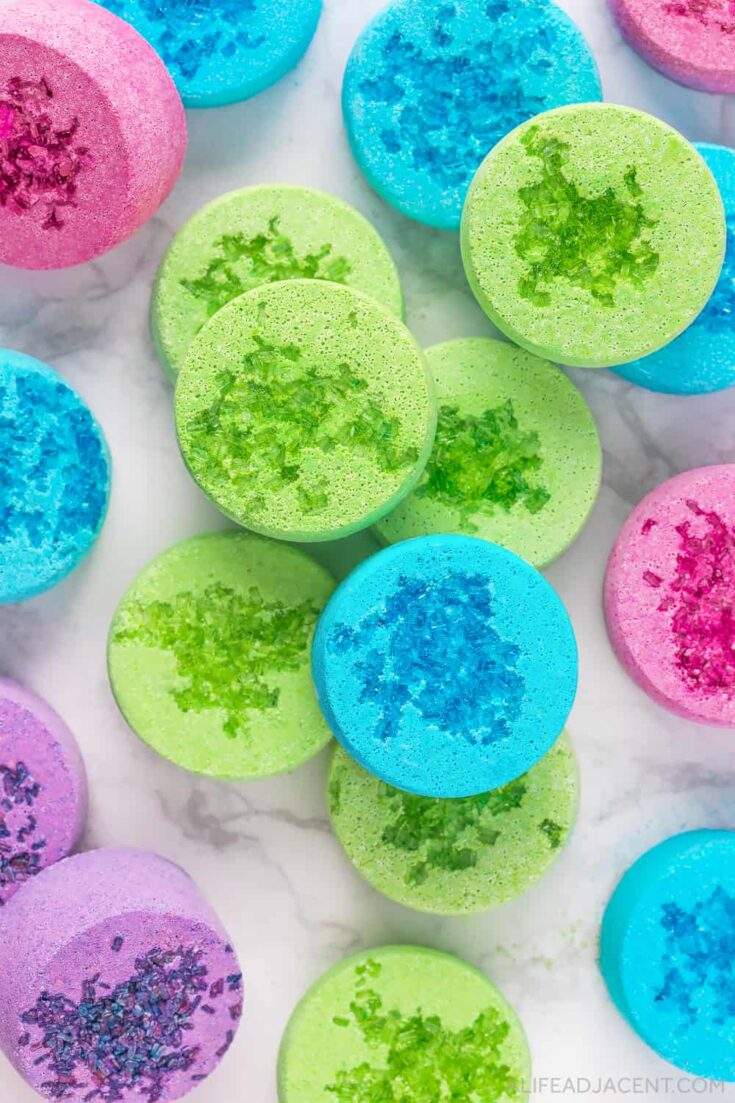
As a bonus, Epsom salts gives them a beautiful sparkly, crystallized appearance.
Epsom Salt Shower Steamers with Corn Starch
1/4 cup baking soda
1/4 cup citric acid
2 tbsp corn starch or arrowroot starch
2 tbsp Epsom salt
15ml / 1 tbsp natural liquid emulsifier or castor oil
2ml natural liquid food coloring
5ml / 120 drops essential oils (blends below)
This is another variation of Epsom salt shower bombs, but with added starch to offset moisture and high humidity.
Epsom salt is highly hygroscopic, but it’s not very absorbent. So in very humid climates, adding corn starch to your shower tablets can help prevent stickiness, and also helps bind them together.
Iff desired, you can use castor oil to replace the emulsifier in this recipe.
Shower Steamers without Citric Acid
1/4 cup baking soda
1/4 cup cream of tartar
1/4 cup Epsom salt
1 tbsp natural liquid emulsifier
2ml natural liquid food coloring
5ml / 120 drops essential oils
Cream of tartar is commonly used as a citric acid substitute for bath bombs, and it works just as well in shower bombs. It reacts with baking soda and water to create gentle carbon dioxide bubbles.
Just note that these shower fizzies aren’t quite as fizzy. Cream of tartar is a mild acid, so it doesn’t have citric acid’ vigorous “fizz”. Instead, it creates a gentle frothing or foaming effect.
As well, please handle these steamers with care, as they are more delicate than the others.
Shower Steamers with Cream of Tartar
1/4 cup baking soda
1/4 cup citric acid
2 tbsp corn starch or arrowroot starch
2 tbsp cream of tartar
1 tbsp natural liquid emulsifier or castor oil
1 tsp / 5ml natural liquid food coloring
5ml / 120 drops essential oils (blends below)
If you don’t have kaolin clay or Epsom salt on hand, you can also make shower steamers with cream of tartar. It has hardening and stabilizing effects, so the tablets stick together better than using starch alone.
How to Make Shower Steamers
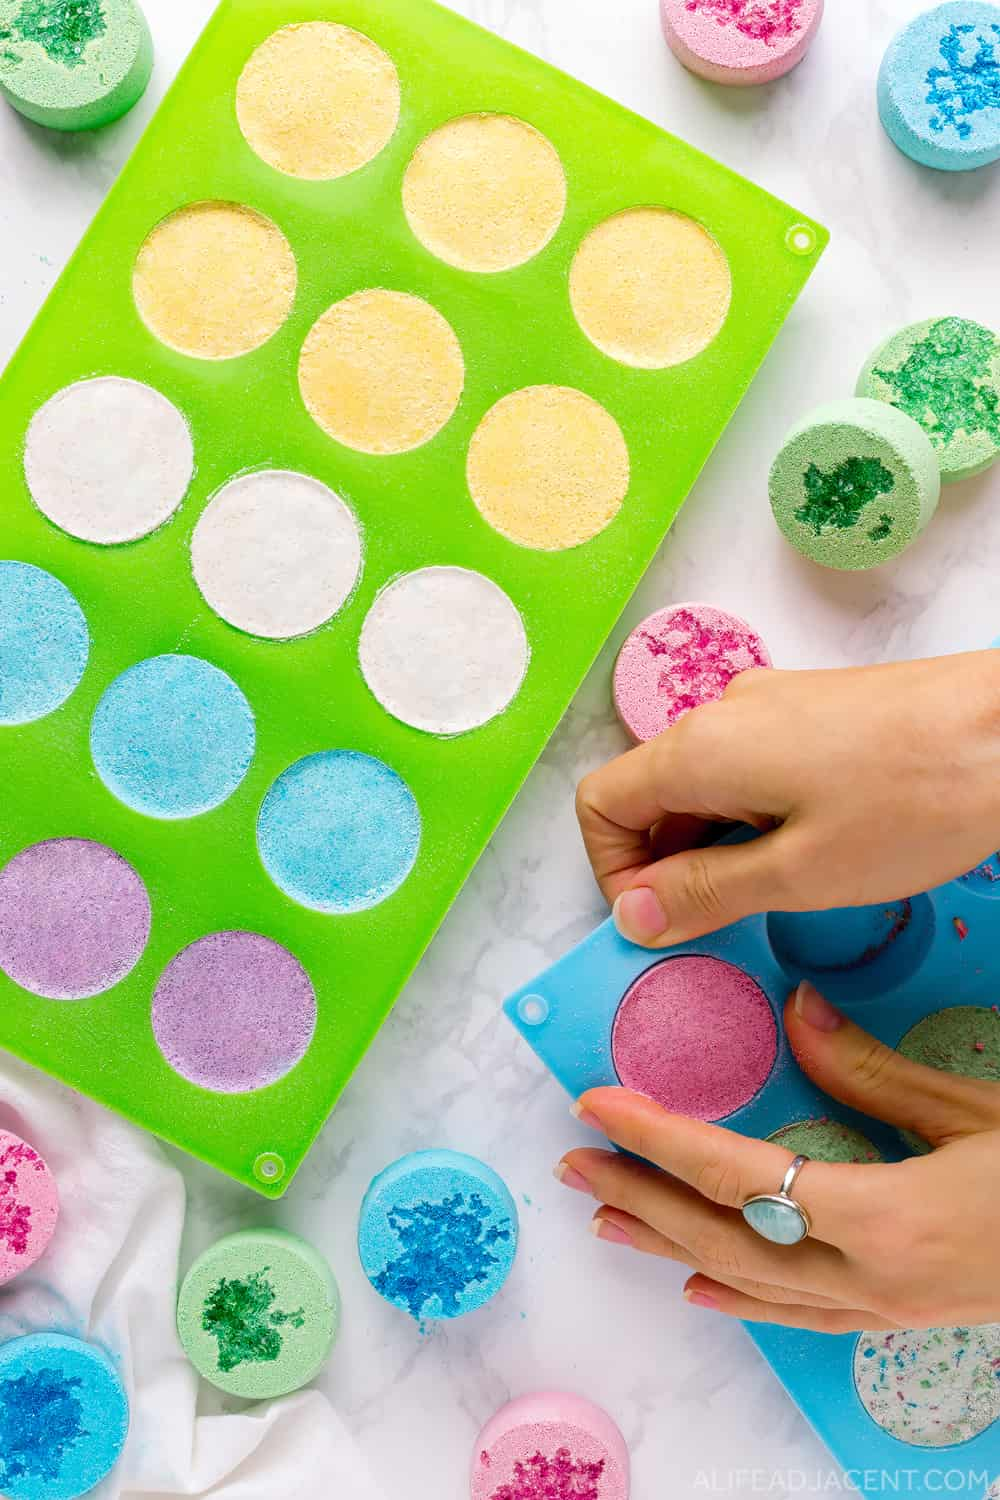
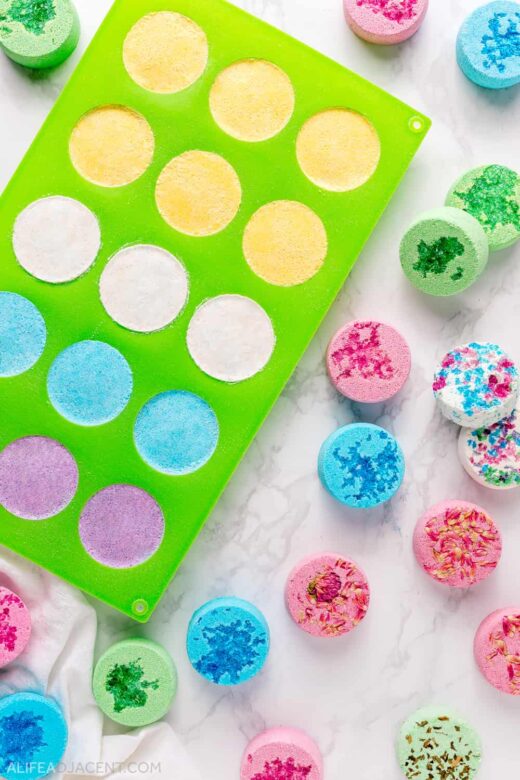
- Make decoration. Before you begin, prepare your tablet mold with your desired shower steamer decoration, such as dried flowers, botanicals, or Epsom salt glitter. (See the decorating section below.)
Tip: Place your mold on a cutting board for easy transport later.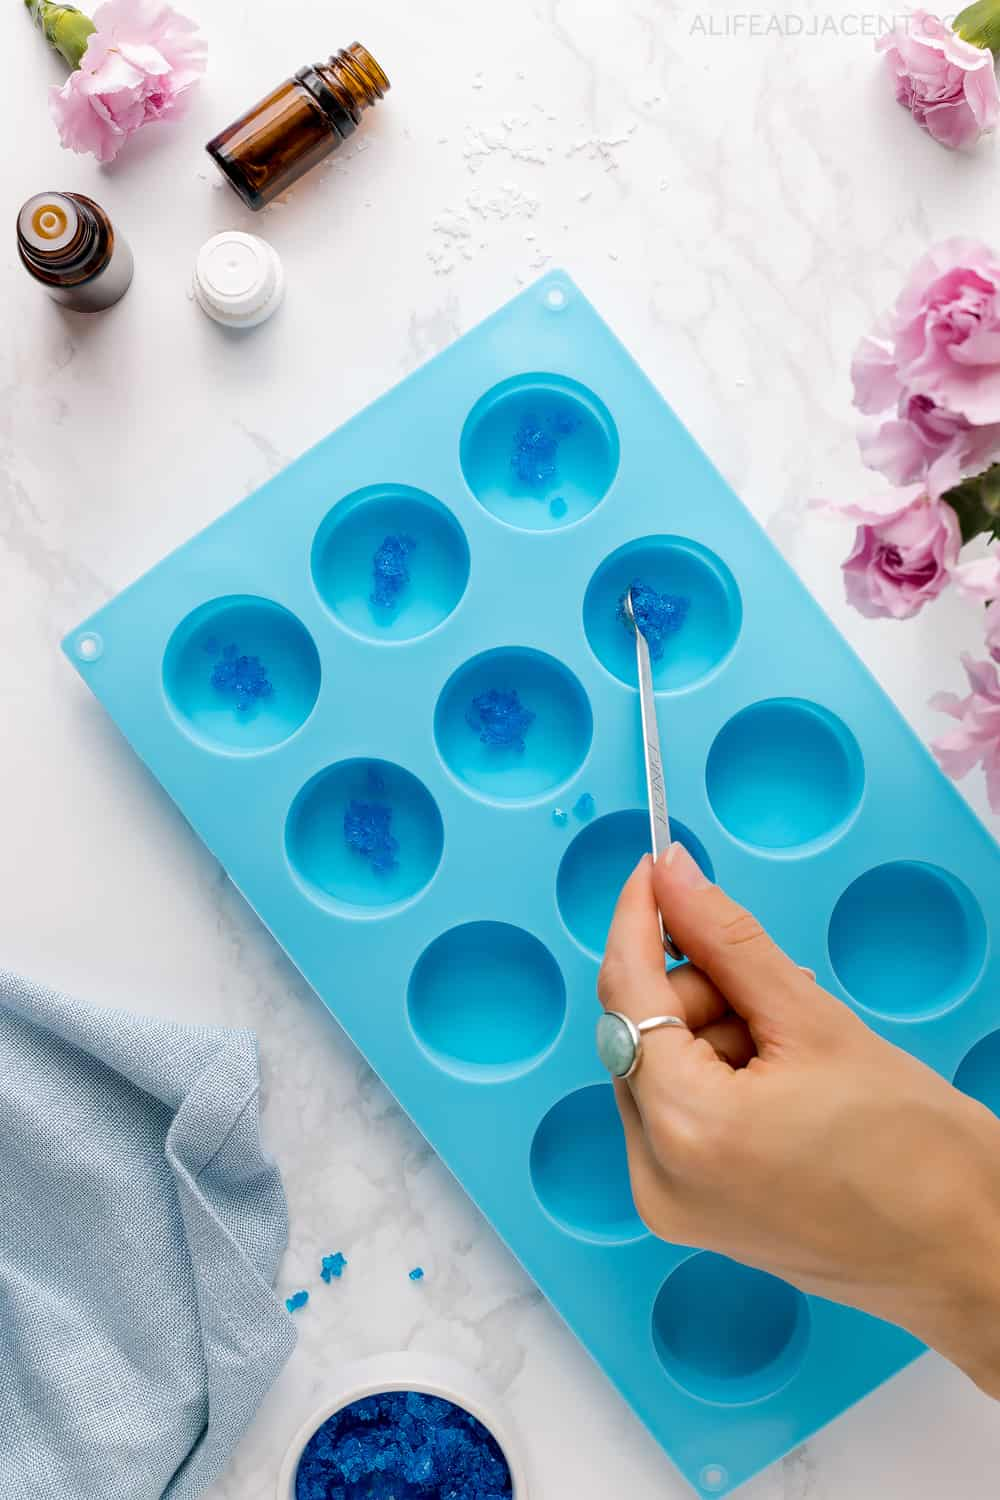
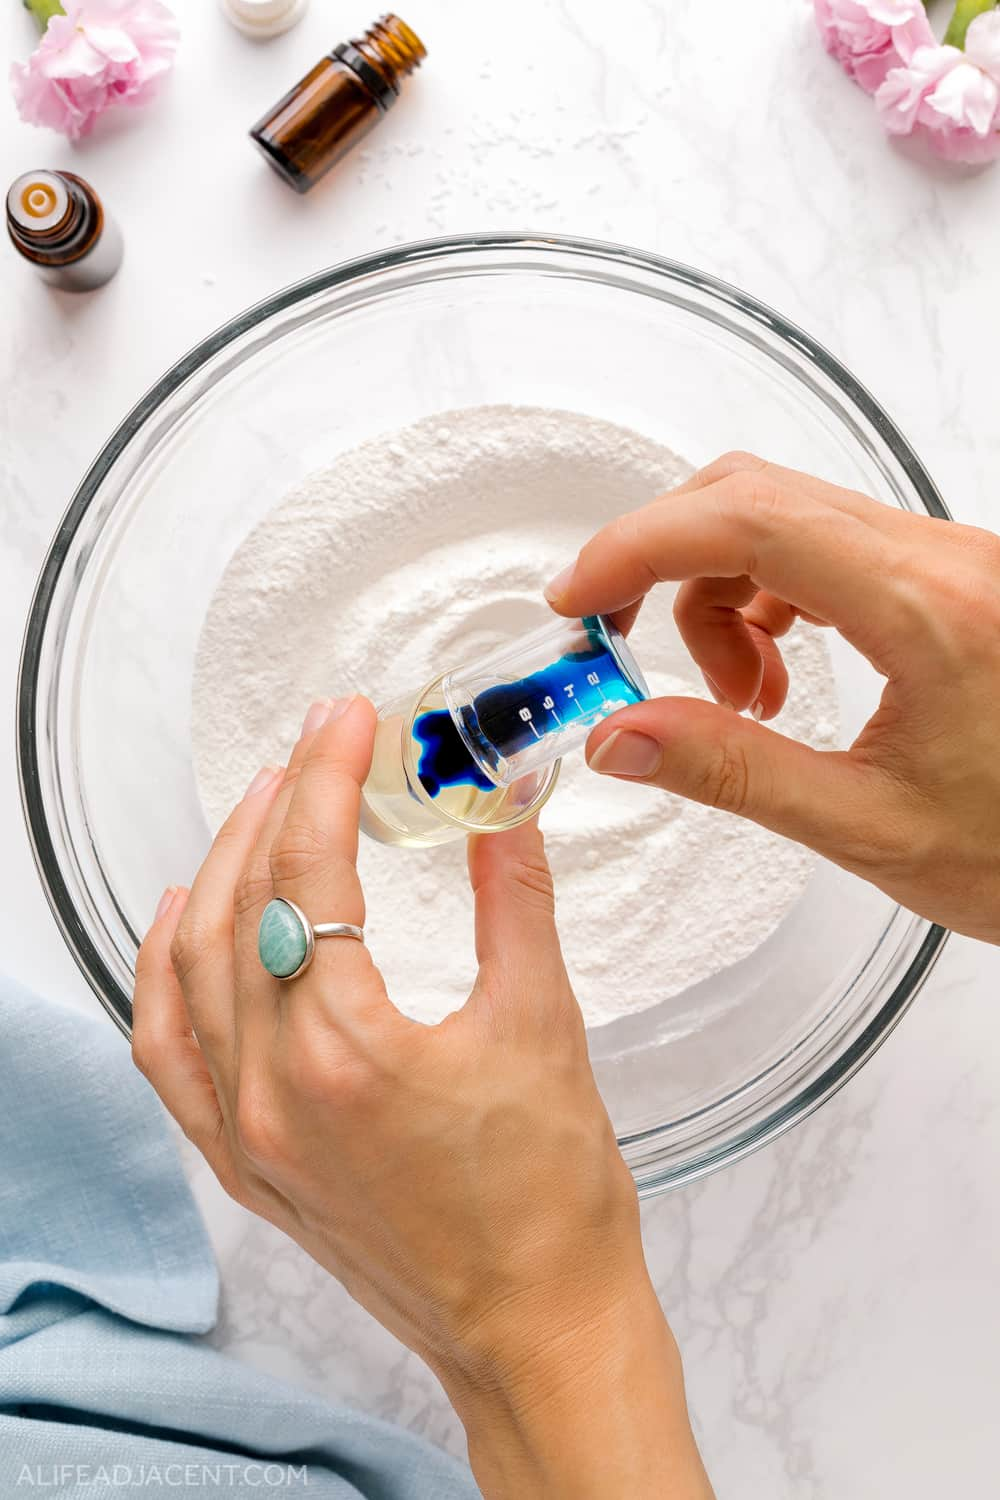
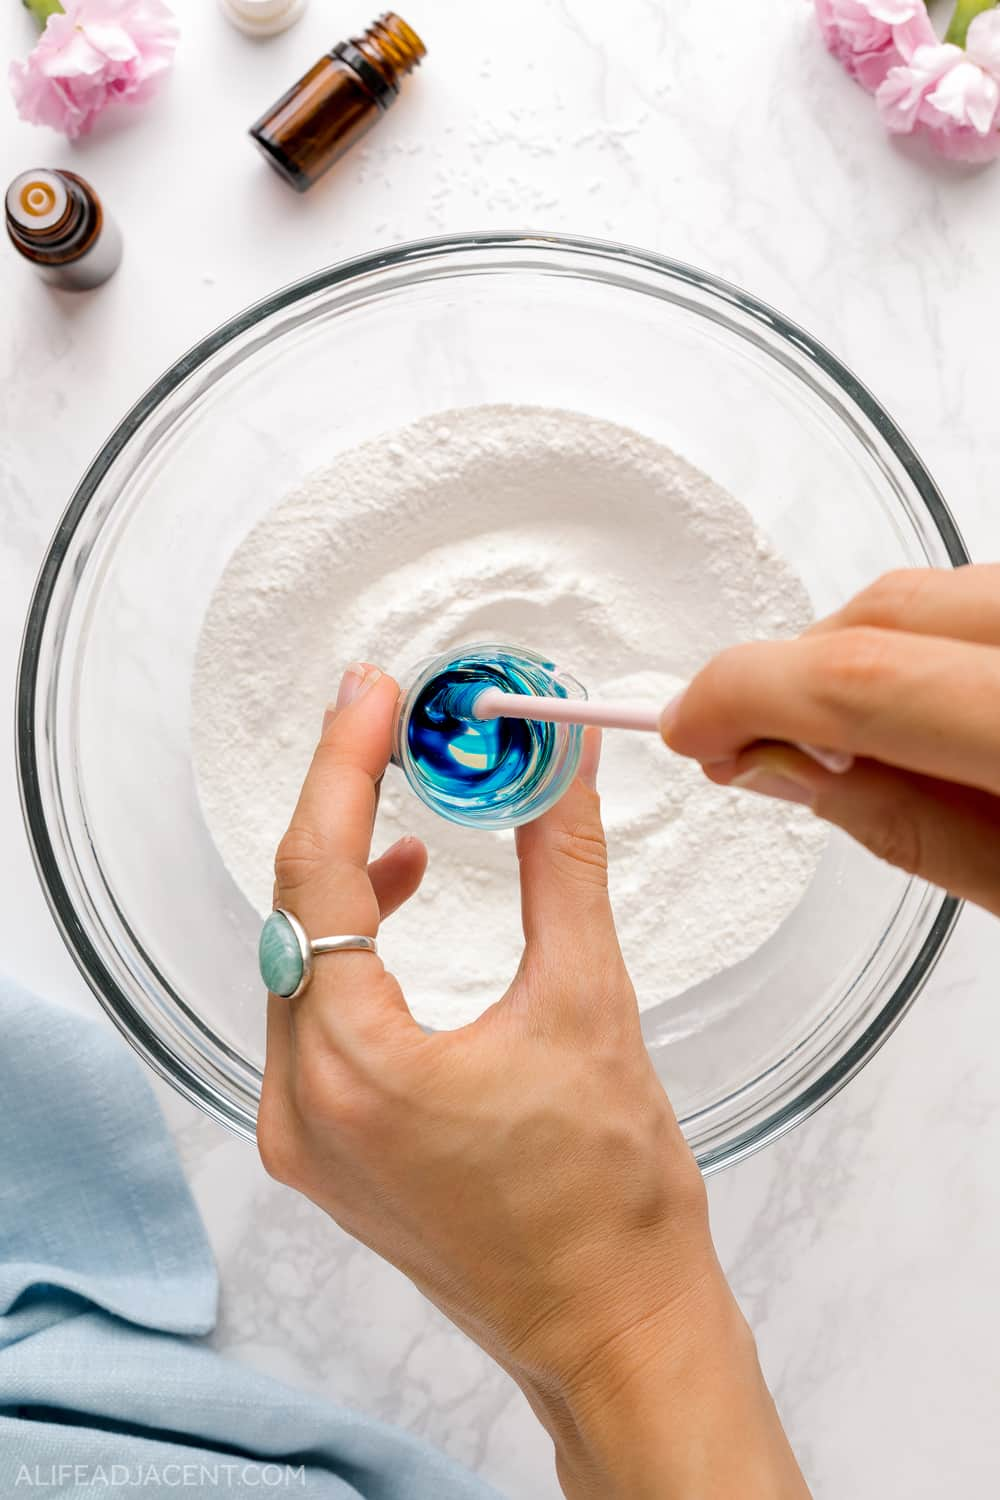
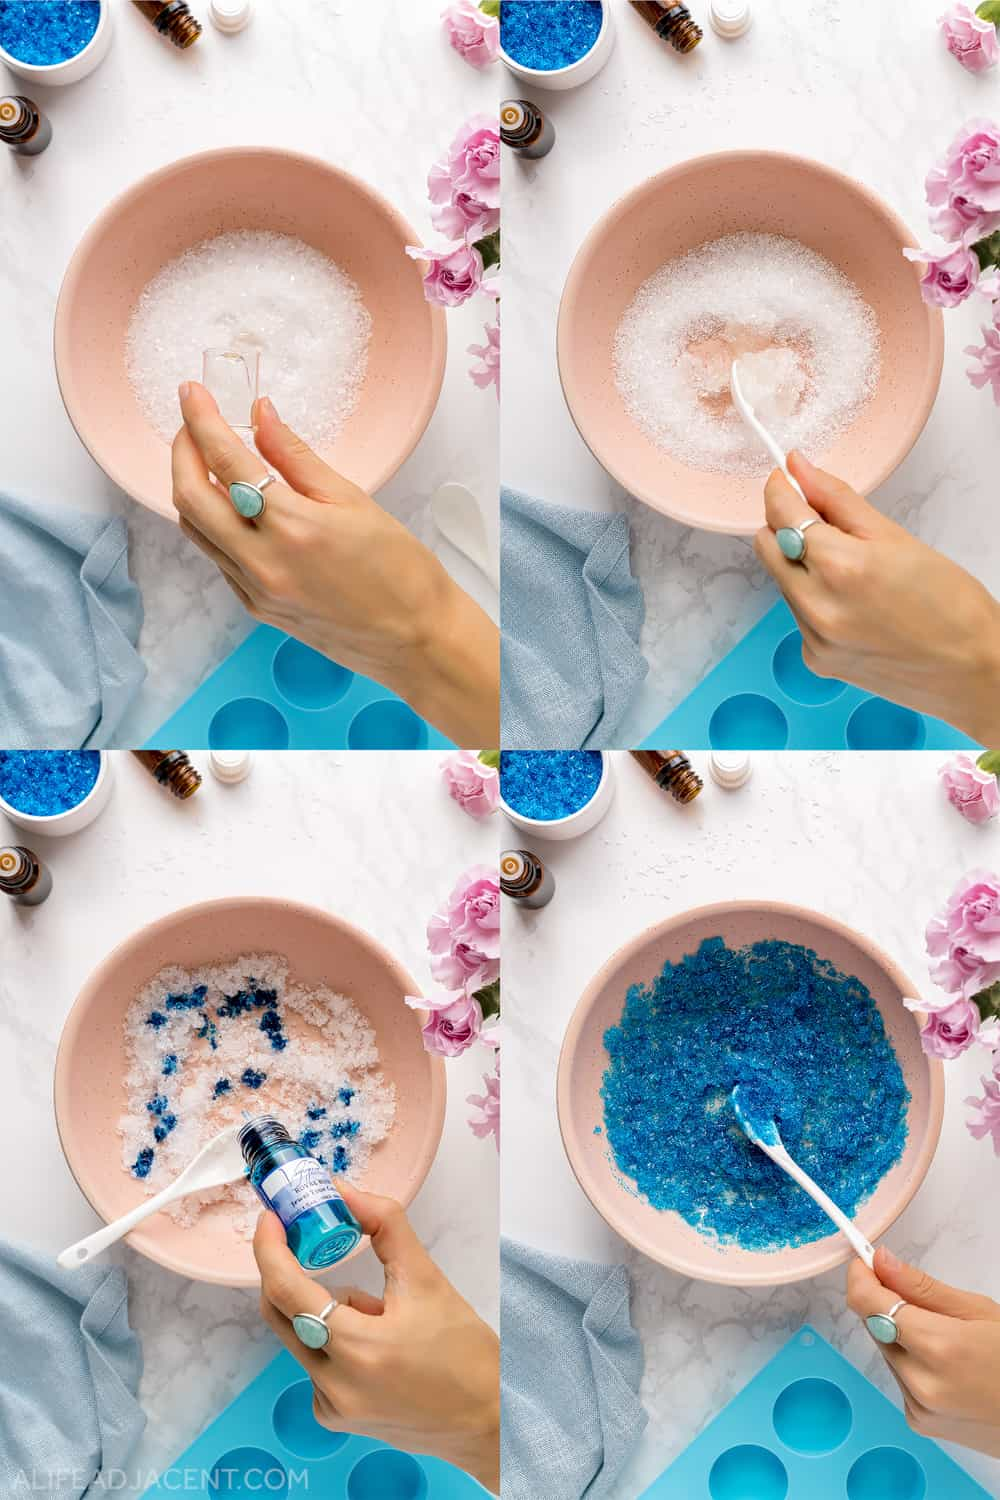
- Measure liquid ingredients. Begin by measuring your liquid shower steamer ingredients. You’ll need 3 small beakers or containers to measure each one. Add your essential oil blend to one beaker. In another, measure the liquid food coloring. In the last beaker, pour in the emulsifier (or castor oil).
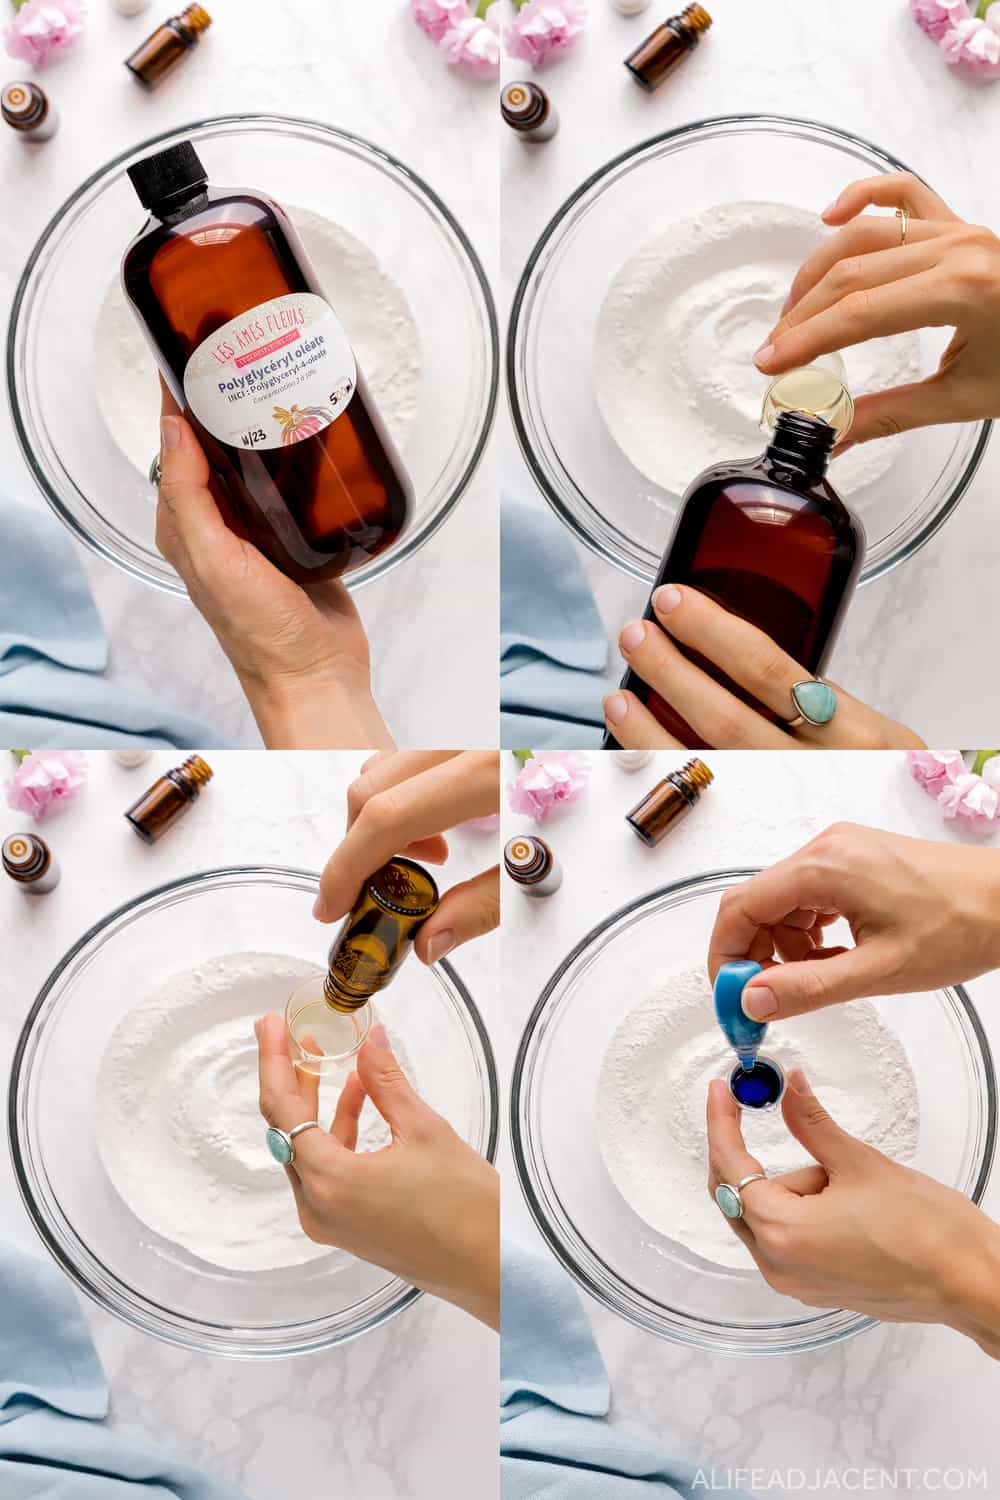
- Mix colorant and emulsifier. Pour the food coloring into the emulsifier (or castor oil). Mix vigorously to suspend the liquid in the oil. This creates a buffer that helps protect the dry mixture from fizzing. Set all beakers aside.
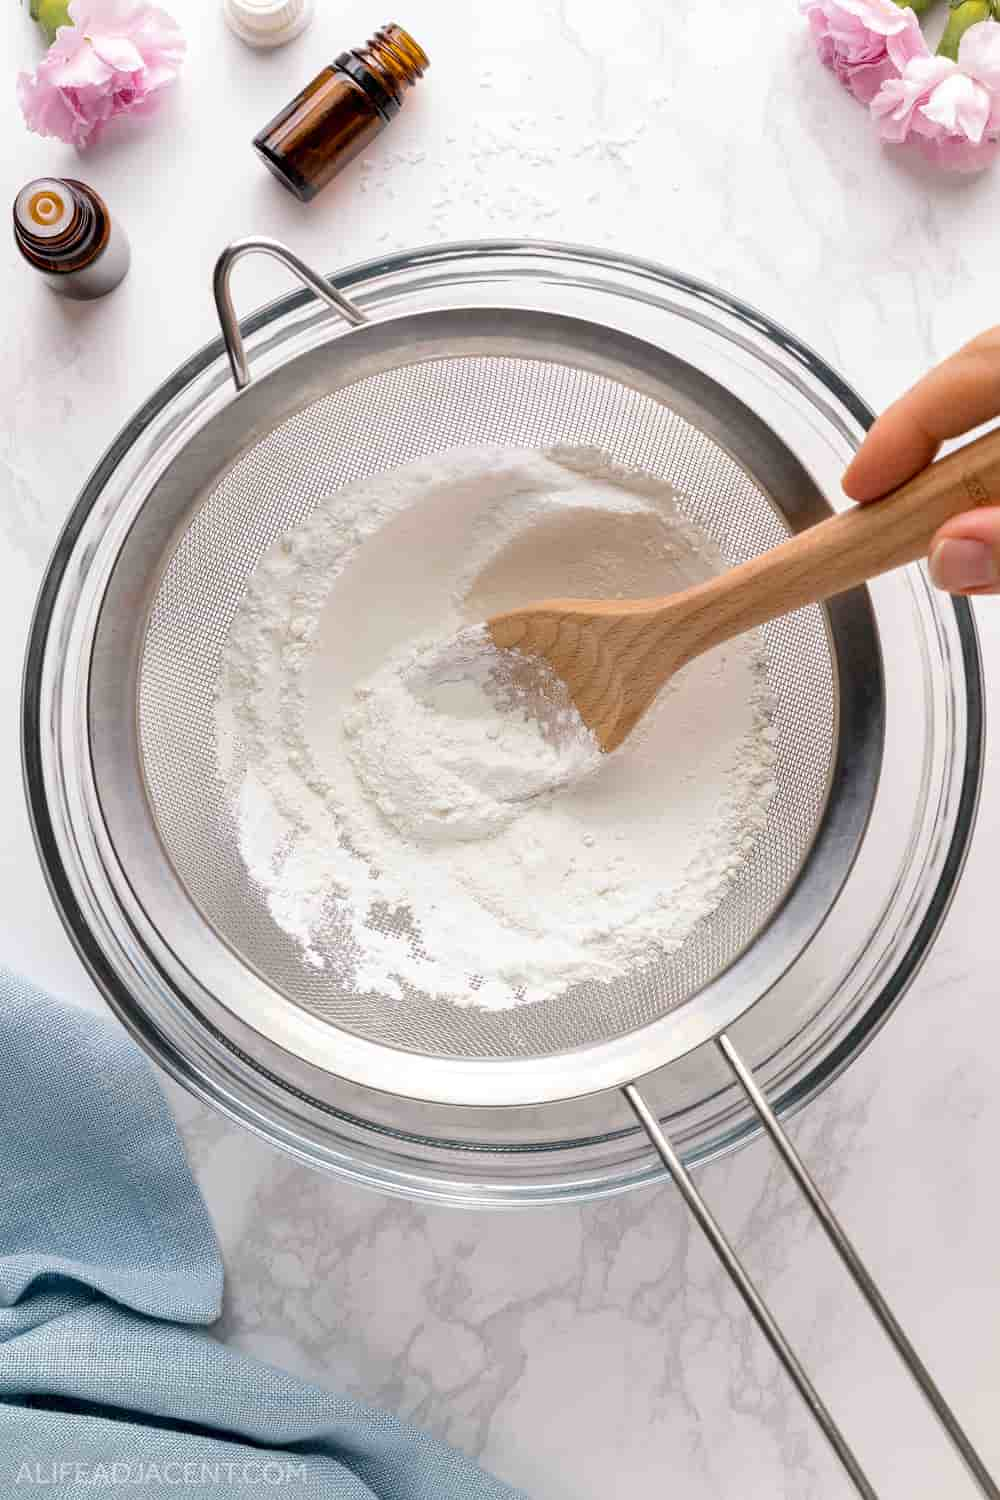
- Mix dry ingredients. In a large, non-metallic mixing bowl, sift all dry ingredients (except Epsom salt) for a uniform texture. Work gently as to not release too much dust into the air (you can also wear a mask to be safe). After sifting, stir carefully to evenly combine all ingredients. Use a wooden spoon or gloved hand – don’t use a whisk, as it creates dust.
Tips: If using a dry colorant (such as mica or pink beet powder), add it during this step. For coloring options, see the section on decorating shower steamers.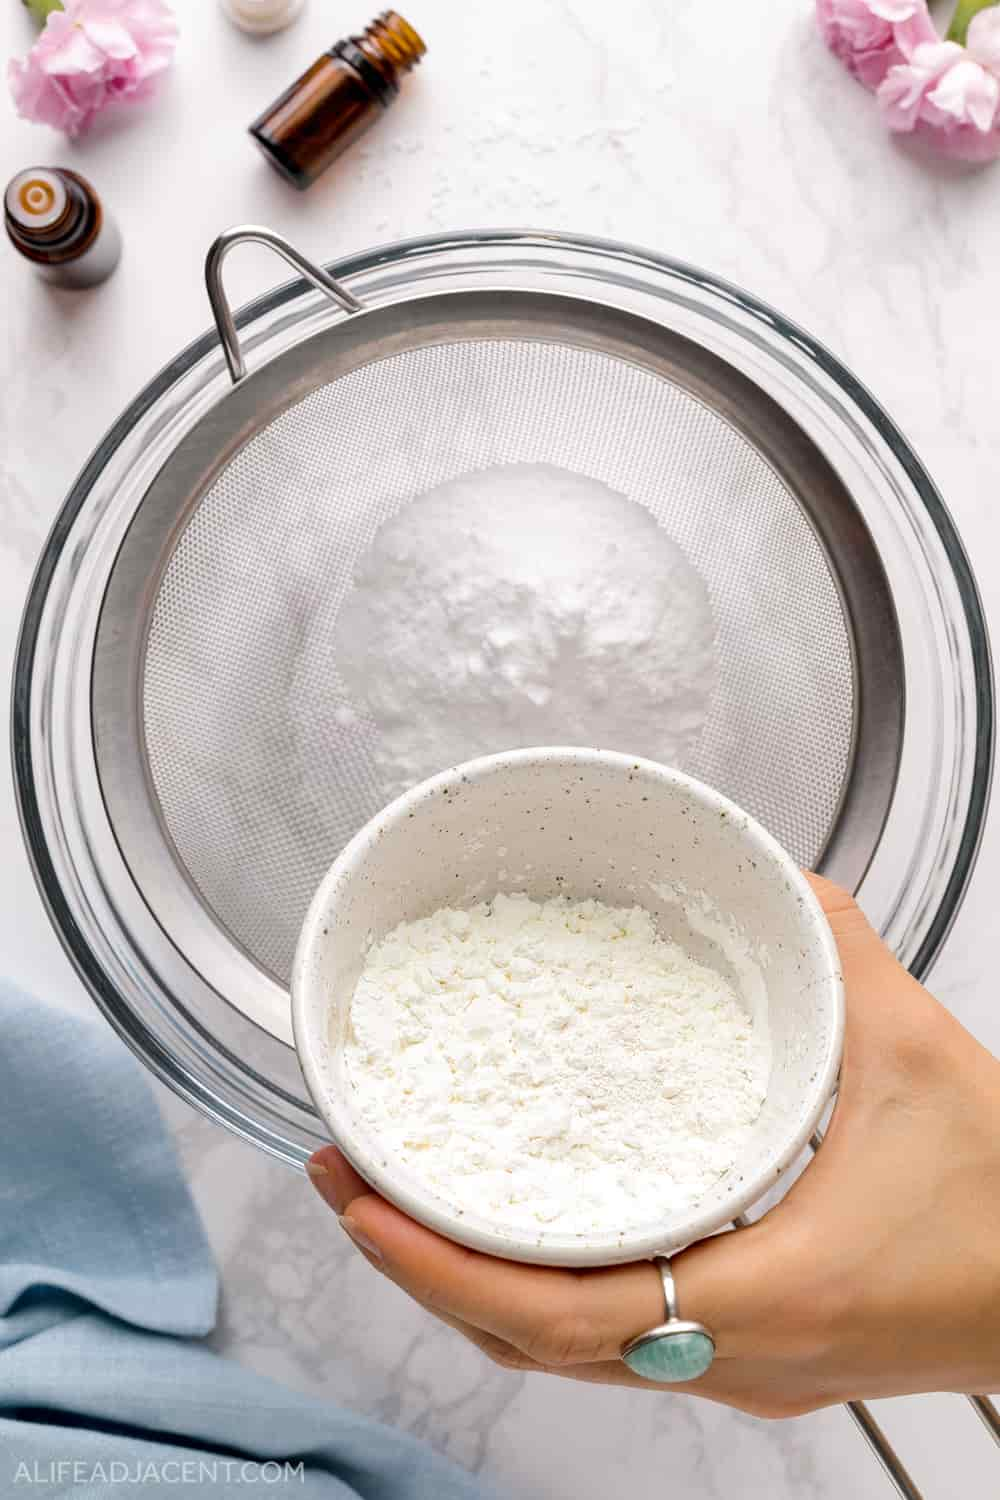
- Add liquid ingredients. Put on your gloves and prepare to work quickly. With one hand, slowly drizzle the emulsifier and coloring mixture into the dry ingredients. Don’t pour it in all at once – work in increments.
With the other hand, immediately begin kneading the liquid into the dry mixture. It will fizz slightly, but just keep mixing to control the reaction. Continue to knead until all of the liquid is incorporated. At this stage your mixture may be lumpy and slightly damp.
- Add essential oils. Add the essential oils to your shower steamers mixture and continue to knead until you achieve a uniform texture and color. Be sure to knead out any lumps or streaks of food coloring.
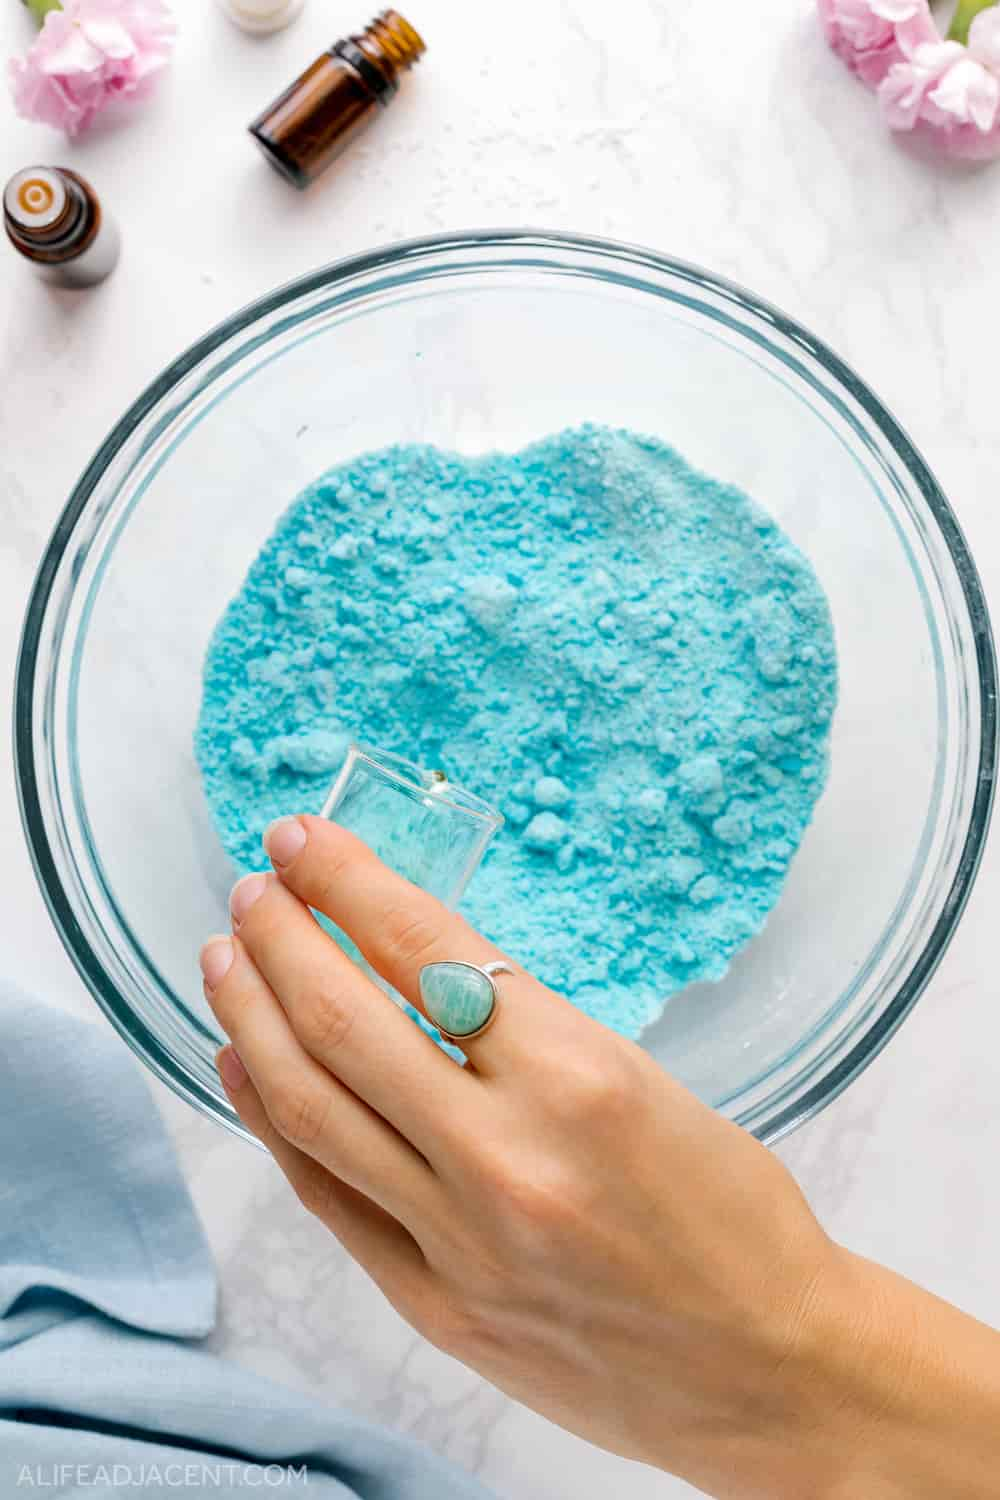
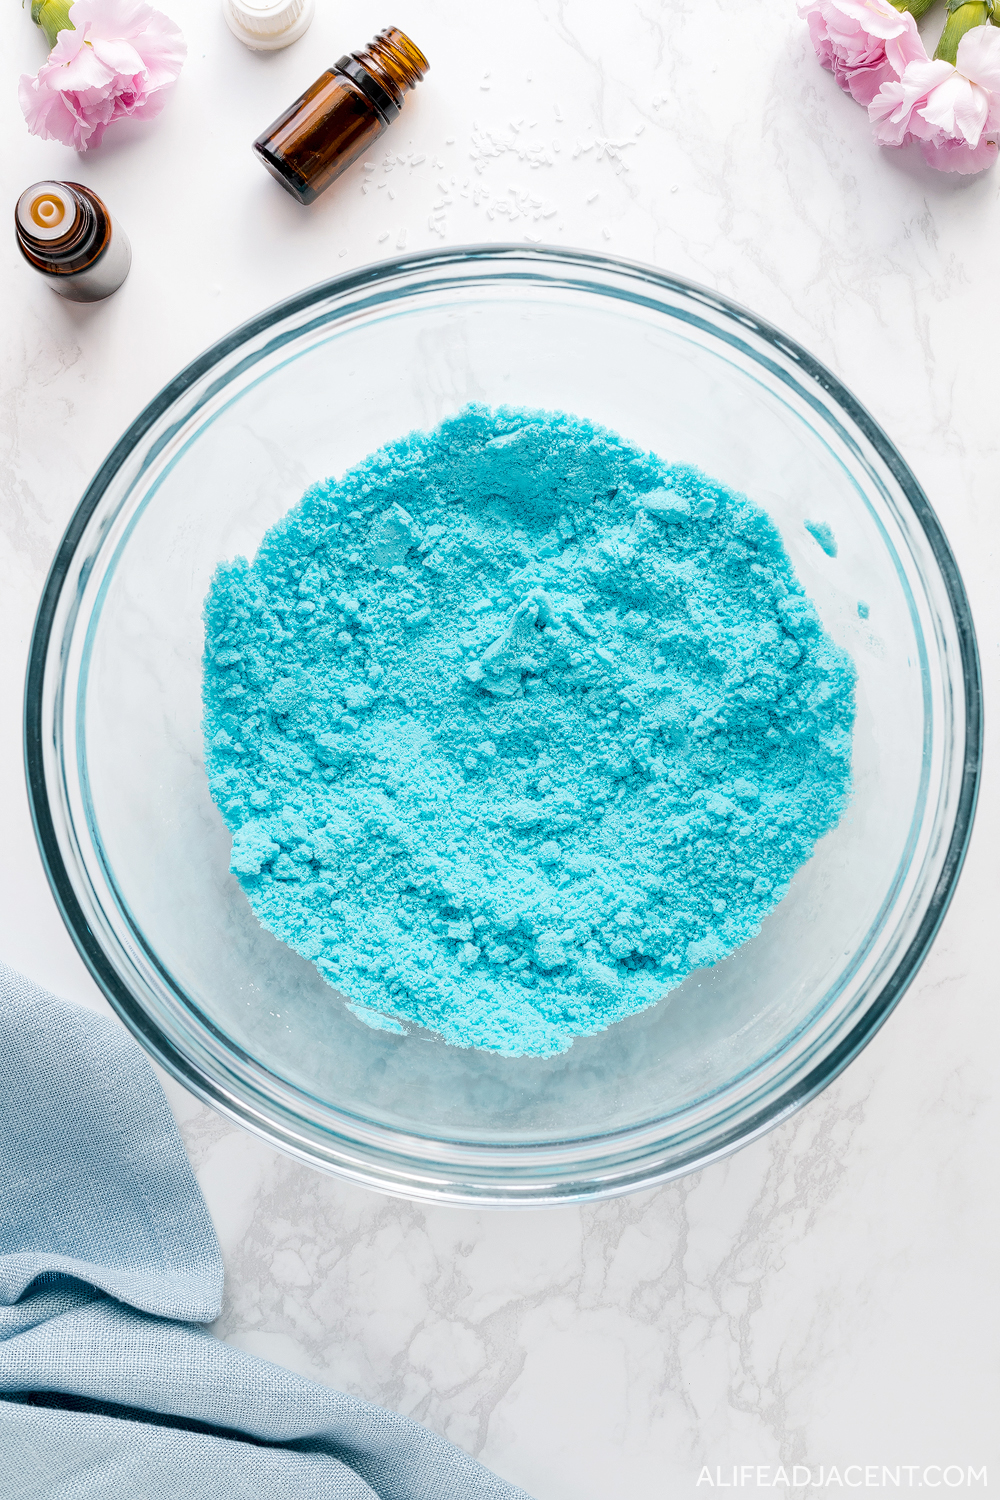
- Check texture. Take a small amount of dry mixture in your hands and squeeze it into a ball. It should form a moldable texture that sticks together.
If your mixture is too dry, pour a few drops of liquid (food coloring, water, witch hazel or alcohol) onto your gloved hand and quickly knead the moisture into the mixture. However, it’s better to err on the side of too dry than too wet. - Mold shower steamers. Take a small amount of mixture in your hands and press it into the mold cavity. Press carefully at first to anchor the decoration in the mold. Once it’s secure, you can press more firmly without worrying about disturbing your design.
Fill the entire mold cavity with the shower steamer mixture. Then, use a cup with a flat bottom to press down firmly on each cavity, using a back-and-forth twisting motion to smooth out the tops.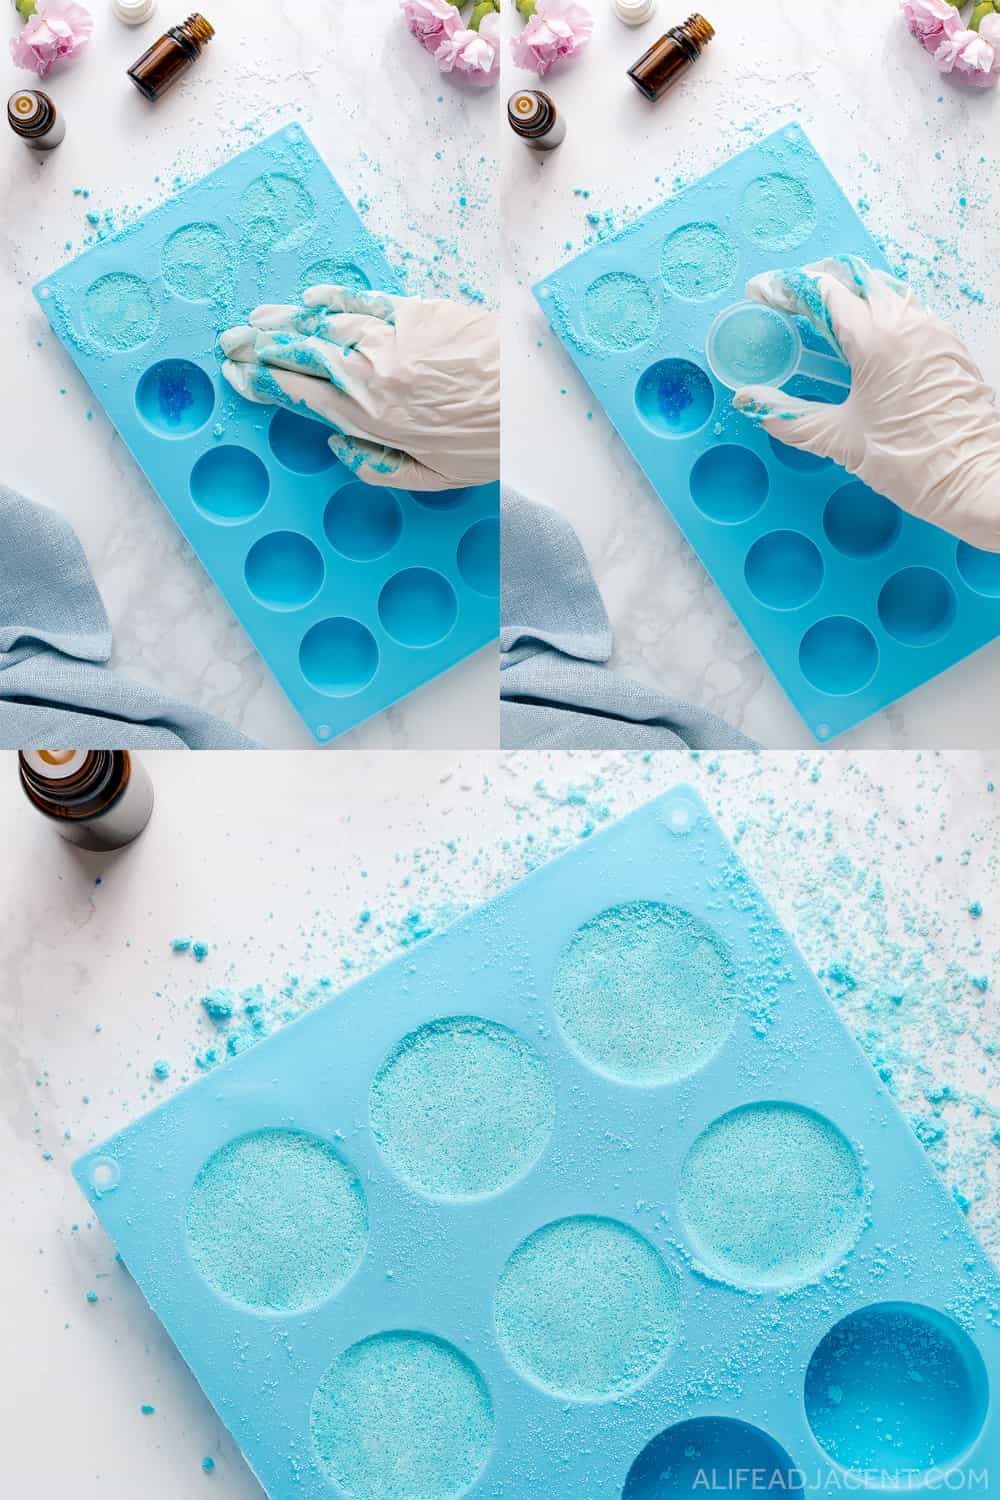
- Leave to dry. Once you’ve filled the mold, transport it to a safe, well-ventilated area where you can leave your tablets to dry undisturbed. Leave them in the mold for 2 days. (Except for Epsom salt shower bombs, which typically dry overnight.)
If you made one of the recipes without citric acid, or if you live in a humid area, leave them for an extra day. When they’re ready, the back of each tablet will feel hard and dry.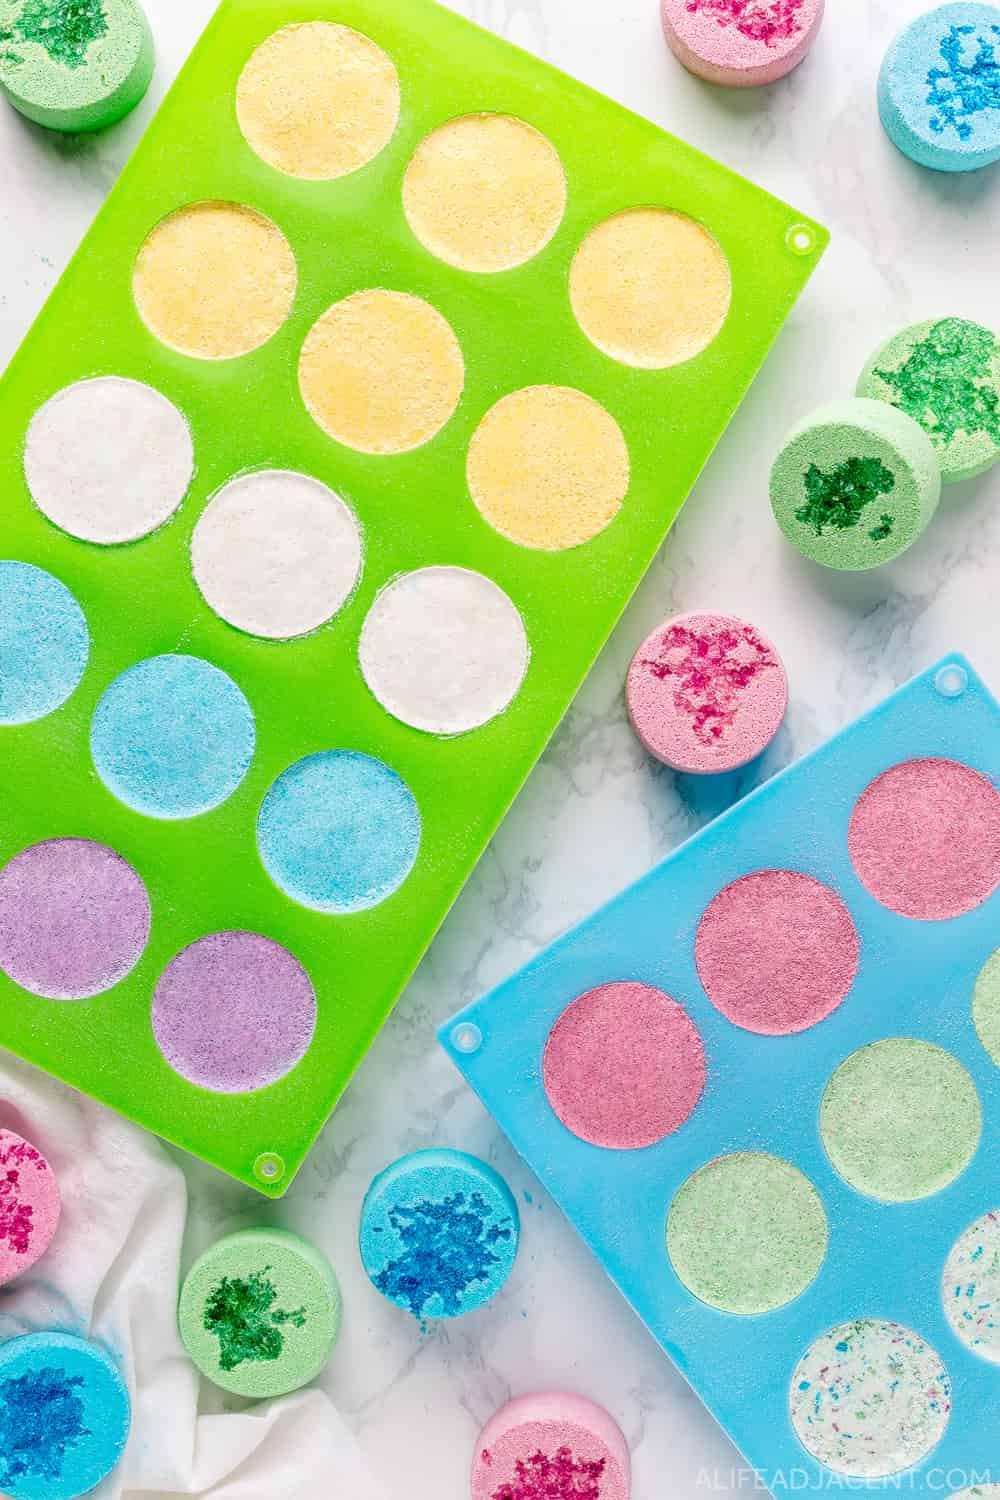
- Remove tablets from mold. Carefully unmold each shower steamer. If you used a silicone mold, use one hand to gently pull apart the silicone. With the other hand, gently push the bottom of the tablet out of the mold. For plastic molds, turn them upside down, and tap the tops gently until the tablets pop out.
- Dry again (optional). Carefully inspect the tablets to make sure they feel completely dry and firm. If you live in a humid climate, leave your tablets to dry on a plate for another day or two. If you’ll be gifting or selling steamers, you want to make sure they are completely dry.
- Wrap or package. Once dry, your DIY shower steamers are ready. Immediately wrap or package each tablet to protect it from moisture and fragrance loss. For tips, see the section on packaging ideas.
Quick Questions
Before you make shower steamers, here’s the basic info to know. If you still have more questions, below you’ll find a comprehensive guide with more tips, tricks, and troubleshooting instructions.
How much does each recipe make?
Each recipe makes 6 aromatherapy shower tablets, but this depends on the size of your mold. To make a larger batch, simply double the recipe. For volume measuring, please tightly pack all ingredients.
How strong do they smell?
These homemade shower steamers are very strongly scented, so please work in a well-ventilated area. You can find essential oil blends below, plus tips for the best scent.
How long do shower steamers last?
Each shower steamer will last approximately 15-30 mins in the shower.
But this also depends on other factors, such as which recipe you make, where your tablet is placed in the shower, and how wet it gets.
What’s the shelf life?
DIY shower steamers will last 6 months to a year when stored properly. For maximum freshness, store them in an airtight jar in a cool, dark place.
See the FAQ section for detailed storage instructions and packaging tips.
What does the emulsifier do?
Emulsifiers are commonly used in professional bath bombs and store-bought shower tablets. They act like “glue,” creating hard, high-quality shower steamers that don’t crumble.
Emulsifiers also buffer liquids, preventing the dry mixture from fizzing too soon. Finally, an emulsifier also stops essential oils from evaporating, ensuring a stronger scent and long-lasting aromatherapy.
I tested a variety of natural liquid emulsifiers and provided the best options below.
Which emulsifier is best?
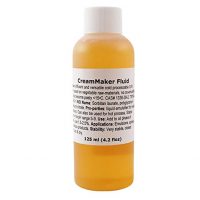
You can use any of these natural liquid emulsifiers: CreamMaker FLUID, polyglyceryl oleate, sorbitan oleate, or CreamMaker ANIO.
For more info, you can read more about emulsifiers and natural Polysorbate alternatives in the FAQ.
Do shower tablets need an emulsifier?
It’s best to use an emulsifier for the benefits mentioned above. However, I understand that these specialty ingredients are not accessible to everyone, so I also wanted to offer an economical alternative.
In 2 out of the 4 shower steamer recipes, you can substitute castor oil for the emulsifier. You can also use half emulsifier and half castor oil, which helps keep costs down.
Please note that you cannot use castor oil as a substitute in the Epsom salt shower tablets or the recipe without citric acid.
Do I need water to make shower steamers?
No, a small amount of liquid food coloring provides enough moisture to mold each aromatherapy tablet. However, it also depends on your home’s temperature and humidity level.
To be prepared, you can keep a small amount (about 2.5ml, or half a teaspoon) of liquid at your workspace. This can be water, witch hazel, or alcohol such as high-proof vodka. You’ll only need it if you find that your mixture is too dry and won’t stick together.
What if I don’t have food coloring?
If you don’t have natural food coloring, you can simply replace it with plain liquid: water, witch hazel, or alcohol. For other natural colorant options besides food coloring, see the decorating guide.
Shower Steamer Essential Oil Blends
Here are some basic essential oil blends of shower aromatherapy. Most contain a mixture of top note and base note essential oils (fixatives), which helps create long-lasting, strong smelling shower tablets.
But DIY shower steamers are highly customizable, so you can also use any essential oil blend you’d like!
Sleep and Relax
60 drops Bulgarian lavender essential oil
40 drops sweet orange essential oil
20 drops copaiba oleoresin
This sleep-inducing scent is perfect for bedtime showers. If you dislike lavender shower steamers, replace lavender with ylang-ylang or chamomile.
Meditation and Relaxation
60 drops ho wood essential oil
60 drops sweet orange essential oil
Transport your mind into a meditative state with this sweet-smelling aromatherapy blend.
Headache and Migraine
120 drops peppermint supreme essential oil
Headaches are bad enough, but a migraine is a more complex situation that may be worsened by certain essential oils.
Aromatherapy can’t stop a severe migraine, but it can offer some temporary relief. During my mom’s migraine attacks, peppermint oil is the only essential oil she can tolerate.
You can also add menthol crystals to shower steamers for headaches, as menthol’s strong scent can also help alleviate pain.
Congestion and Sinus
50 drops eucalyptus or rosemary essential oil
50 drops peppermint essential oil
20 drops cedarwood essential oil
This soothing blend makes excellent shower melts for colds and congestion relief.
Wake Up and Focus
50 drops blood orange essential oil
30 drops grapefruit essential oil
30 drops lime essential oil
20 drops amyris essential oil
This uplifting and citrusy blend has a topical vibe that wakes you up and leaves you feeling refreshed.
Allergy Relief
60 drops blue tansy essential oil
30 drops lemongrass essential oil
30 drops cedarwood essential oil
These allergy shower bombs contain essential oils with antihistamine properties, which may help relieve allergy symptoms and irritated sinuses.
Energy Cleansing
60 drops sage essential oil
35 drops ho wood essential oil
25 drops bay leaf essential oil
This blend of sacred herb essential oils helps cleanse your aura in the shower.
DIY Shower Steamers Recipes
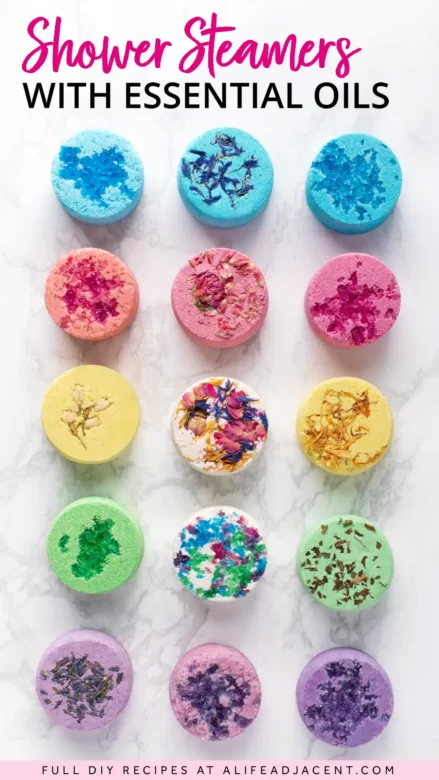
Learn how to make DIY shower steamers with essential oils! Choose from 4 easy shower steamer recipes, including Epsom salt shower fizzies and a recipe without citric acid. Also includes 8 essential oil blends for shower aromatherapy.
Materials
Aromatherapy Shower Steamers Recipe
- 1/4 cup baking soda
- 1/4 cup citric acid
- 3 tbsp corn starch or arrowroot starch
- 1 tbsp kaolin clay
- 15ml / 1 tbsp natural liquid emulsifier or castor oil
- 1 tsp / 5ml natural liquid food coloring
- 5ml / 120 drops essential oils
DIY Shower Steamers with Epsom Salt
- 1/4 cup baking soda
- 1/4 cup citric acid
- 1/4 cup Epsom salts
- 15ml / 1 tbsp natural liquid emulsifier
- 1ml natural liquid food coloring
- 5ml / 120 drops essential oils
DIY Shower Steamers without Citric Acid
- 1/4 cup baking soda
- 1/4 cup cream of tartar
- 1/4 cup Epsom salt
- 1 tbsp natural liquid emulsifier
- 2ml natural liquid food coloring
- 5ml / 120 drops essential oils
DIY Shower Steamers with Cream of Tartar
- 1/4 cup baking soda
- 1/4 cup citric acid
- 2 tbsp corn starch or arrowroot starch
- 2 tbsp cream of tartar
- 1 tbsp natural liquid emulsifier or castor oil
- 1 tsp / 5ml natural liquid food coloring
- 5ml / 120 drops essential oils
Tools
- Shower steamer tablet mold
- Large mixing bowl
- Measuring cups
- Sieve for even texture
- Small beakers
- Small spatula for mixing
- Plastic scoop or measuring cup for smoothing
- Gloves for protection
- Mask to protect face
Instructions
- Prepare the mold. Before you begin, prepare your shower steamer mold with your desired decoration, such as dried flowers, botanicals, or Epsom salt glitter (tutorial below).
Tip: Place your mold on a cutting board for easy transport later. - Prepare liquid ingredients. You'll need 3 small beakers or containers to measure each liquid ingredient. Add your essential oil blend to one beaker. In another, measure the liquid food coloring.
In the last beaker, pour in the emulsifier (or castor oil). Then, pour the food coloring into the same beaker. Mix vigorously to suspend the liquid in the oil. (This creates a buffer that helps protect the dry mixture from fizzing.) Set all beakers aside. - Mix dry ingredients. In a large, non-metallic mixing bowl, sift all dry shower steamer ingredients (except Epsom salt) for a uniform texture. Work gently as to not release too much dust into the air (you can also wear a mask to be safe). After sifting, stir carefully to evenly combine all ingredients. Use a wooden spoon or gloved hand – don't use a whisk, as it creates dust.
Tip: If using a dry colorant (such as mica or pink beet powder), add it during this step. For coloring options, see the section on how to decorate shower tablets. - Add liquid ingredients. Put on your gloves and prepare to work quickly. With one hand, slowly drizzle the emulsifier/colorant mixture into the dry ingredients. (Don't pour it in all at once – work in increments.) With the other hand, immediately begin whisking and kneading the liquid into the dry mixture. It will fizz slightly – just keep mixing to control the reaction. Continue to knead until all of the liquid is incorporated.
- Add essential oils. At this stage your shower steamers mixture may be lumpy and slightly damp. Add the essential oils and continue to knead until you achieve a uniform texture and color. Be sure to knead out any lumps or streaks of food coloring.
Tip: See the section on essential oil blends below. - Check texture. Take a small amount of dry mixture in your hands and squeeze it into a ball. It should form a moldable texture that sticks together.
Tip: If your mixture is too dry, you can pour a few drops of liquid (food coloring, water, witch hazel or alcohol) onto your gloved hand and quickly knead the moisture into the mixture. However, it's better to err on the side of too dry than too wet. - Fill the mold. Take a small amount of mixture in your hands and press it into the mold cavity. Press carefully at first to anchor your decoration in the mold. Once it's secure, you can press more firmly without worrying about disturbing your design.
Fill the entire mold cavity with the shower steamer mixture. Then, use a cup with a flat bottom to press down firmly on each cavity, using a back-and-forth twisting motion to smooth out the tops. - Leave to dry. Once you've filled the mold, transport it to a safe, well-ventilated area where you can leave your shower steamer tablets to dry undisturbed. Leave them in the mold for 2 days. (Except for Epsom salt shower bombs, which typically dry overnight.)
If you made one of the recipes without citric acid, or if you live in a humid area, leave them for an extra day. When they’re ready, the back of each tablet will feel hard and dry. - Unmold shower tablets. Carefully unmold your DIY shower steamers. If you used a silicone mold, use one hand to gently pull apart the silicone. With the other hand, gently push the bottom of the tablet out of the mold. For plastic molds, turn them upside down, and tap the tops gently until the tablets pop out.
- Dry again (optional). Carefully inspect the tablets to make sure they feel completely dry and firm. If you live in a humid climate, leave your tablets to dry on a plate for another day or two. If you’ll be gifting or selling shower steamers, you want to make sure they are completely dry.
- Wrap and package. Once dry, immediately wrap or package each tablet. For tips, see the section on packaging ideas.
Notes
- Each recipe makes 6 aromatherapy shower tablets, but this depends on the size of your mold. Simply double the recipe to make a larger batch.
- For maximum freshness, store DIY shower steamers in an airtight jar and use within 6 months to a year.
- See the article above for essential oil blends and tips for the strongest scent.
- Consult the FAQ section for detailed storage instructions, packaging tips, and tricks for foolproof DIY shower steamers.
- Check out the decorating guide for tips on the best molds, colorants and decoration options. It also includes a tutorial for colored Epsom salt glitter for a sparkly effect.
Recommended Products
As an Amazon Associate and member of other affiliate programs, we earn from qualifying purchases.


How to use shower steamers
To use a shower steamer, place it in an area of your shower where it will get just wet enough to fizz (but not under the direct stream).
Splash a small amount of water onto the tablet to activate it and release the essential oils. Repeat as needed, or if the tablet begins to fizzle out.
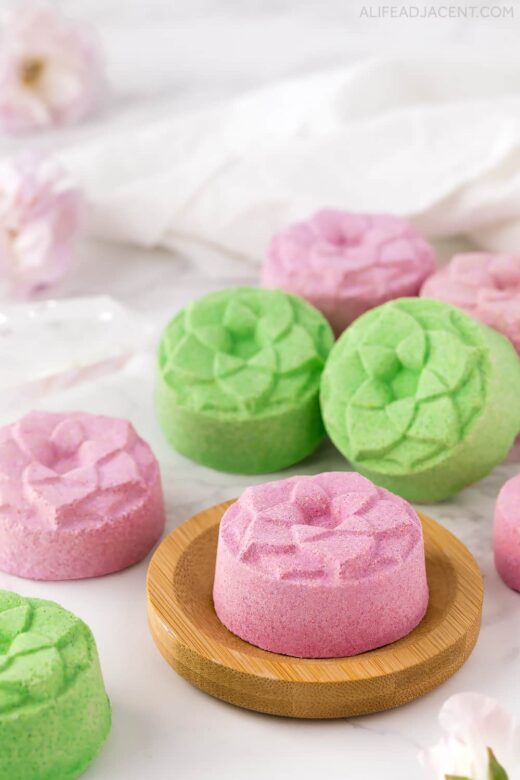
Where should you place a shower steamer? You can place it on the corner of the shower floor, on a caddy or shelf, or in a small soap dish. There are shower steamer trays made specifically for this purpose, like the bamboo tray pictured.
You can also place a steamer in a reusable cotton muslin or mesh bag and hang it from your shower head. The closer it is to your head, the faster the aromatherapy vapor reaches your nostrils.
But you don’t have to take a shower to use a steamer. You can also place one on the edge of a sink to enjoy aromatherapy while you’re washing your face, brushing your teeth, or doing dishes.
As a quick alternative to an essential oil diffuser, you can also drop a tablet in a bowl of water to freshen the air in a room.
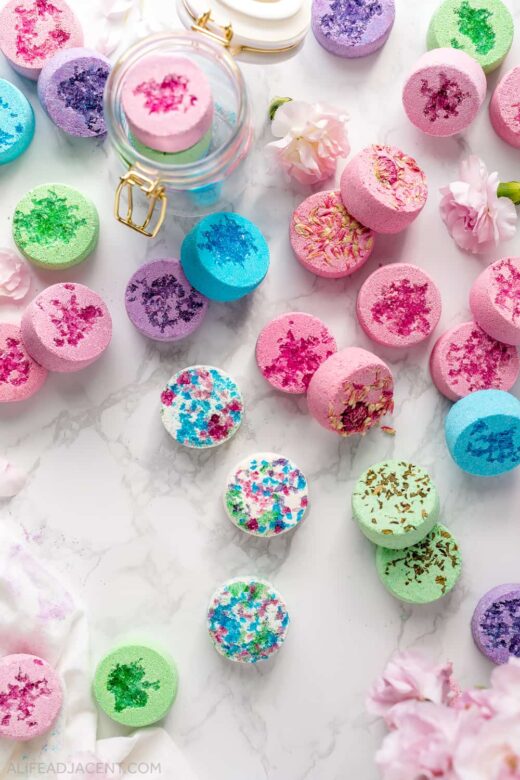
🌈 DIY Shower Steamers Decorating Guide
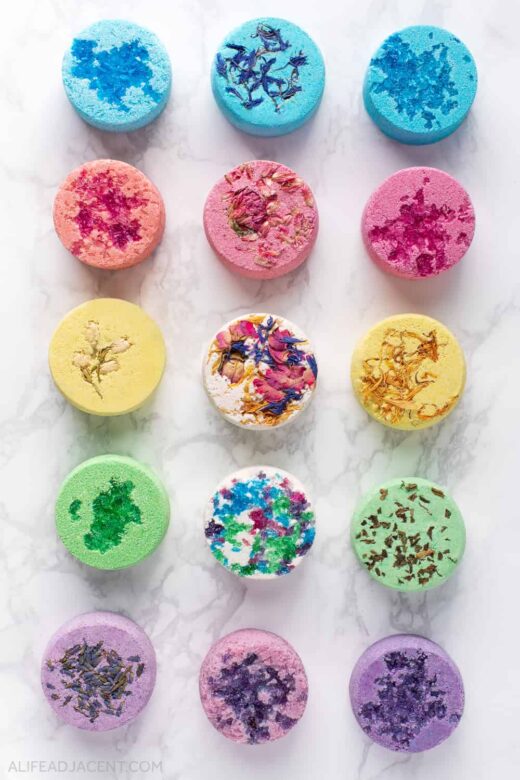
From botanicals, to Epsom salt glitter, to a rainbow of natural colorants, there are many ways to adorn your shower melts. Below you’ll find decorating tips, molds, and a tutorial for shiny Epsom salt glitter.
How to color shower steamers
A few things to consider when choosing a colorant:
- If you use liquid coloring, you won’t need any extra liquid to mold your shower steamers. But you’ll need to mix well to prevent streaks. Depending on the product used, liquid colors may become splotchy over time.
- Of the powdered colorants, mica powder and clay create the most uniform colors. Natural colorants like beet or butterfly pea powder may leave small particles of plant matter in your steamers, but this is to be expected with natural materials.
- To color shower tablets with powdered colorants, add a few teaspoons to your dry mixture and adjust as needed. For liquid colorants, mix it with your castor oil or emulsifier as a buffer.
Natural colorants
- Natural food coloring. You can find food coloring in a rainbow of natural colors made from plant-based pigments like beet, spirulina, spinach, turmeric, and butterfly pea.
- Powdered food coloring. Brightly colored food or spice powders make lovely colorants, and natural food coloring powders for baking also work well in shower steamers.
- Clay. You can also replace white kaolin clay with colored clay. Just keep in mind that clay is unpredictable, and tends to darken or change color on contact with essential oils.
How to create natural colors
- Red or pink: Dragonfruit powder (pitaya), red beet powder, pink beet powder, rose petal powder, rosehip extract, raspberry powder, fuscia hibiscus powder, prickly pear powder, red radish powder, French pink clay, rose clay
- Blue: Blue spirulina powder (blue algae), indigo powder, Cambrian blue clay
- Purple: Butterfly pea powder (blue matcha), blueberry powder, purple sweet potato powder (taro), açai berry powder, red cabbage powder, black carrot powder, elderberry powder, purple corn powder, Brazilian purple clay
- Green: Green spirulina powder, spinach powder, matcha powder (ceremonial matcha gives the brightest green), pandan leaf powder, French green clay
- Yellow or orange: Turmeric powder, marigold extract, annatto powder, yam powder, safflower powder, carrot powder, goldenberry powder
Non-natural colorants
- Mica. Mica powder is a common colorant, but it’s not without issues. It’s not 100% natural and may be contaminated with heavy metals. Mica also carries major environmental and ethical concerns, so if you’re going to use it, please source cruelty-free mica.
- Soap coloring. Liquid soap coloring or bath bomb coloring is made specifically for bath and body products, so it works well in shower steamers.
- Food coloring. Generic food coloring works just as well as soap coloring.
How to decorate shower steamers
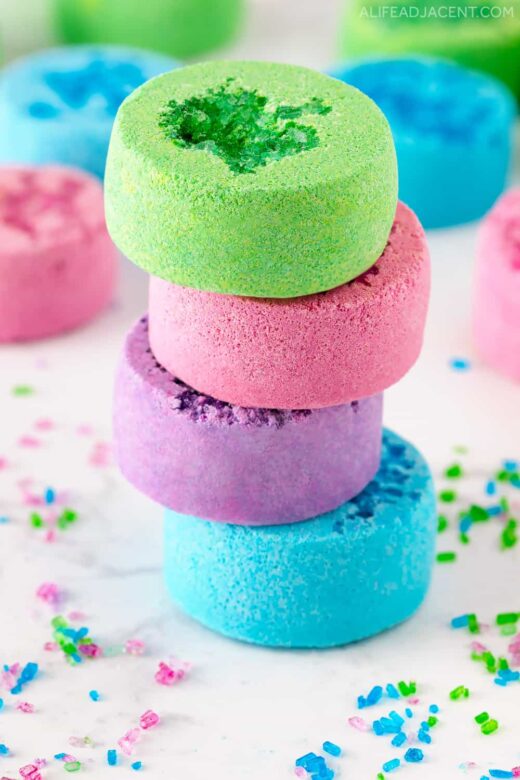
Options for decoration include:
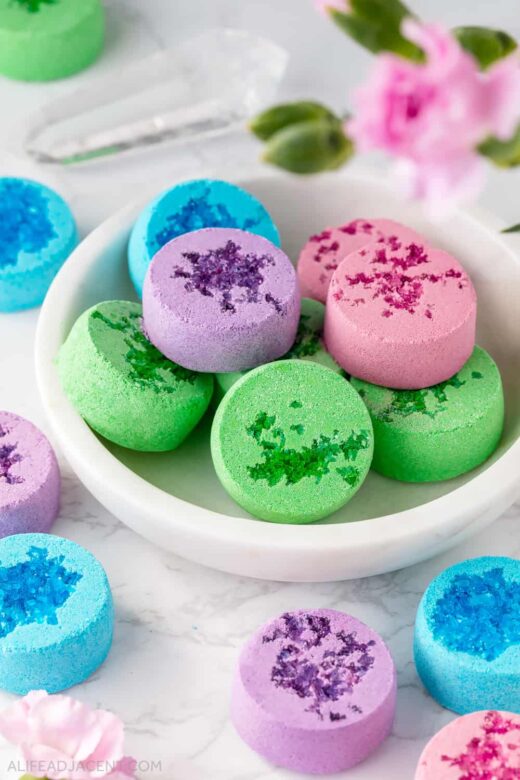
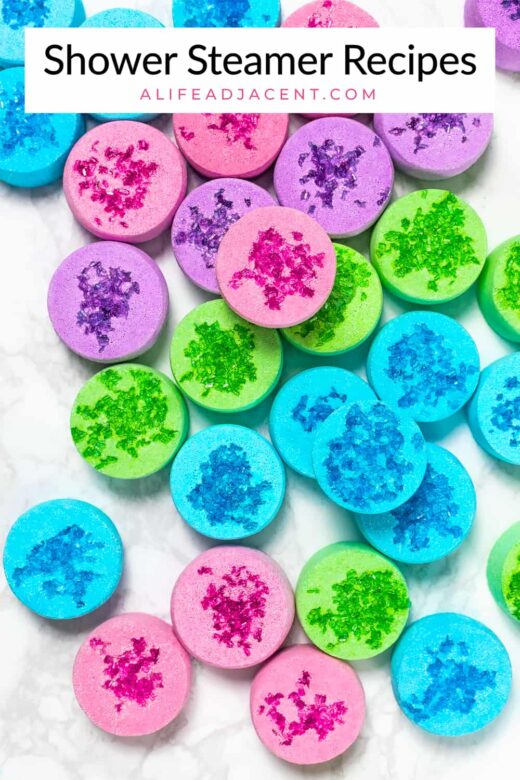
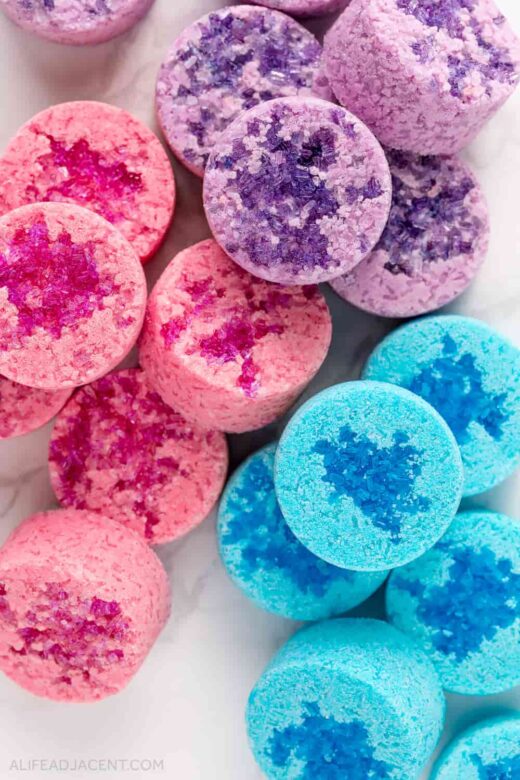
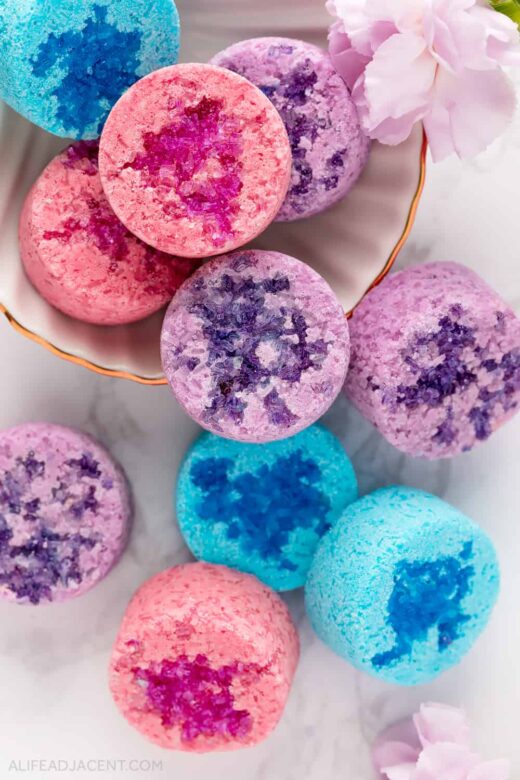
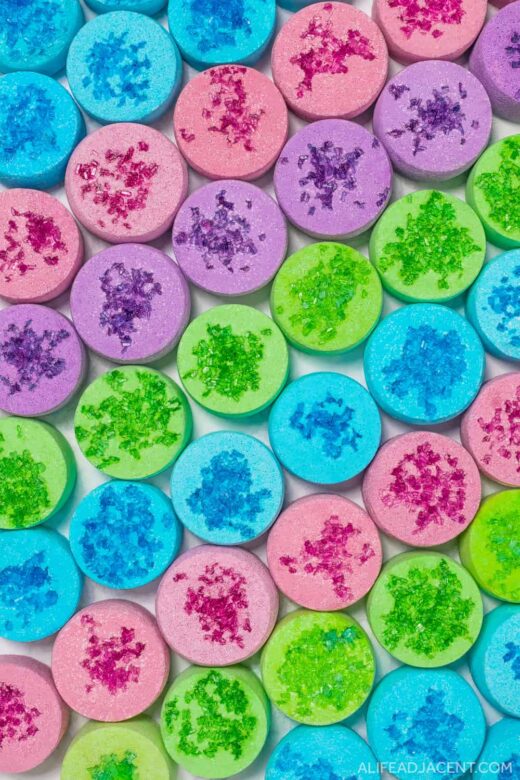
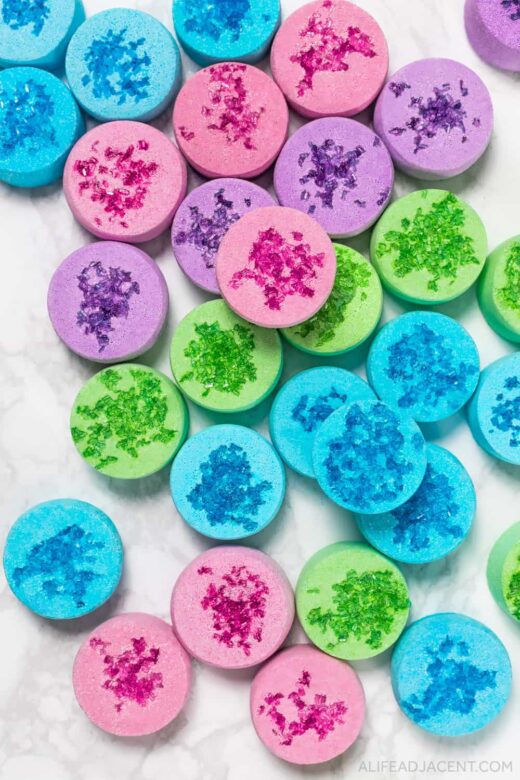
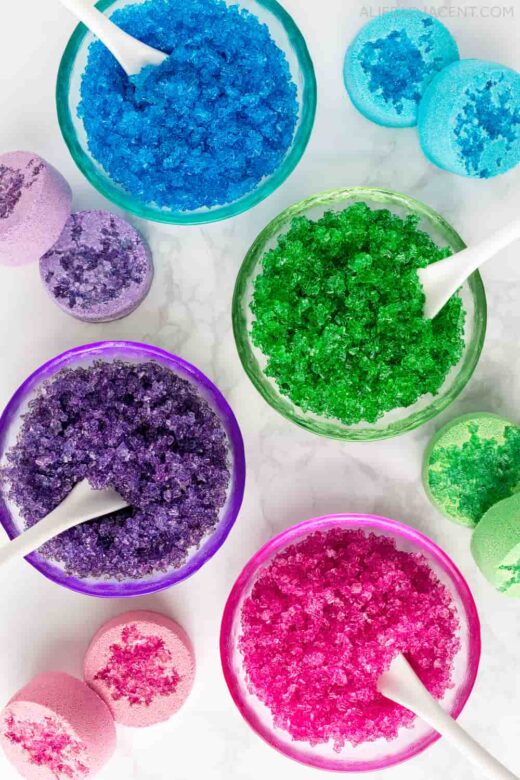
- Colored Epsom salt. Use a single color for a sparkly geode effect, or multiple for colorful confetti. When confetti shower bombs fizz, it creates a rainbow volcano.
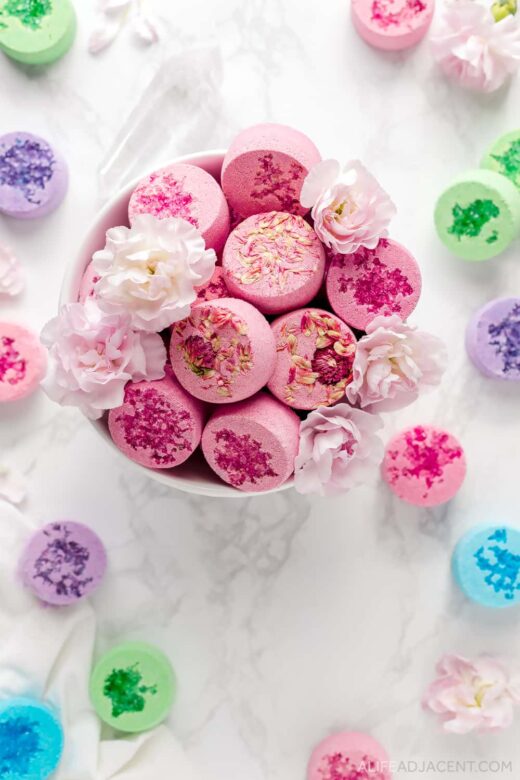
- Dried botanicals. Dried herbs or flower petals make beautiful natural decorations for botanical shower steamers. Ideas include peppermint leaves, pretty pink globe amaranth, rose petals, lavender buds, jasmine flowers, calendula, or cornflower petals.
- Dried citrus. Dried orange slices or fruit rind such as lime or lemon peel are perfect for citrus-scented shower tablets.
- Himalayan pink salt. Himalayan shower salt rocks are popular, and you can harness its benefits by decorating your shower steamers with naturally colored pink Himalayan salts.
- Mica paint. If you’re feeling creative, you can use mica mixed with a tiny bit of alcohol to paint or drizzle a unique design onto the top of each tablet. Check out these handmade steamers for examples.
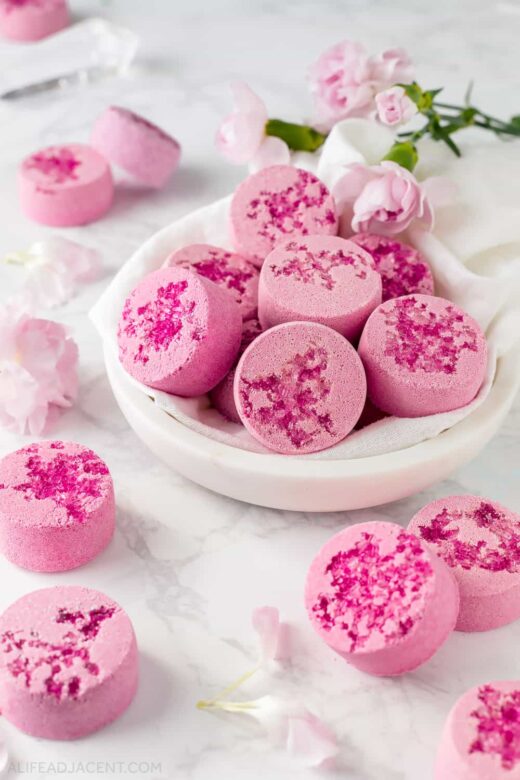
Epsom salt glitter
Here’s an easy tutorial to recreate the sparkly, crystallized look of the homemade shower steamers pictured.
You’ll need:
2 tbsp Epsom salt
1 tsp castor oil
20 drops food coloring (or as desired)
Castor oil’s sticky texture gives Epsom salt a glistening, shimmery finish. It also acts as a barrier that stops the food colouring from eroding the salt (and ruining the shine).
If you don’t have food coloring, you can also use a powdered colorant such as mica, but your salts won’t be as shiny.
How to make Epsom salt glitter
- Combine Epsom salts with castor oil and mix well until evenly coated. The salts will be very oily – this is normal, and it will dry to a lacquered finish.
- Once the salt is coated with oil, add food coloring a few drops at a time and mix well to ensure even distribution. Continue until you achieve your desired color.
- Spread out the salts and leave them to dry overnight. The next day, use a spoon to break apart any hardened clumps.
- Spoon a small amount of colored Epsom salts into each mold cavity. To avoid cracked or jagged edges, keep the Epsom salts away from the edges of each tablet. Place a small amount of salts in the middle of each cavity to give each tablet a crystal geode-like look.
- Once you’ve arranged the Epsom salt decoration, you can move on to making your shower steamers.
Best shower steamer molds
Theoretically, you can make shower tablets in any mold you have on hand – they’ll work in any size and shape. But these are some of the easiest options to use.
Silicone molds
Silicone molds are a popular choice for DIY shower steamers. They’re inexpensive and simple to use, and the tablets pop out very easily.
Plus, they come in all shapes and sizes, from small tablet molds to larger pucks or discs, which may last multiple showers.
For best results, silicone tablet molds should be somewhat thick but still flexible. Thin, flimsy molds allow tablets to “bust out” at the sides, which can create bloated-looking tablets instead of nice, uniform circles.
I used 2 different molds to create 1.5 inch and 1.57 inch round tablets. Be mindful of quality and check your molds on arrival, because I’ve seen sellers suddenly change a product or switch to a cheaper quality silicone.
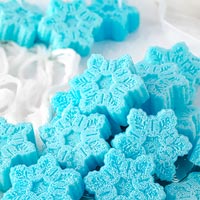
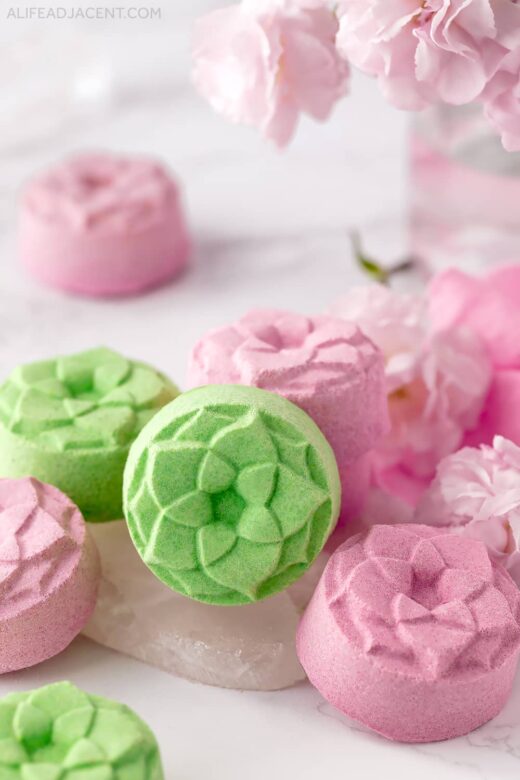
Plastic molds
Plastic molds are another popular choice, but they’re not quite as durable or easy to use. I used a plastic lotus mold to make the flower shower tablets, but they also come in a variety of shapes, sizes, and patterns.
Press molds
You can also use a press mold. A disc shaped press works well for shower steamers – look for a shampoo bar mold, bath bomb puck mold, or disc mold.
Sphere mold
If you’d prefer spherical shower bombs that look like bath bombs, you can also use a mini sphere mold. These tiny 1.75″ molds would make perfect mini shower tablets.
Bath bomb press
A handheld bath bomb press or stamp allows you to create shower fizzies with more intricate patterns.
Many press molds are made specifically for bath bombs, but you can also use a mooncake press. However, this is by far the most time consuming and more difficult method to use.
How to package shower tablets
Whether you’re making shower steamers to sell, for homemade gifts, or for your own use, it’s important to package them properly. Proper storage protects them from moisture, maintains their freshness, and keeps the scent strong.
For best results, store homemade shower steamers in an airtight jar in a cool, dark place. It’s fine to store them in the bathroom, but keep them in the cupboard under your sink, and keep the jar tightly sealed.
For best results, wrap each shower tablet individually before packaging it. You can use plastic cling wrap or opt for recyclable brown paper as a more eco-friendly option.
Beeswax wrap is another excellent zero-waste choice, as the wax helps create a seal that protects your shower steamers scent. Cut larger sheets of beeswax wrap to fit each steamer.
For gifting, place a couple wrapped tablets in a small mason jar, cotton muslin bag, or gift box.
❓ FAQ: Frequently Asked Questions and Troubleshooting
My shower steamers are expanding – what do I do?
If your steamers are expanding in the mixing bowl, you’ve added too much liquid and activated the fizzing reaction.
It’s crucial to do damage control before the reaction gets out of hand – the more your tablets fizz in the bowl, the less fizzing power they’ll have in the shower.
To fix expanding shower steamers, quickly add more Epsom salt, corn starch, or clay. Don’t add fizzing ingredients like baking soda or citric acid, as this will only add more fuel to the fizz.
Once you get the reaction under control, you’ll want to add more of the other ingredients to compensate.
So if you add a tablespoon of Epsom salts to stop the fizzing, you should add more baking soda, citric acid, and emulsifier in the right ratio. Also, add more essential oil to replace any that was vaporized.
What if my shower tablets are expanding in the mold?
With the right moisture balance, your tablets should not expand or fizz. But if they do start rising slightly, don’t panic – a little expansion is easily fixable.
If your shower tablets start to rise in the mold, use a small measuring cup or plastic scoop to press the tops down. Repeat until the expanding stops and your tablets stay flat.
It will stop eventually, especially if your shower steamers contain Epsom salt or clay, which harden quickly.
However, if they’re rising like muffins in the oven, you have a bigger problem on your hands. You can use the method above, but in the end, you may end up with shower steamers that don’t work.
If you “burn out” their fizzing power too soon, they won’t fizz by the time you go to use them in the shower. In this case, unfortunately it’s best to just try again with a new batch.
Ideally, you should check before molding to make sure your mixture isn’t too wet. Before you mold, squeeze a ball of the mixture in your hand. If it expands, you know you have a problem you need to fix.
Why are my shower steamers crumbling?
Have you ever made beautiful shower tablets, only to find that they crumble at the slightest touch?
Your shower steamers may crumble for a few reasons:
- Too wet. Cold temperatures, high humidity, and inadequate drying time can cause soggy, crumbling tablets. To combat this, try the shower steamers recipes with moisture-absorbing, hardening ingredients such as Epsom salt and clay.
- Too dry. Often, shower bombs may crumble if they don’t contain enough moisture, essential oils, or liquid binders to hold the dry ingredients together. These recipes are formulated to combat this issue.
- Too soft. Soft shower steamers are another common issue, likely caused by a lack of hardening ingredients. In particular, recipes without citric acid tend not to dry as hard. The best way to harden shower bombs is with Epsom salt.
Why are my shower steamers cracking?
Cracking is a separate issue from crumbling, often with two conflicting causes.
DIY shower steamers may crack if they are too wet – the expansion and subsequent drying can leave visible cracks in the finished tablets.
However, your tablets may also crack if they’re too dry. If you have dry air and use too many drying ingredients (such as clay), you may end up with shower steamers that dry out too much.
Why are my shower steamers sticky?
Sticky shower steamers are caused by too much humidity, too much emulsifier, and not enough moisture-absorbing ingredients to compensate.
Baking soda, citric acid, and liquid emulsifiers are hygroscopic, meaning they absorb moisture from the air. Emulsifiers in particular are formulated to bind water. So unless a shower steamer recipe includes ingredients to absorb excess moisture, you may end up with a sticky feel.
To prevent stickiness, it’s crucial to add moisture-absorbing ingredients such as corn starch, clay, or Epsom salt to offset humidity.
Can you make shower bombs in high humidity?
You can still make shower fizzies even if you live in high humidity. Tips for best results:
- Wrap and package your shower tablets promptly after they dry. This prevents them from becoming soft or sticky, and absorbing too much moisture.
- If you live in a humid area where crumbling is an issue, quick-drying Epsom salt shower bombs may work best for you.
- If your steamers don’t seem to dry, make them with clay next time.
To dry shower steamers faster, you can:
- Place them in a room with a dehumidifier or place them directly in front of a fan.
- Sprinkle dry rice or silica packets around the mold to absorb moisture from the air.
Why do my shower steamers have no smell?
If your DIY shower steamers don’t smell like anything, you likely didn’t add enough essential oils, didn’t account for evaporation, or didn’t include an ingredient to anchor the fragrance.
Luckily, this shouldn’t happen with these recipes, as they contain emulsifiers (or castor oil) to anchor the scent, and plenty of essential oils for fragrance.
Finally, if you followed the instructions, your shower steamer might just be too old, or simply have lost its scent. You can “boost” it by adding essential oil directly to the top right before use.
How much essential oil do shower steamers need?
To account for evaporation, shower steamers need twice as much essential oil as you would expect for a strong, robust scent.
For strong-smelling shower steamers, you should add at least 20 drops per tablet as a general rule (or even more). This is why I used 120 drops (5ml) of essential oils for 6 tablets.
Why do shower tablets need so much essential oil?
Essential oils are extremely volatile substances that vaporize and evaporate quickly, which is why sometimes a shower steamer can smell like nothing by the time you go to use it.
There’s no scientific way to prove exactly how much essential oils are lost during the drying process. But you can assume your homemade shower steamers may lose half their fragrance (or more) as they dry.
How can I make my shower steamers smell stronger?
If your shower tablets aren’t strong enough, there are a few ways to make them smell more fragrant.
1. Add more essential oils.
The easiest way to make shower steamers smell stronger is simply to add more essential oils – try adding 30 drops per tablet if 20 drops wasn’t enough. (Plus, be sure to use high quality oils.)
For an instant fix, you can “boost” your shower tablet by adding a few drops of essential oil directly to the top before use.
However, keep in mind that inhaling too much essential oil can have adverse effects – see the safety disclaimer.
2. Use more fixatives.
An essential oil’s weight determines how quickly it evaporates. Lighter essential oils such as peppermint, lemon, and bergamot are classified as top notes, and vaporize quickly.
But heavier base note oils (also called fixatives) take far longer to evaporate. These oils are typically thicker and more resinous, like balsams, oleoresins, and woods.
If your essential oil blend contains predominantly top notes, it tends to lose its scent faster. But adding more fixatives helps “fix” or anchor an fragrance, helping DIY shower steamers smell stronger.
It’s the same concept taken from perfumery, only applied to shower steamers. Try adding the following fixatives to your scents:
3. Preserve the essential oils.
As a more advanced tip, you can also add a few drops of rosemary co2 extract to your essential oil blend. This potent antioxidant helps protect essential oils from oxidation, preserving their scent even longer.
Finally, wrapping shower tablets as soon as possible also helps preserve their scent, as well as storing them properly in an airtight jar to protect them from oxygen.
Why use an emulsifier in shower steamers?
When it comes to making shower steamer tablets, the moisture balance is by far the most important (and frustrating) part of the process.
You need just enough moisture to form a moldable texture. But too much will cause premature fizzing, and too little may cause the tablets to crack once you remove them from the mold.
So, how do you fix these seemingly conflicting issues? This is where a liquid binder or “glue” comes in to help stop your tablets from crumbling.
Emulsifier benefits
- Sticking together: Getting dry ingredients such as baking soda, citric acid, and corn starch to stick together can be challenging, but an emulsifier’s viscous, slightly sticky texture is the perfect solution.
- Buffering the fizz: The main issue with making shower fizzies is how volatile the mixture is. But emulsifiers bind water, acting as a buffer between the liquid and the dry mixture.
- Long-lasting scent: An emulsifier helps anchor the essential oils in the tablets, slowing their evaporation and ensuring the steamers hold their scent.
- Moisture regulator: By acting like glue, emulsifiers help regulate moisture balance. They keep the tablets moist without being soggy. In dry climates, they help keep the tablets from drying out too much.
What are the best natural emulsifiers for shower steamers?
I tested many natural, PEG-free emulsifiers in these DIY shower steamer recipes, with the ones that worked best listed below. The main difference was price and how easily each one rinsed away in the shower.
CreamMaker FLUID is the only emulsifier to wash away easily with water. The other emulsifiers may leave a slight residue in your shower that requires more rinsing.
You can use whatever one is most accessible or economical to you. If the links provided don’t ship to your area, check your local cosmetic or bath and body supply store.
- CreamMaker FLUID: A blend of three natural emulsifiers that rinses away easily, dries hard, and works well as an alternative to polysorbates. Also known as PlantaMulse Liquid.
- Polyglyceryl oleate: Viscous natural emulsifier made by reacting glycerol and oleic acid. Note: polyglyceryl oleate is not to be confused with glyceryl oleate, which is an extremely slippery, semi-solid oil.
- Sorbitan oleate: Thick natural emulsifier made by reacting sorbitol and oleic acid. Though it’s a different product, sorbitan oleate does not possess any noticeable difference in efficacy to polyglyceryl oleate.
- CreamMaker ANIO: Natural emulsifier made by reacting glycerin with fatty acids. Full disclosure: it works, but I ran out before I could thoroughly test how well it stacks up to the others.
Can you use polysorbate 80 in shower steamers?
Polysorbates (such as polysorbate 80 and polysorbate 20) are the most common emulsifiers for bath bombs, shower steamers, and other bath products. But they’re not naturally derived, and may contain toxic residue, so I don’t recommend them.
Instead, the emulsifiers listed are all PEG-free and derived from natural materials such as glycerin, palm oil, and coconut oil.
Is there a natural alternative to polysorbate 80?
If you’re looking for a natural polysorbate alternative, CreamMaker FLUID is a great choice.
Of the natural emulsifiers listed above, CreamMaker FLUID’s HLB value (hydrophobic-lipophilic balance) is closest to Polysorbate 80.
Polysorbate 80 HLB value: 15
CreamMaker’s HLB value: 11
It’s not the same, but it’s close, and it’s also the only natural emulsifier I’ve found that rinses clean with no residue. Nothing else compares, and I’ve spent a lot of money trying to find a comparable alternative.
Why use castor oil in shower steamers?
I wanted an easily accessible, economical emulsifier alternative, and castor oil turned out to be the perfect substitute.
You’ll need it anyway if you’d like to create the shiny Epsom salt decoration, and you can save on costs by using it in your shower steamer recipe as well.
Aside from its sticky, glue-like properties, castor oil has a long shelf life. Because it’s a somewhat drying oil, it also helps your steamers dry into hard tablets.
Just keep in mind that it’s still not quite as effective as an emulsifier. Emulsifiers are stickier and make better “glue”. And since oil and water don’t mix, castor oil won’t completely suspend food coloring like an emulsifier will.
Don’t worry about using high quality castor oil – save that for beauty products, like eyelash serum. You can use any kind of castor oil in shower bombs.
How to make shower steamers last longer in the shower?
The best way is to add kaolin clay – it dries hard and doesn’t dissolve, so it creates a buffer that slows down the fizzing reaction.
Corn starch, castor oil, and a liquid emulsifier also help slow fizzing to some extent, but clay is the most effective. That’s why shower tablets with clay last the longest.
Which starch is best for shower fizzies?
Corn starch, arrowroot starch and tapioca starch are often used interchangeably in bath bombs and shower steamers, but after testing so many batches, I noticed clear differences.
Corn starch is more absorbent than arrowroot or tapioca starch. It holds onto more water (and oil), so it’s definitely the most forgiving starch, and helps prevent early fizzing.
Arrowroot starch and tapioca starch can’t handle as much moisture, and can get waterlogged quickly. Surprisingly, some batches with arrowroot starch felt harder to the touch than corn starch.
In the end, all three starches create well-formed, hard tablets, so you can use whatever you have on hand. If you live in a humid climate, corn starch will likely work better.
Which liquid is best for shower steamers?
You can use water, witch hazel, or alcohol to make these homemade shower steamers recipes.
Alcohol evaporates the quickest. But this isn’t always desirable, as once the alcohol evaporates, your mixture may end up too dry. Depending on your climate, you may find water or witch hazel works better.
Why use clay in shower steamers?
Wet clay hardens as it dries, so it creates durable shower tablets that resist crumbling or breakage. It’s also more dense than starch, which helps the tablets hold their shape better than starch alone.
As mentioned, clay also slows down the fizzing reaction. It’s also very absorbent, which makes it more forgiving. So if you accidentally add too much liquid to your shower steamers, the clay will help save you from a fizzy mess. Clay also helps absorb excess moisture if you live in a humid area.
Is clay safe to use?
There’s a drawback to using clay in shower steamers: it can clog shower pipes. Technically, it’s not advisable to let clay wash down the drain.
However, these recipes contain only about 1/6 of a tablespoon per tablet, which is probably much less than if you were using a clay face mask or a bath bomb with kaolin clay.
So it’s up to you to determine whether it’s safe to let this amount of clay go down your pipes.
Can you use a shower steamer as a bath bomb?
No, a shower steamer contains too much essential oil to be safely used in the bath – try our bath bomb recipes instead.
How do I know if shower steamers are good?
Aromatherapy shower tablets have exploded in popularity, and many are clamouring to capitalize on their success. But unfortunately, not everyone has your best interests at heart.
Shower tablets should enhance your health and well-being, not damage it – which is why they should contain only 100% pure essential oils, not synthetic fragrance oils.
Since you’ve found yourself on a natural blog, you likely understand why delivering a hit of synthetic fragrances straight into your sinuses is not a good idea!
If you’d rather purchase store-bought steamers, read the ingredients list. If you see “fragrance” or “parfum” on the list, stay far away, because those are not aromatherapy shower steamers (but these are).
⚠️ Health and safety disclaimer
It’s important to note that shower steamers are only for aromatherapeutic benefits and are not meant to treat or cure any illness.
Please do not make or use these recipes if you have any health conditions before consulting with a professional. As well, please note that menthol and menthol-containing oils such as eucalyptus, peppermint and rosemary may not be safe for pregnant women or young children.
Be very careful when exiting the shower, as emulsifiers and castor oil may leave residue that makes the shower floor more slippery.
Ali
Friday 29th of May 2026
Hi, I have been looking for DIY shower steamer info and your guide seems to be very comprehensive--thank you. However, I have one question which appears to not have been already asked. Due to dabbling in making other items I have many of the ingredients in hand, including powdered clay--but mine is bentonite, not kaolin. Obviously the color is different, but if I'm ok with that do you know of any reason not to use it?
Kyla
Saturday 6th of June 2026
Hi Ali, thanks! I'm so glad to hear you found the guide helpful.
I haven't personally tested bentonite clay in shower steamers, so I can't say for certain how it would perform. That said, bentonite behaves quite differently from kaolin. It absorbs significantly more water and swells when hydrated, so it may affect both the texture of the mixture and the way the finished shower steamer performs. You may find that it makes the mixture drier or requires some adjustment to the liquid ingredients to achieve the right consistency.
If you're comfortable experimenting, I'd suggest trying a small test batch first. However, if you're looking for the most predictable results, I would recommend sticking with kaolin clay for this recipe.
If you do decide to try the bentonite, I'd love to hear how it turns out!
Donna
Sunday 20th of July 2025
Getting ready to start making shower steamers. Can I use coconut oil as an emulsifier. Your site is so informative and easy to use instructions...other sites I visited used coconut oil and I do have that on hand..thanking you in advance for your reply..
Kyla
Sunday 20th of July 2025
Hi Donna, I'm so glad to hear you find our site informative and easy to use. Thank you, and we appreciate your feedback! Yes, you can substitute coconut oil in the shower steamers, with one caveat. As I always say when someone asks to modify one of our recipes, I cannot guarantee you will achieve the exact same results as I did. However, coconut oil should still work to hold the shower steamers together and bind the essential oils. Best of luck!
Jessica
Thursday 6th of February 2025
Hello!
Thank you so much for such a detailed post! I'm new to making shower steamers (and hoping to get into bath bombs as well), and such great instructions give me confidence to start.
I have two questions. 1. If I live in a dry climate and want to mail these to family in a more humid climate, would it be helpful to put silica packets in the packaging container? 2. For packaging, would it be possible to shrink wrap each individual steamer (and possibly bath bombs) before putting them in a jar? I'm hoping to preserve the smell for as long as possible, but I'm just not sure if the heat gun used to shrink wrap them would melt the steamer prematurely.
Thanks! I'm looking forward to making my first batch and making them look as pretty as the pictures!
Jessica
Kyla
Thursday 13th of February 2025
Hi Jessica, thanks so much for your kind words, and I'm so happy to hear you found the post helpful!
To answer your questions, it's hard to say for sure how the shower steamers would hold up to transit in a humid climate as we’ve never shipped them, but I think your idea to use silica packets sounds like a great idea.
As for shrink wrapping, this is also another very good idea. But like you already thought of, I think avoiding the heat gun is likely best. You could instead wrap them by hand to avoid any potential heat damage with something like cling wrap, bees wrap, or brown paper. Though for long term storage or for shipping and gifting, I would lean toward a plastic free option. as I worry the combination of heat, humidity, and essential oils could erode the plastic. You might have to experiment to see how the tablets holds up.
I hope this helps, and wishing you all the best with making your shower steamers. 😊
Pamela
Sunday 23rd of June 2024
Hi there,
Thank you so much for this guide!
I was wondering if I can omit the food colouring?
Thanks!
Kyla
Thursday 27th of June 2024
Hi Pamela, yes, you can omit the food coloring just as long as you replace it with another liquid to maintain the same moisture balance in the recipe. So you can use 1 tsp/5ml of water, witch hazel, or high-proof alcohol instead. 😊
Jeremy
Thursday 9th of May 2024
Hi kyla,
Your page is a savior! I tried using your formula with cream of tartar, however, I bumped into 2 issues:
1) I could not get the scent strong enough even after 200 drops of EO. But I do realise stirring and mixing them does make the scent stronger. I tried based note EO but still not does help.
2) My steamer also does not fizz that much using the same formula. Is it one of the ingredients that hinders the fizzing reaction?
I was hopping you can give me some advice please! Thank you so much in advance!
Jeremy
Thursday 16th of May 2024
@Kyla, thank you so much for your reply! I will stick with Citric acid from now on!
For the formula and EO, I am using this.
1/4 cup baking soda 1/4 cup citric acid 1 tbsp corn starch 1 tbsp natural liquid emulsifier 1 tsp of menthol crystal (it helps to bring out the scent slightly stronger but i am not sure if i am using this correctly) 120 drops essential oils (50 drops Lavender, 30 drops bergamot, 30 drops Ylang Ylang). I am using Ylang Ylang as based note
Hope you can see something that can help correct my formula! Thanks a million!
Kyla
Friday 10th of May 2024
Hi Jeremy, I'm sorry to hear you're running into issues. Making shower steamers can be such a tricky process, even when carefully following instructions!
To answer your first question, yes, cream of tartar isn't quite as fizzy as citric acid. It has more of a gentle "frothing" effect, so if you're looking for max fizziness, citric acid is still best.
Which exact blend of essential oils are you using? Sounds like you've used plenty of EO and base notes which is great. I'm wondering if you just need even more to account for how much is evaporating, or if your blend is mostly comprised of oils that vaporize quickly.
Awaiting your response so that we can fix this!