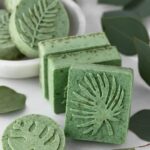
DIY Eucalyptus Soap Recipe (Melt and Pour)
This easy-to-make eucalyptus soap has a fresh, invigorating scent and is an ideal recipe for beginner soap makers. Made with melt and pour soap base and eucalyptus essential oil, this soap is wonderful for deodorizing your skin and uplifting your senses.
Servings: 5 bars
Equipment
- Sharp knife, box grater, or a specialized soap knife
- Cutting board
- Measuring spoons
- Heat-proof measuring cup such as Pyrex if using a microwave to melt the soap
- Small spray bottle with vodka or another high-proof alcohol for soap bubbles
- Heat-safe glass bowl and pot (or a double boiler) if melting soap on the stove
- Heat-safe spatula or wooden spoon
Ingredients
DIY Eucalyptus Soap Recipe
- 1 lb goat’s milk or shea butter melt and pour soap base
- 1/2 teaspoon spirulina powder mixed with a dab of coconut oil or another carrier oil
- 2-3 pinches dried peppermint leaves (or dried spearmint)
- 50 drops eucalyptus essential oil (or Breathe Easy blend)
Instructions
- Grate or chop the melt and pour base into approximately 1-inch cubes.
- Place the chopped soap base in a double boiler, or create a water bath by placing a heat-safe glass bowl over a shallow saucepan filled with just enough water to cover the bottom. Stir the soap often and watch it closely, as it melts quite quickly and you don’t want it to burn. (Note: You can also use a microwave for this step. Melt the soap in 15- to 20-second increments and stir well in between.)
- Once the soap has completely melted, remove it from the heat.
- Next, add the spirulina powder. For easier mixing, stir the powder into a dab of coconut oil first so that it incorporates more easily into the soap base, as too much mixing at this point can create soap bubbles.
- Then, add the essential oils and dried herbs and stir again.
- Your soap is ready to pour into your molds. I used pretty, leaf-patterned silicone soap molds, but you can use any size or shape of mold.
- After pouring your soap, you can spritz any bubbles that appear on the surface with the alcohol spray. Soap makers often use rubbing alcohol to dissipate soap bubbles. However, since the smell of rubbing alcohol gives me a migraine, I just use vodka instead.
- Allow your soap to cool and set for approximately 20 minutes. Try not to move it until it’s set. You can also place your soap molds on a cookie sheet or large tray to make them easier to move.
- Next, move the tray with your soaps to an area where they can set for another 4 to 6 hours, or overnight.
- The next day, remove your soap from the molds. You can allow them to dry for a few days to increase their firmness, but some people package them immediately in paper or plastic for gifting or to enjoy right away.
Notes
Melt and pour soap can last approximately 1 to 2 years before drying out or losing quality. However, because this recipe contains dried peppermint leaves, it’s best to use the soap sooner.
The fresh eucalyptus scent may also fade over time, so I recommend using them within 3 months for the best experience.
You can always add a few drops of essential oil to your bar later to freshen the scent. Ultimately, the best-before date of your melt and pour soap base will help determine its overall shelf life.